
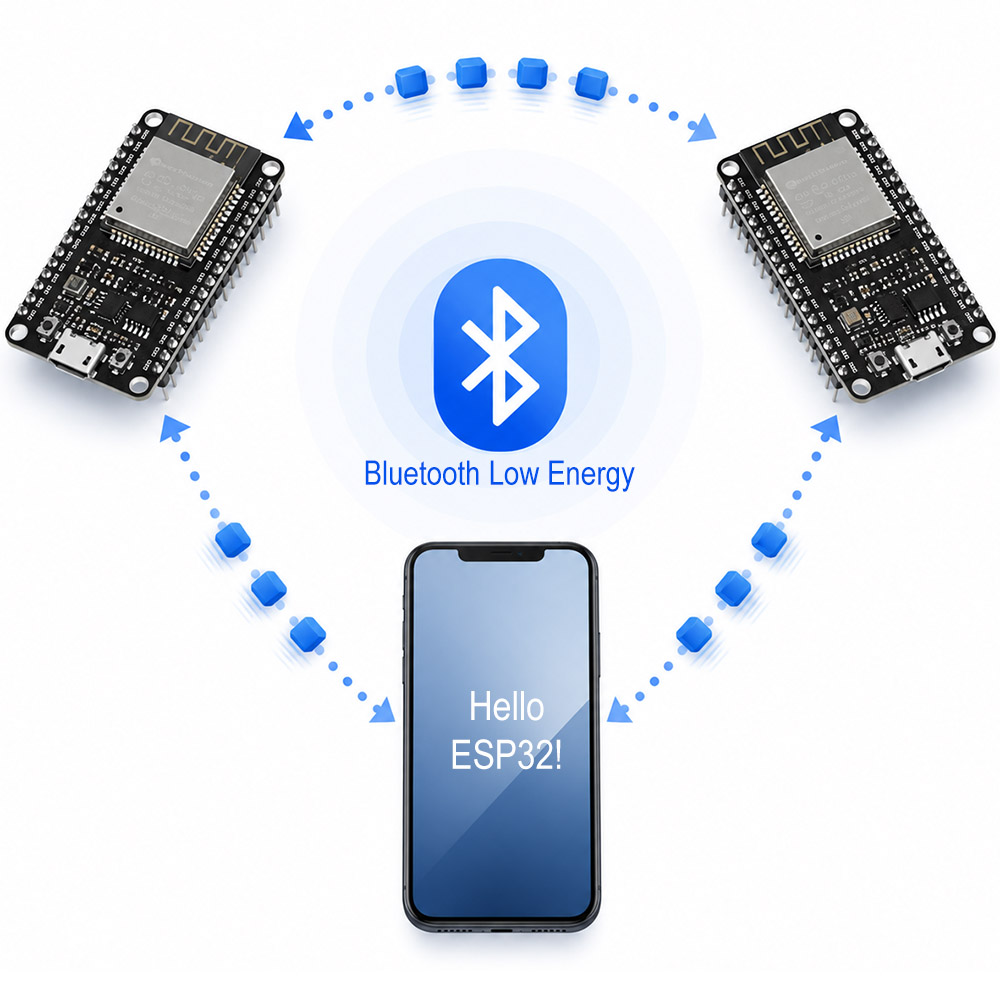
About this Post
In this post, I would like to walk you through using BLE (Bluetooth® Low Energy) on ESP32-based boards. While classic Bluetooth is very easy to use with the BluetoothSerial library from the Arduino ESP32 board package, BLE — using the library of the same name — requires a bit more familiarization and a basic understanding of the underlying concepts.
I will limit myself to the ESP32, because the libraries for other boards — such as ArduinoBLE for BLE-enabled Arduino boards (Arduino Nano 33 IoT/BLE, Arduino UNO R4 WiFi, etc.) — differ significantly. Covering everything in a single post would have made it too confusing and too long. In this post, I’ll discuss the ArduinoBLE library.
This is what you can expect in this article:
- A Brief Overview of BLE
- A First Minimal Sketch
- Callbacks
- Notify and Descriptors
- Connecting Two ESP32s via BLE
- Additional Examples of Use
- BLE “HC-05” Modules
- Appendix
A Brief Overview of BLE
First, I need to introduce a few basic BLE-related concepts that might confuse you at first (I felt the same way!). Hopefully, the example sketches will clear things up.
Peripheral and Central
Bluetooth® Low Energy (BLE) was introduced with Bluetooth 4.0 and is designed for applications with low power consumption and low data rates. This allows battery-powered devices, such as sensors or Bluetooth trackers, to often operate for months or even years on a single button cell battery.
In BLE, there are two roles: peripheral and central. The peripheral device (hereinafter referred to as the peripheral) provides information, while the central device (hereinafter referred to as the central) retrieves this information, establishes a connection, and reads or modifies it. You can think of the peripheral as a server and the central as a client. Typical peripherals are sensors or microcontrollers, while smartphones or PCs often take on the role of the central.
Services and Characteristics
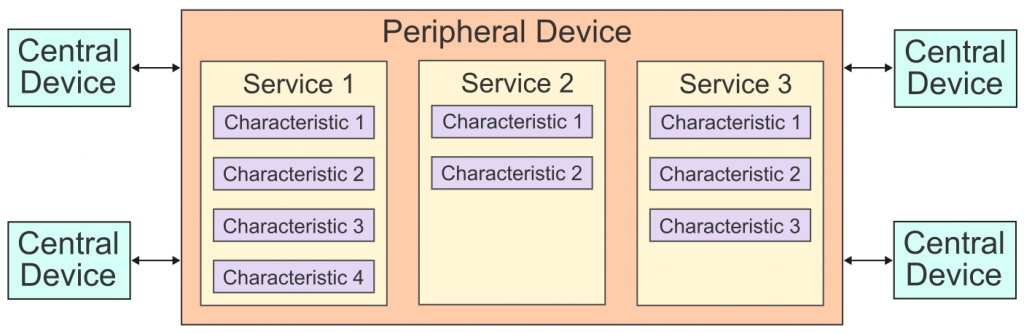
The data provided by the peripheral is organized into services. Each service contains one or more characteristics in which the actual data is stored. Each characteristic and each service has a unique identifier (UUID = Universally Unique Identifier). Characteristics can have different properties. For example, they can be read-only, writable, or enabled for automatic notifications (notify or indicate).
Notify is particularly useful: If the peripheral changes the value of a characteristic, it can notify the central unit. This means the central unit does not have to repeatedly query the data. This simplifies the code and is ideal for measured values such as temperature, acceleration, or heart rate.
In order for a central device to locate a peripheral device at all, the peripheral regularly transmits short advertising packets. These packets contain, among other things, the device name and the services it offers. Only after the peripheral has been located is a connection established and the desired data exchanged.
Standardized vs. Non-Standardized Services and Characteristics
Many BLE devices have similar features, such as a rechargeable battery. The Bluetooth SIG (Special Interest Group) has standardized services and characteristics for such features. 16-bit UUIDs have been defined for these standardized services, for example:
- Battery Service
- UUID: 0x180F
- Battery Level Characteristics
- UUID: 0x2A19
How you define and organize your own services and characteristics is up to you. You define the corresponding UUIDs yourself. Since you typically assign 128-bit UUIDs for this purpose, the risk of collisions — that is, identical UUIDs — is extremely low. Let us consider two buttons on a microcontroller board that serves as a peripheral. The button states (pressed/released) are transmitted via BLE. The UUIDs could then look like this:
- Button Service
- UUID:19B10000-E8F2-537E-4F6C-D104768A1214
- Button 1 Characteristic
- UUID:19B10001-E8F2-537E-4F6C-D104768A1214
- Button 2 Characteristic
- UUID:19B10002-E8F2-537E-4F6C-D104768A1214
The position of the hyphens is fixed, as is the length of the UUIDs, which is 32 hexadecimal digits.
Advertising and General Advertising Profile (GAP)
Using the General Advertising Profile (GAP), BLE devices regularly send small advertising packets. These include, among other things, the device name and the UUIDs of the services being offered. This allows other devices to discover the peripheral and decide whether they want to connect to it.
Since advertising packets offer only a limited amount of storage space, typically only a single 128-bit service UUID can be transmitted. Although additional services may be present, they are not recognized until after the connection is established.
Generic Attribute Profile (GATT)
The Generic Attribute Profile (GATT) defines how data is organized and exchanged in the form of services and characteristics. Using GATT, characteristic values can be read, written, or transmitted via Notify or Indicate.
In most applications, the peripheral is the GATT server, since it provides the services and characteristics. The central, accordingly, is the GATT client that accesses this data. However, the terms “server” and “client” are independent of the roles of peripheral and central. In specific applications, a device can also take on both roles simultaneously.
A First Minimal Sketch
The following sketch turns the ESP32 into a peripheral that offers one service and one characteristic. A suitable program on a smartphone or PC serves as the central device, which is authorized to read and modify the value of the characteristic.
Before you upload the sketch, check whether your ESP32 supports Bluetooth. Most do, but not all. The ESP32S2 is one of the models that does not support Bluetooth.
#include <BLEDevice.h>
//#include <BLEServer.h> // should be included automatically
//#include <BLEUtils.h> // should be included automatically

#define SERVICE_UUID        "12345678-1234-1234-1234-1234567890ab"
#define CHARACTERISTIC_UUID "abcd1234-1234-1234-1234-abcdef123456"

BLECharacteristic *pCharacteristic;

void setup() {
  Serial.begin(115200);

  BLEDevice::init("ESP32 BLE Minimal");

  BLEServer *pServer = BLEDevice::createServer();
  BLEService *pService = pServer->createService(SERVICE_UUID);
  pServer->advertiseOnDisconnect(true);

  pCharacteristic = pService->createCharacteristic(
    CHARACTERISTIC_UUID,
    BLECharacteristic::PROPERTY_READ |
    BLECharacteristic::PROPERTY_WRITE
    /* NR = no response, needed for Bluetooth LE Lab */
    // | BLECharacteristic::PROPERTY_WRITE_NR
  );

  pCharacteristic->setValue("Hello Smartphone!");

  pService->start();

  BLEAdvertising *pAdvertising = BLEDevice::getAdvertising();
  pAdvertising->addServiceUUID(SERVICE_UUID);
  pAdvertising->start();

  Serial.println("BLE Server started");
}

void loop() {
  String value = pCharacteristic->getValue();

  if (value.length() > 0) {
    Serial.println(value);
    delay(2000);
  }
}
Explanations
First, you need to include BLEDevice.h. This library file should include all other files required by the sketch.
Our sketch has only one service and one characteristic. The UUIDs can be chosen freely.
With BLECharacteristic *pCharacteristic;, you define a pointer to a characteristic object. The “p” is there to remind you that this is a pointer. The object itself is created later. Since we will also need the characteristic later in loop(), it is defined globally.
BLEDevice::init(); initializes the BLE device and sets its name. A lot happens in the background to accomplish this, such as initializing the ESP32’s Bluetooth hardware. BLEDevice is not a class that you create an object from; rather, it contains a set of functions. That is why you call the init function using the scope operator “::” (class::function()) and not, as you are probably more used to, using the dot operator (object.function()).
Use BLEServer *pServer = BLEDevice::createServer(); to create a GATT server or a pointer to it. The server is assigned a service with the UUID defined at the beginning using BLEService *pService = pServer->createService(SERVICE_UUID);. Since “pServer” is a pointer, you use the arrow operator instead of the dot operator to access createService(). Using advertiseOnDisconnect(true) ensures that you can reconnect immediately after a disconnect. Otherwise, you would have to restart the ESP32.
You can then add a characteristic to the service using createCharacteristic(). To do this, you pass the UUID and the properties. In this example, the value of the characteristic can be both read and written.
setValue() accepts either an Arduino-String or a pointer to a byte array (uint8_t) with the data length specified (setValue(const uint8_t *pData, size_t length)). This allows both text and any binary data to be transmitted.
Finally, the service still needs to be started.
With getAdvertising(), you get a pointer to the advertising object (there is only one). Only with addServiceUUID() does the service become visible during the scanning process. Without this specification, a client can still discover the service via the GATT server after establishing a connection.
In loop(), the value of the characteristic is regularly queried using getValue() and displayed.
But what am I supposed to do with this now?
To get started with the peripheral you just created, you will need a central device. A smartphone or a PC works well for this. I will focus on smartphones here, but in the appendix I will also introduce some (Windows) PC apps for BLE.
There are various BLE apps available for smartphones; I have tried LightBlue® and nRF Connect on my Android smartphone. Both apps are also available for Apple smartphones. For this post, I am primarily using LightBlue, as I find its interface a bit more user-friendly. In the appendix, I will briefly discuss nRF Connect.
Open LightBlue, select the “ESP32 BLE Minimal” peripheral, and connect. Then go to the characteristic. In the upper-right corner of the screen, you will likely see “HEX.” Tap it, select “UTF-8 String,” and tap “Save.” Use “Read” to view the characteristic’s value and “Write” to change it.

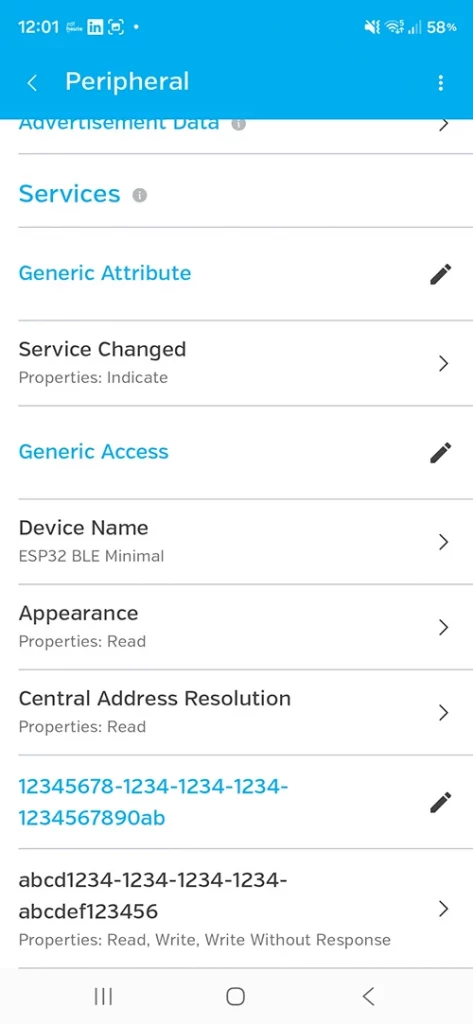
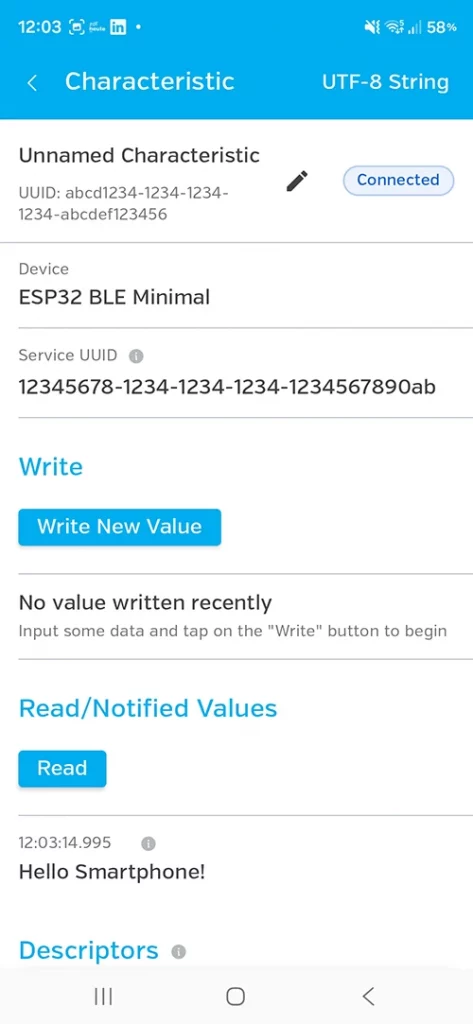
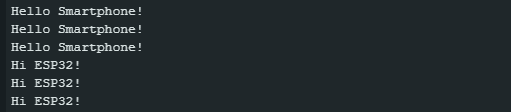
If you write something like “Hi ESP32!” as the new value, you will see that both the output from the next “Read” and the output on the serial monitor change accordingly:
Callbacks
Characteristic Callbacks
The first example was meant to illustrate the concept, but it has only limited practical value. That is why we are now going to switch an LED on the peripheral via the central unit. It is actually a simple task: when the characteristic has a certain value, turn the LED on; when it has another specific value, turn it off.
It would be much more convenient if we didn’t have to keep querying the value of the characteristic, but instead if writing to the characteristic would automatically trigger the associated actions. And that is exactly what callbacks are for. Let us take a look at an example:
#include <BLEDevice.h>
#include <BLEServer.h>
#include <BLEUtils.h>

#define SERVICE_UUID        "11111111-1111-1111-1111-111111111111"
#define CHARACTERISTIC_UUID "11111112-1111-1111-1111-111111111111"

const int ledPin = 17;

// Callback-Class
class MyCallbacks : public BLECharacteristicCallbacks {

  void onWrite(BLECharacteristic *pCharacteristic) override{

    String value = pCharacteristic->getValue();//.c_str(); //uncomment if necessary

    Serial.print("Received: ");
    Serial.println(value);

    if (value == "ON") {
      digitalWrite(ledPin, HIGH);
      Serial.println("LED ON");
    }
    else if (value == "OFF") {
      digitalWrite(ledPin, LOW);
      Serial.println("LED OFF");
    }
  }
};

void setup() {

  Serial.begin(115200);

  pinMode(ledPin, OUTPUT);
  digitalWrite(ledPin, LOW);

  BLEDevice::init("ESP32 BLE LED");

  BLEServer *pServer = BLEDevice::createServer();

  BLEService *pService =
      pServer->createService(SERVICE_UUID);
  pServer->advertiseOnDisconnect(true);

  BLECharacteristic *pCharacteristic =
      pService->createCharacteristic(
          CHARACTERISTIC_UUID,
          BLECharacteristic::PROPERTY_READ |
          BLECharacteristic::PROPERTY_WRITE
      );

  pCharacteristic->setValue("OFF");
  pCharacteristic->setCallbacks(new MyCallbacks());

  pService->start();

  BLEAdvertising *pAdvertising =
      BLEDevice::getAdvertising();

  pAdvertising->addServiceUUID(SERVICE_UUID);
  pAdvertising->setScanResponse(true);
  pAdvertising->start();

  Serial.println("BLE Server started");
}

void loop() {
  // nothing to do
}
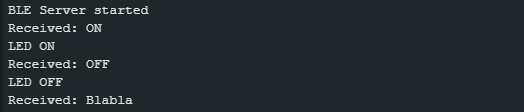
Connect an LED to pin 17. Then take your BLE Central device, connect to the “ESP32 BLE LED” peripheral, and select its only characteristic. If you type “ON,” the LED will light up; if you type “OFF,” it will turn off again. If you type anything else, such as “Blabla,” nothing will happen. In the serial monitor, it looks like this:
Explanation of the Sketch
The only truly new feature here is the callback. For readers with limited experience in C++, things are about to get a little challenging. “BLECharacteristicCallbacks” is a class with the member function onWrite(), which is called in the event of a write operation. Since the library’s developers couldn’t know exactly what should happen when onWrite() is called, they defined the function as “virtual.”
Virtual functions are defined when they are to be overridden in derived classes. And that is precisely what we are doing here. Using class MyCallbacks : public BLECharacteristicCallbacks {...., we derive the class MyCallbacks from the predefined class BLECharacteristicCallbacks and define our own onWrite() function. The body of the function can be modified, but its parameter cannot. It expects a pointer to a BLECharacteristic object.
Using setCallbacks(new MyCallbacks()), we create an object of the MyCallbacks class, which we assign to pCharacteristics.
And then you might have come across the following line:
pAdvertising->setScanResponse(true);
It is important to note that a BLE advertising packet is tiny (a maximum of 31 bytes for standard advertising). If these 31 bytes are not enough, a second packet can be used — the scan response. In other words, the line means: “If a scanner requests it, send an additional scan response packet.” This way, you will be on the safe side.
Additional Callback Classes and Callback Functions
In the example sketch, we set up a callback for a characteristic and defined the onWrite() function. In addition to onWrite(), there are other functions such as onRead(), onNotify(), and onStatus(). Furthermore, there are other callback functions with their own functions. Here is an (incomplete!) list of some callback classes with selected callback functions:
- BLEServerCallbacks: Client connects (
onConnect()) or disconnects (onDisconnect()) - BLEClientCallbacks: Client Connection to the Server (
onConnect(),onDisconnect()) - BLECharacteristicCallbacks: A characteristic is being written or read (
onRead(),onWrite()). - BLEDescriptorCallbacks: Accessing a descriptor (
onRead(),onWrite()) - BLESecurityCallbacks: e.g., authentication or authorization (
onAuthenticationComplete(),onAuthorizationRequest())
You can find the callback class and function definitions in the BLE library files of the Arduino ESP32 board package (here). There is also some additional information in the example sketches in the BLE library, which you can find under File → Examples → Examples for your board → BLE.
To illustrate this, I extended the BLECharacteristicCallbacks class from the previous example with a onRead() function (more precisely, I redefined the function). I also defined a BLEServerCallbacks class that uses onConnect() and onDisconnect() to indicate whether a client has connected or disconnected:
#include <BLEDevice.h>
#include <BLEServer.h>
#include <BLEUtils.h>

#define SERVICE_UUID        "11111111-1111-1111-1111-111111111111"
#define CHARACTERISTIC_UUID "11111112-1111-1111-1111-111111111111"

const int ledPin = 17;

// Callback-Class
class MyCharacteristicsCBs : public BLECharacteristicCallbacks {

  void onWrite(BLECharacteristic *pCharacteristic) override{

    String value = pCharacteristic->getValue();//.c_str(); //uncomment if necessary

    Serial.print("Received: ");
    Serial.println(value);

    if (value == "ON") {
      digitalWrite(ledPin, HIGH);
      Serial.println("LED ON");
    }
    else if (value == "OFF") {
      digitalWrite(ledPin, LOW);
      Serial.println("LED OFF");
    }
  }

  void onRead(BLECharacteristic *pCharacteristic) override{

      Serial.print("Characteristic ");
      Serial.print(pCharacteristic->getUUID().toString());
      Serial.print(" was read");
  }
};

class MyServerCBs : public BLEServerCallbacks {
    void onConnect(BLEServer *pServer) override {
      Serial.println("Client is connected");
    }

    void onDisconnect(BLEServer *pServer) override {
      Serial.println("Client is disconnected");
    }
};


void setup() {

  Serial.begin(115200);

  pinMode(ledPin, OUTPUT);
  digitalWrite(ledPin, LOW);

  BLEDevice::init("ESP32 BLE LED");

  BLEServer *pServer = BLEDevice::createServer();

  BLEService *pService =
      pServer->createService(SERVICE_UUID);
  pServer->advertiseOnDisconnect(true);
  pServer->setCallbacks(new MyServerCBs());

  BLECharacteristic *pCharacteristic =
      pService->createCharacteristic(
          CHARACTERISTIC_UUID,
          BLECharacteristic::PROPERTY_READ |
          BLECharacteristic::PROPERTY_WRITE
      );

  pCharacteristic->setValue("OFF");
  pCharacteristic->setCallbacks(new MyCharacteristicsCBs());

  pService->start();

  BLEAdvertising *pAdvertising =
      BLEDevice::getAdvertising();

  pAdvertising->addServiceUUID(SERVICE_UUID);
  pAdvertising->setScanResponse(true);
  pAdvertising->start();

  Serial.println("BLE Server started");
}

void loop() {
  // nothing to do
}
And while I was at it, I also added the function getUUID(), which returns the UUID of a characteristic. With toString(), you can convert it into a string that you can display on the serial monitor.
Multiple Characteristic Callbacks
You might be wondering how to handle this when setting up callbacks for multiple characteristics, where different actions are to be performed for each characteristic. Do I then have to create a separate callback class and callback object for each characteristic? No, not necessarily.
In the line void onWrite(BLECharacteristic *pCharacteristic), the function receives as a parameter a pointer to the exact characteristic that was just written to. If you have created the characteristics pChar1 and pChar2, you can check within the function which characteristic was just written to, for example, if(pCharacteristic == pChar1) {.....}.
To make this work, assign the same callback object to both characteristics:
class MyCallbacks : public BLECharacteristicCallbacks {....};
....
BLECharacteristic *pChar1;
BLECharacteristic *pChar2;
....
MyCallbacks *callbacks = new MyCallbacks();
....
pChar1->setCallbacks(callbacks);
pChar2->setCallbacks(callbacks);
If the tasks to be performed by the callback are very different, it might be clearer to create separate callback classes.
Notify and Descriptors
What is this for?
In the examples so far, the action always originated from the central device: it set the value of a characteristic, which the peripheral then evaluated and reacted to accordingly.
In the next example, we will reverse this principle. The action will now be initiated on the peripheral side, and the central device reacts. To do this, we will connect two pushbuttons to the ESP32 and want to see immediately on the smartphone when one of the buttons is pressed or released.
In principle, this could already be achieved using the techniques described so far. For each button, we create a separate characteristic and change its value according to the button’s state. The central could then read this value at regular intervals. However, this constant polling is cumbersome and also carries the risk that a brief button press between two read operations might go unnoticed.
It is more elegant to have the central automatically notified as soon as the value of a characteristic changes. That is precisely what the notify property is for.
However, simply setting the notify property is not enough. The characteristic must also be enabled for notifications. This is done using the Client Characteristic Configuration Descriptor(CCCD). This standardized descriptor has the UUID 0x2902 and allows the Central to subscribe to notifications (or indications) for a characteristic.
Since we are already using descriptors, we might as well use them to solve a second problem. Because our example uses two characteristics, we would have to distinguish between them on the central side based on their UUIDs — which is not very convenient. The Characteristic User Description descriptor (UUID 0x2901), on the other hand, allows us to assign a freely chosen name to a characteristic. This makes it much easier to distinguish between the two characteristics.
Example Sketch for Notify and Descriptors
To prepare, connect two pushbuttons to the appropriate pins on the ESP32. Connect the other ends of the two pushbuttons to GND.
Here is the sketch:
#include <BLEDevice.h>
#include <BLEServer.h>
#include <BLEUtils.h>
#include <BLE2901.h>
#include <BLE2902.h>

#define SERVICE_UUID "7a3e0001-9b52-4b24-91c9-123456789abc"
#define BUTTON1_UUID "7a3e0002-9b52-4b24-91c9-123456789abc"
#define BUTTON2_UUID "7a3e0003-9b52-4b24-91c9-123456789abc"

const int button1Pin = 18;
const int button2Pin = 19;

BLECharacteristic *button1Char;
BLECharacteristic *button2Char;

bool lastButton1 = HIGH;
bool lastButton2 = HIGH;

void setup() {
  Serial.begin(115200);

  pinMode(button1Pin, INPUT_PULLUP);
  pinMode(button2Pin, INPUT_PULLUP);

  BLEDevice::init("ESP32 Two Button Server"); //new name

  BLEServer *pServer = BLEDevice::createServer();
  pServer->advertiseOnDisconnect(true);
  BLEService *pService = pServer->createService(SERVICE_UUID);

  button1Char = pService->createCharacteristic(
    BUTTON1_UUID,
    BLECharacteristic::PROPERTY_READ |
    BLECharacteristic::PROPERTY_NOTIFY
  );

  button2Char = pService->createCharacteristic(
    BUTTON2_UUID,
    BLECharacteristic::PROPERTY_READ |
    BLECharacteristic::PROPERTY_NOTIFY
  );

  BLE2901 *desc1 = new BLE2901();
  desc1->setDescription("Button 1 state");
  button1Char->addDescriptor(desc1);
  button1Char->addDescriptor(new BLE2901());
  button1Char->addDescriptor(new BLE2902());
  button1Char->setValue("Button 1 not pressed");

  BLE2901 *desc2 = new BLE2901();
  desc2->setDescription("Button 2 state");
  button2Char->addDescriptor(desc2);
  button2Char->addDescriptor(new BLE2902());
  button2Char->setValue("Button 2 not pressed");

  pService->start();

  BLEAdvertising *pAdvertising = BLEDevice::getAdvertising();
  pAdvertising->addServiceUUID(SERVICE_UUID);
  pAdvertising->setScanResponse(true);
  pAdvertising->start();

  Serial.println("BLE Server started");
}

void loop() {
  bool button1 = digitalRead(button1Pin);
  bool button2 = digitalRead(button2Pin);

  if (lastButton1 == HIGH && button1 == LOW) {
    button1Char->setValue("Button 1 pressed");
    button1Char->notify();

    Serial.println("Button 1 pressed");
    delay(200);
  }
  else if(lastButton1 == LOW && button1 == HIGH) {
    button1Char->setValue("Button 1 released");
    button1Char->notify();

    Serial.println("Button 1 released");
    delay(200);
  }
  if (lastButton2 == HIGH && button2 == LOW) {
    button2Char->setValue("Button 2 pressed");
    button2Char->notify();

    Serial.println("Button 2 pressed");
    delay(200);
  }
  else if (lastButton2 == LOW && button2 == HIGH) {
    button2Char->setValue("Button 2 released");
    button2Char->notify();

    Serial.println("Button 2 released");
    delay(200);
  }

  lastButton1 = button1;
  lastButton2 = button2;
}
Output
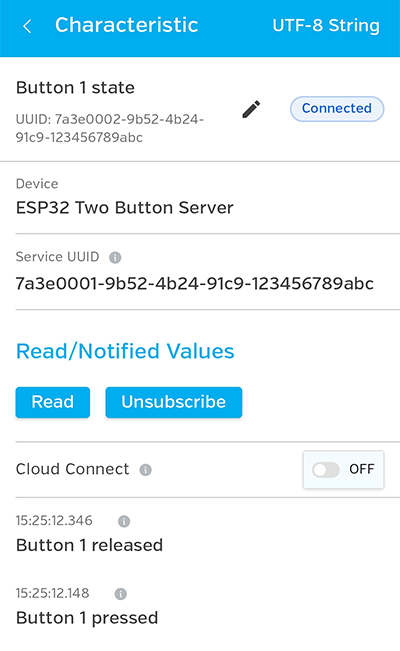
As before, open your favorite BLE app, select the BLE peripheral (in this case: “ESP32 Two Button Server”), and then choose one of the two characteristics: “Button 1 state” or “Button 2 state.”
Then you will need to subscribe to the notification. There is a “Subscribe” button for that.
If you press either of the two buttons now, you will receive the corresponding message in your app.
You can see what that looks like in LightBlue in the image on the right.
Explanations
To use these two descriptors, you must include the corresponding header files, BLE2901.h and BLE2902.h.
This time, we will create two characteristics. I think the procedure is self-explanatory. The notify property is set with BLECharacteristic::PROPERTY_NOTIFY.
Next, we will handle the “Characteristic User Description” descriptor for the characteristic of the first button. For this, we will create a new BLE2901 object using BLE2901 *desc1 = new BLE2901(); and store its address in the pointer desc1.
Next, we assign the desired name to the descriptor using desc1->setDescription("Button 1 state");.
The descriptor is assigned to the characteristic using button1Char->addDescriptor(desc1);. We will do the same for the second button below.
Assigning the CCCD is easier: button1Char->addDescriptor(new BLE2902());.
In loop(), we continuously check the status of the buttons. If a status changes, we update the value of the characteristic using buttonxChar->setValue("Button x .....");.
buttonxChar->notify();.A few more comments on the sketch
This sketch is for illustrative purposes only and has not been optimized. To ensure that button presses in rapid succession are not lost, I would use interrupts. We could also get by with just one characteristic covering buttons 1 and 2. However, I wanted to show how to set up two characteristics.
Connecting Two ESP32s via BLE
For didactic reasons, the client side has so far been a smartphone, PC, or laptop. Now we are taking the next step by having two ESP32s communicate via BLE. A message entered in the serial monitor of the server ESP32 (peripheral) should be displayed on the serial monitor of the client ESP32, and vice versa.
The Server (Peripheral)
On the server side, there is not really anything new regarding BLE. However, we are combining some elements from previous examples into a single sketch. When the message is sent to the client (more specifically, when we change the value of the characteristic), we use notify so that the client does not have to constantly check for the value in loop(). To be notified of a message arrival (= write event) on the client side without having to constantly check “manually,” we use the characteristic callback function onWrite().
We also use the server callback functions onConnect() and onDisconnect() to keep track of the connection status.
We use two characteristics for the messages we send and receive. RX_UUID is the UUID for receiving (R = receive), and TX_UUID is the UUID for sending (T = transmit).
Here is the server sketch:
#include <BLEDevice.h>
#include <BLEServer.h>
#include <BLEUtils.h>
#include <BLE2902.h>

#define SERVICE_UUID "11111111-1111-1111-1111-111111111111"
#define RX_UUID      "22222222-2222-2222-2222-222222222222" // Client -> Server
#define TX_UUID      "33333333-3333-3333-3333-333333333333" // Server -> Client

BLECharacteristic *txCharacteristic;
bool deviceConnected = false;

class ServerCallbacks : public BLEServerCallbacks {
  void onConnect(BLEServer *pServer) {
    deviceConnected = true;
    Serial.println("Client connected");
  }

  void onDisconnect(BLEServer *pServer) {
    deviceConnected = false;
    Serial.println("Client diconnected");
    pServer->startAdvertising();
  }
};

class RxCallbacks : public BLECharacteristicCallbacks {
  void onWrite(BLECharacteristic *pCharacteristic) {
    String value = pCharacteristic->getValue();

    if (value.length() > 0) {
      Serial.print("Received: ");
      Serial.println(value);
    }
  }
};

void setup() {
  Serial.begin(115200);

  BLEDevice::init("ESP32 BLE Server");

  BLEServer *pServer = BLEDevice::createServer();
  pServer->setCallbacks(new ServerCallbacks());

  BLEService *pService = pServer->createService(SERVICE_UUID);

  BLECharacteristic *rxCharacteristic = pService->createCharacteristic(
    RX_UUID,
    BLECharacteristic::PROPERTY_WRITE
  );
  rxCharacteristic->setCallbacks(new RxCallbacks());

  txCharacteristic = pService->createCharacteristic(
    TX_UUID,
    BLECharacteristic::PROPERTY_NOTIFY
  );
  txCharacteristic->addDescriptor(new BLE2902());

  pService->start();

  BLEAdvertising *advertising = BLEDevice::getAdvertising();
  advertising->addServiceUUID(SERVICE_UUID);
  advertising->setScanResponse(true);
  advertising->start();

  Serial.println("Server started");
}

void loop() {
  if (deviceConnected && Serial.available()) {
    String text = Serial.readStringUntil('\n');

    if (text.length() > 0) {
      txCharacteristic->setValue(text);
      txCharacteristic->notify();

      Serial.print("Sent: ");
      Serial.println(text);
    }
  }
}
If input is entered via the serial monitor and the server is connected to the client (if (deviceConnected && Serial.available())), the input is set as the new value, and the client is notified via notify().
The Client (Central)
The client side is new and includes a whole range of new features. Until now, the software (like LightBlue) has handled scanning for available BLE devices. We had then selected the device from the list and established the connection. Now we need to teach the central ESP32 how to do all of this. Since that involves quite a few things at once, I have added an intermediate step: a central sketch that initially just scans and searches for the desired service.
Intermediate Step: The Client scans
So here is the scanner sketch:
#include <BLEDevice.h>
#include <BLEUtils.h>

#define SERVICE_UUID "11111111-1111-1111-1111-111111111111"

void scanForDevices() {
  Serial.println("Searching server...");

  BLEScan *pScan = BLEDevice::getScan();
  pScan->setActiveScan(true);

  BLEScanResults *pResults = pScan->start(5);

  for (int i = 0; i < pResults->getCount(); i++) {
    BLEAdvertisedDevice device = pResults->getDevice(i);

    Serial.println(device.toString());

    if (device.haveServiceUUID() &&
        device.isAdvertisingService(BLEUUID(SERVICE_UUID))) {
      Serial.println("Matching server found!");
    }

    Serial.println();
  }
}

void setup() {
  Serial.begin(115200);
  BLEDevice::init("ESP32 BLE Client");

  scanForDevices();
}

void loop() {
}
Upload this sketch and the server sketch to two ESP32 boards. On the client side, you should see output like this:
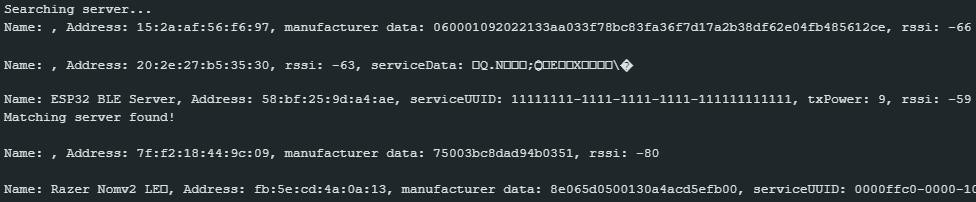
BLEScan *pScan = BLEDevice::getScan(); creates a pointer to the scan object. pScan->setActiveScan(true); makes the scan active, meaning that the scanner not only listens to what the BLE devices’ advertising packets offer but also sends a scan request to devices of interest. The devices respond with a scan response packet, which may contain additional data. If you pass false instead, no scan request is sent. With BLEScanResults *pResults = scan->start(5);, you start a five-second scan and create a pointer to the result.
pResults->getCount(); returns the number of BLE devices found. Use BLEAdvertisedDevice device = pResults->getDevice(i); to “extract” the device with the corresponding sequence number. Use device.toString() to retrieve the device information as a string, which you can then output using Serial.print(). device.haveServiceUUID() && device.isAdvertisingService(BLEUUID(SERVICE_UUID)) checks whether the device has a service and whether that service has the UUID “SERVICE_UUID”. The function isAdvertisingService() expects a BLEUUID object as a parameter, which it generates from the UUID. The Complete Client Sketch
#include <BLEDevice.h>
#include <BLEUtils.h>
#include <BLEClient.h>

#define SERVICE_UUID "11111111-1111-1111-1111-111111111111"
#define RX_UUID      "22222222-2222-2222-2222-222222222222" // Client -> Server
#define TX_UUID      "33333333-3333-3333-3333-333333333333" // Server -> Client

BLERemoteCharacteristic *rxCharacteristic;
BLERemoteCharacteristic *txCharacteristic;

bool connected = false;

void notifyCallback(
  BLERemoteCharacteristic *characteristic,
  uint8_t *data,
  size_t length,
  bool isNotify
) {
  Serial.print("Received: ");

  for (size_t i = 0; i < length; i++) {
    Serial.print((char)data[i]);
  }

  Serial.println();
}

class ClientCallbacks : public BLEClientCallbacks {
  void onConnect(BLEClient *client) {
    Serial.println("Connected to server");
  }

  void onDisconnect(BLEClient *client) {
    connected = false;
    Serial.println("Disconnected from server");
  }
};

bool connectToServer() {
  Serial.println("Serching server...");

  BLEScan *pScan = BLEDevice::getScan();
  pScan->setActiveScan(true);

  BLEScanResults *pResults = pScan->start(5);

  BLEAdvertisedDevice *pServerDevice = nullptr;

  for (int i = 0; i < pResults->getCount(); i++) {
    BLEAdvertisedDevice device = pResults->getDevice(i);

    if (device.haveServiceUUID() &&
        device.isAdvertisingService(BLEUUID(SERVICE_UUID))) {
      pServerDevice = new BLEAdvertisedDevice(device);
      break;
    }
  }

  if (pServerDevice == nullptr) {
    Serial.println("Server not found");
    return false;
  }

  BLEClient *pClient = BLEDevice::createClient();
  pClient->setClientCallbacks(new ClientCallbacks());

  if (!pClient->connect(pServerDevice)) {
    Serial.println("Connection failed");
    return false;
  }

  BLERemoteService *pService =
      pClient->getService(BLEUUID(SERVICE_UUID));

  if (pService == nullptr) {
    Serial.println("Service not found");
    pClient->disconnect();
    return false;
  }

  rxCharacteristic =
      pService->getCharacteristic(BLEUUID(RX_UUID));

  txCharacteristic =
      pService->getCharacteristic(BLEUUID(TX_UUID));

  if (rxCharacteristic == nullptr || txCharacteristic == nullptr) {
    Serial.println("Characteristic not found");
    pClient->disconnect();
    return false;
  }

  txCharacteristic->registerForNotify(notifyCallback);

  connected = true;
  Serial.println("Ready. Type in some text and press enter.");
  return true;
}

void setup() {
  Serial.begin(115200);
  BLEDevice::init("ESP32 BLE Client");

  connectToServer();
}

void loop() {
  if (!connected) {
    static unsigned long lastTry = 0;

    if (millis() - lastTry > 5000) {
      lastTry = millis();
      connectToServer();
    }

    return;
  }

  if (Serial.available()) {
    String text = Serial.readStringUntil('\n');

    if (text.length() > 0) {
      rxCharacteristic->writeValue(text, text.length());

      Serial.print("Sent: ");
      Serial.println(text);
    }
  }
}
The first thing you might notice in the client sketch is the two BLERemoteCharacteristics. On the server side, the services and characteristics are actually created. They are therefore represented by objects of type BLEService and BLECharacteristic. The client does not create these objects again. After establishing a connection, it searches for the offered services and characteristics based on their UUIDs. To access these remote objects, the library uses the BLERemoteService and BLERemoteCharacteristic classes. A BLERemoteCharacteristic is thus the local representation of a characteristic located on the BLE server.
Next, I would like to focus on the connectToServer() function. I explained the first few lines in the intermediate step above. BLEClient *pClient = BLEDevice::createClient(); creates a pointer to your client object. Then, using pClient->setClientCallbacks(new ClientCallbacks()), a callback object of the ClientCallbacks class is assigned to the client object. The callback functions onConnect() and onDisconnect() allow us to be notified of changes in the connection status and to automatically reconnect later in loop().
pClient->connect(pServerDevice); attempts to connect the client to the server and reports back whether it was successful.
rxCharacteristic = pService->getCharacteristic(BLEUUID(RX_UUID)); returns the address of rxCharacteristic. We follow the same procedure for txCharacteristic. If this fails, the pointer is still a null pointer (nullptr). We can check for this and, if necessary, disconnect the client from the server.
Just as we subscribed to notifications on our smartphones earlier, we basically need to do the same thing here — specifically, with txCharacteristic->registerForNotify(notifyCallback);.
Hopefully, the rest of the sketch is clear. Now you can send messages via the serial monitors of the server and client ESP32s.
Additional Examples of Use
Checking the Battery Level of BLE Devices
I would like to return to the topic of standardized services and characteristics. A complete list is available here on the official website of the Bluetooth Special Interest Group. You can easily find out which standardized services and characteristics are implemented in your BLE peripherals using apps like LightBlue.
My first example shows how you can read the battery charge level of a BLE device using the ESP32 — provided the device offers the Battery Service with the UUID 0x180F and has the Battery Level Characteristic with the UUID 0x2A19.
This is the sketch:
#include <BLEDevice.h>
#include <BLEUtils.h>
#include <BLEClient.h>

#define BATTERY_SERVICE_UUID "180F"
#define BATTERY_LEVEL_UUID   "2A19"

// MAC-Address from LightBlue or nRF Connect:
BLEAddress headphoneAddress("80:C3:BA:96:56:DC");

BLERemoteCharacteristic *batteryCharacteristic;
bool connected = false;

bool connectToHeadphones() {
  Serial.println("Connect to headphone...");

  BLEClient *pClient = BLEDevice::createClient();

  if (!pClient->connect(headphoneAddress)) {
    Serial.println("Connection failed");
    return false;
  }

  Serial.println("Connected");

  BLERemoteService *batteryService =
      pClient->getService(BLEUUID(BATTERY_SERVICE_UUID));

  if (batteryService == nullptr) {
    Serial.println("Battery service not found");
    pClient->disconnect();
    return false;
  }

  batteryCharacteristic =
      batteryService->getCharacteristic(BLEUUID(BATTERY_LEVEL_UUID));

  if (batteryCharacteristic == nullptr) {
    Serial.println("Battery level characteristic not found");
    pClient->disconnect();
    return false;
  }

  connected = true;
  Serial.println("Battery characteristic found");
  return true;
}

void readBatteryLevel() {
  if (!batteryCharacteristic->canRead()) {
    Serial.println("Cannot read battery level");
    return;
  }

  String value = batteryCharacteristic->readValue();

  if (value.length() > 0) {
    uint8_t batteryLevel = value[0];

    Serial.print("Battery level: ");
    Serial.print(batteryLevel);
    Serial.println(" %");
  }
  else {
    Serial.println("No value received");
  }
}

void setup() {
  Serial.begin(115200);
  delay(1000);

  BLEDevice::init("ESP32 BLE Battery Client");

  if (connectToHeadphones()) {
    readBatteryLevel();
  }
}

void loop() {
  static unsigned long lastRead = 0;

  if (connected && millis() - lastRead > 10000) {
    lastRead = millis();
    readBatteryLevel();
  }
}
I selected my Bluetooth headphones as the BLE device. I used LightBlue to find the corresponding MAC address. There, I also saw that the device offers the Battery Service.
What is new in this sketch is that the function connect() function is passed a MAC address instead of a pointer to a BLEAdvertisedDevice object. Both approaches work. In addition, we use the function canRead() here to check whether we can read the characteristic.
The rest of the sketch should sound familiar to you. Here is the output.

Now for the bad news regarding standardized services: Although the Bluetooth SIG defines numerous standardized services, in practice many BLE devices implement a wide variety of manufacturer-specific services and characteristics instead. For example, in headphones, features such as active noise cancellation, equalizers, or firmware updates are usually implemented via proprietary BLE services. The standardized battery service is the exception rather than the rule here.
Control your Smartphone via BLE/HID – Remote Shutter Release for Cameras
If you can interact with a smartphone via BLE, isn’t it also possible to control certain smartphone functions using an ESP32? Yes, it is possible, but not that simple. One option would be to write your own smartphone app. However, that’s likely beyond the capabilities of most people. Alternatively, you can turn the ESP32 into an HID input device (HID = Human Interface Device). While this is easier than writing a smartphone app, it is still complex enough that I could fill an entire blog post with it. Since I am not an expert on this topic either, I turned to ChatGPT for help. The task was to write a sketch that would let me trigger the camera on my Android smartphone using a button on the ESP32. It worked right away.
This is the sketch:
#include <BLEDevice.h>
#include <BLEServer.h>
#include <BLEHIDDevice.h>
#include <BLEUtils.h>

const int buttonPin = 17;
bool lastState = HIGH;
bool connected = false;

BLEHIDDevice *hid;
BLECharacteristic *inputReport;

// HID Report Map für Consumer Control: Volume Up / Volume Down
const uint8_t reportMap[] = {
  0x05, 0x0C,       // Usage Page: Consumer
  0x09, 0x01,       // Usage: Consumer Control
  0xA1, 0x01,       // Collection: Application
  0x85, 0x01,       // Report ID: 1

  0x15, 0x00,       // Logical Minimum: 0
  0x25, 0x01,       // Logical Maximum: 1
  0x75, 0x01,       // Report Size: 1 Bit
  0x95, 0x02,       // Report Count: 2 Bits
  0x09, 0xE9,       // Usage: Volume Up
  0x09, 0xEA,       // Usage: Volume Down
  0x81, 0x02,       // Input: Data, Variable, Absolute

  0x75, 0x01,       // Report Size: 1 Bit
  0x95, 0x0E,       // Report Count: 14 Bits Padding
  0x81, 0x03,       // Input: Constant

  0xC0              // End Collection
};

class ServerCallbacks : public BLEServerCallbacks {
  void onConnect(BLEServer *server) {
    connected = true;
    Serial.println("Smartphone connected");
  }

  void onDisconnect(BLEServer *server) {
    connected = false;
    Serial.println("Smartphone disconnected");
    BLEDevice::startAdvertising();
  }
};

void sendVolumeDown() {
  // Bit 0 = Volume Up, Bit 1 = Volume Down
  uint8_t press[]   = { 0x02, 0x00 };
  uint8_t release[] = { 0x00, 0x00 };

  inputReport->setValue(press, sizeof(press));
  inputReport->notify();

  delay(80);

  inputReport->setValue(release, sizeof(release));
  inputReport->notify();

  Serial.println("Sent volume down");
}

void setup() {
  Serial.begin(115200);

  pinMode(buttonPin, INPUT_PULLUP);

  BLEDevice::init("ESP32 Camera Button");

  BLEServer *server = BLEDevice::createServer();
  server->setCallbacks(new ServerCallbacks());

  hid = new BLEHIDDevice(server);
  inputReport = hid->inputReport(1);

  hid->manufacturer()->setValue("My ESP32");
  hid->pnp(0x02, 0x1234, 0x5678, 0x0100);
  hid->hidInfo(0x00, 0x01);

  hid->reportMap((uint8_t *)reportMap, sizeof(reportMap));
  hid->startServices();

  BLEAdvertising *advertising = BLEDevice::getAdvertising();
  advertising->setAppearance(0x03C1);
  advertising->addServiceUUID(hid->hidService()->getUUID());
  advertising->setScanResponse(true);
  advertising->start();

  Serial.println("BLE HID started");
  Serial.println("Pair with your phone and open camera app.");
}

void loop() {
  bool state = digitalRead(buttonPin);

  if (lastState == HIGH && state == LOW) {
    if (connected) {
      sendVolumeDown();
    }
    delay(250); // debouncing
  }

  lastState = state;
}
Then I asked ChatGPT for a “high-level” explanation, with the following result:
The sketch makes the ESP32 appear to a smartphone as a Bluetooth input device. It does this by using the standardized Bluetooth HID profile, which is also used by keyboards, mice, and remote controls, for example. The so-called HID Report Map defines which input commands the ESP32 can send; in this case, these are “Volume Up” and “Volume Down.” Although both commands are defined, the sketch uses only “Volume Down,” since many camera apps interpret this key press as the shutter button.
Upon startup, the ESP32 creates a BLE server and sets up the HID service on it. It then begins advertising so that the smartphone can find and pair with the device under the name “ESP32 Camera Button.” Callback functions are used to detect whether a smartphone is connected; if the connection is lost, advertising automatically restarts. In the main loop, the ESP32 monitors the button on GPIO 17 and detects the transition from the unpressed to the pressed state. If a smartphone is connected, the sendVolumeDown() function first sends the button press and, shortly thereafter, the button release. To the smartphone, the ESP32 thus behaves like a Bluetooth remote control whose volume button is used as a camera shutter button.
BLE “HC-05 Modules”
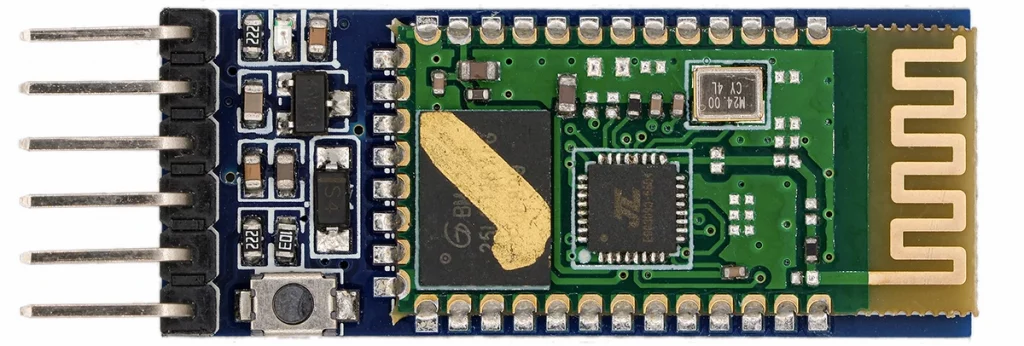
In one of my first posts, I discussed the HC-05 and HC-06 modules (link to the post). These modules enable simple communication via Bluetooth Classic from one MCU board to another or from an MCU board to a smartphone. Recently, BLE versions of these modules have become increasingly common. They are sold as “standard” HC-05 or HC-06 modules, so you do not realize what you have bought until your order arrives. The AT command AT+VERSION? returns hc05V2.3_le or something similar. The modules do not connect to each other. Configuration options are limited, as the modules can only be controlled via AT commands.
I think these modules are fake, since there are no HC-05 or HC-06 modules that support BLE on the manufacturer’s website (which is only in Chinese — you will need to use your browser’s translation feature).
So, what can you do with it? After all, you can use apps like LightBlue to send messages back and forth between your smartphone and the module — though that doe not make much sense for most ESP32 boards, since you can do that without the module anyway. If you still want to give it a try, connect the module to Serial1, for example (GND-GND, VCC-3.3V, RX-TX1, TX-RX1). Pair the module with your smartphone and then select it in LightBlue or another BLE app. There you will find a Write/Notify characteristic that you can use to communicate.
Here is a sketch you can use:
#define RX1 16
#define TX1 17

void setup() {
  Serial.begin(38400);
  Serial1.begin(38400, SERIAL_8N1, RX1, TX1);

  if(Serial1){
    Serial.println("Serial1 successfully set up");
  }
}

void loop() { // run over and over
  if (Serial1.available()) {
    Serial.write(Serial1.read());
  }
  if (Serial.available()) {
    Serial1.write(Serial.read());
  }
}
If you want to dive deeper
This post is comprehensive, but it still only scratches the surface of BLE. If you want to dive deeper, I recommend going through the examples in the BLE library.
It is also worth taking a look at the header files for the BLE library—you can find them here. For example, if you want to know what functions a BLEAdvertisedDevice object has, check the BLEAdvertisedDevice.h file.
And if you ever get stuck on your BLE projects and cannot figure out the problem on your own, I recommend ChatGPT. The AI is very knowledgeable about this topic (which is not the case for all topics!).
How you can support me
Did you enjoy this post? And did you notice that there are no annoying ads here? To keep it that way, you can support me. You can find out how here.
Appendix
nRF Connect Smartphone BLE App
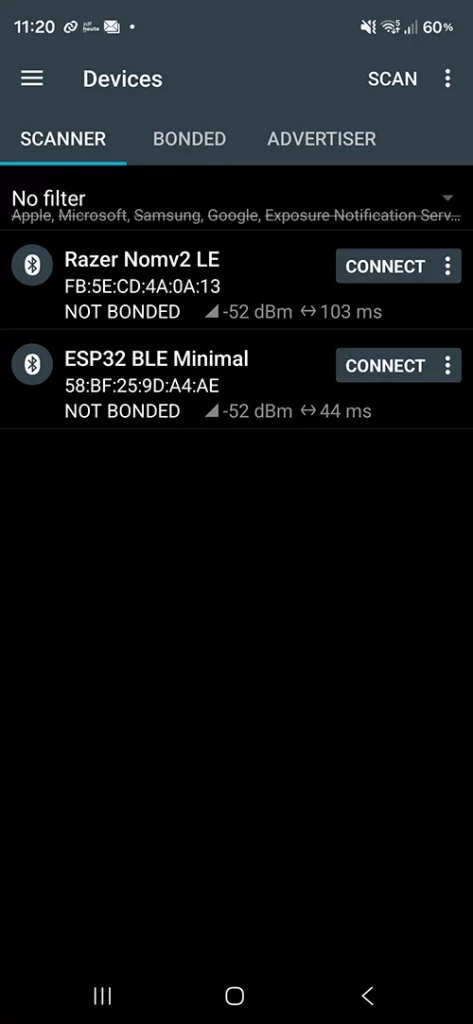
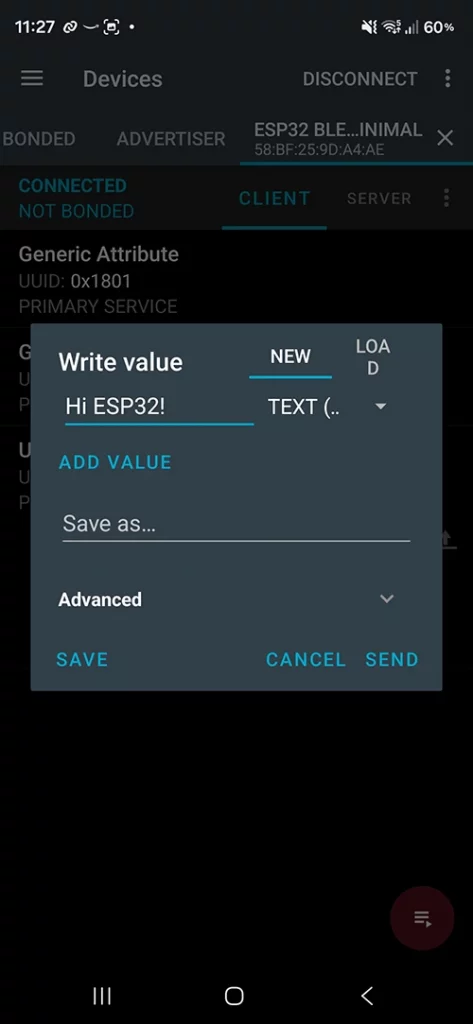
An alternative to LightBlue is the nRF Connect app. You can find the available Bluetooth devices under “Scanner.” Tap “Connect” and then go to your device’s tab. There, tap the characteristic of your choice. The down arrow lets you read the characteristic, while the up arrow opens a write dialog. Select the data type, enter the value or text, and tap “Send.” Here is what it looked like for me using the sketch minimal_example.ino:

nRF Connect is also available as a PC program. During installation, it asked me to install additional utilities. It all seemed a bit too much for my needs, so I decided not to go through with it.
More Windows BLE Apps
Bluetooth LE Explorer
There are also various BLE programs available for PCs and laptops. For Windows systems, I recommend “Bluetooth LE Explorer” from the Microsoft Store. There are certainly plenty of options for Mac and Linux systems as well (e.g., LightBlue for Mac), but since I happen to have a Windows PC, I was not able to try them out.
In Bluetooth LE Explorer, first go to “Discover and Pair” and then select “Start”:

Your BLE device should then appear in the list (in this case: ESP32 BLE Minimal). Click on the device to go to the following overview:
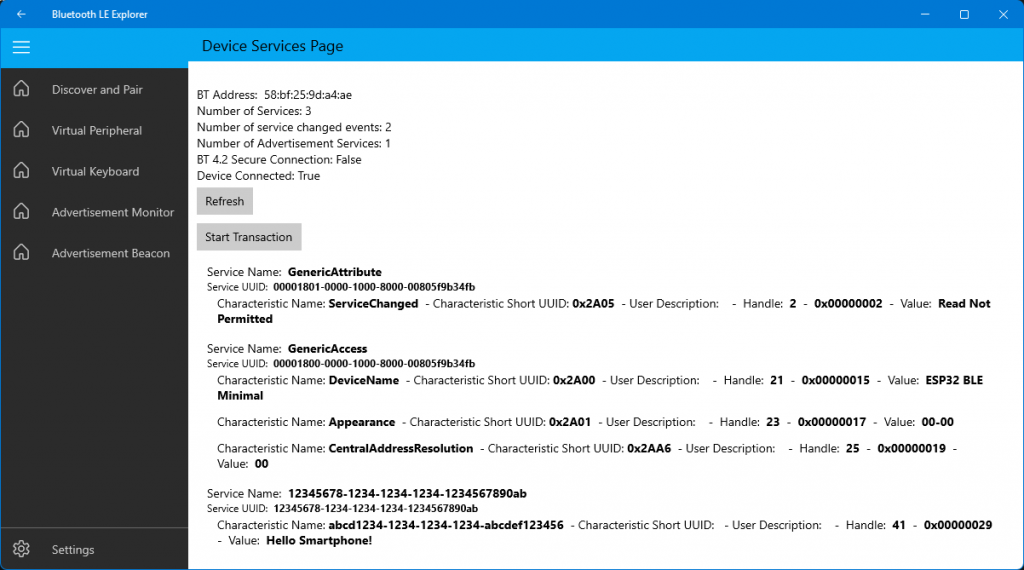
If you are using the “ESP32 BLE Minimal” example, you can now click on the characteristic to read its value or write a new value. Be sure to set the correct data format.

With PCs and laptops, keep in mind that the device remembers the name of the peripheral, among other things. If you create a new peripheral with a different name using your ESP32, you will likely still see the old name. Apparently, the PC or laptop recognizes the device by its MAC address and does not re-read all the information but retrieves it from a cache. To fix this, go to Windows settings → “Bluetooth & Devices” and remove the device there. If that does not help, briefly turn Bluetooth off and then back on again on your computer.
Bluetooth LE Lab
I also tried “Bluetooth LE Explorer” from the Microsoft Store. In my opinion, I would not recommend it. With this program, you first have to pair the Bluetooth device. You can do this via Windows Settings → Bluetooth & devices → Add a device → Bluetooth → All devices. Then launch “Bluetooth LE Lab” and select the device.
Also important: You must assign the “PROPERTY_WRITE_NR” property (write without acknowledgment) to the characteristic and check the corresponding box in “Bluetooth LE Lab” when writing (see below). If you forgot to do this on your first attempt, simply uploading the modified sketch again will not be enough. Yoo will also need to unpair the device, briefly turn Bluetooth off and then back on, and pair it again.
