
About this Post
Now that I’ve written about the YX5300 MP3 player module in my last post, I’d like to focus on controlling the DFPlayer Mini with the Arduino.
- Technical Specifications and Pin Assignment
- File structure of the SD card
- Circuit for serial control with Arduino
- The DFRobotDFPlayerMini Library
- Ein eigener Sketch mit Menüführung
- Control via pushbuttons
- DFPlayer Mini vs. YX5300 Module
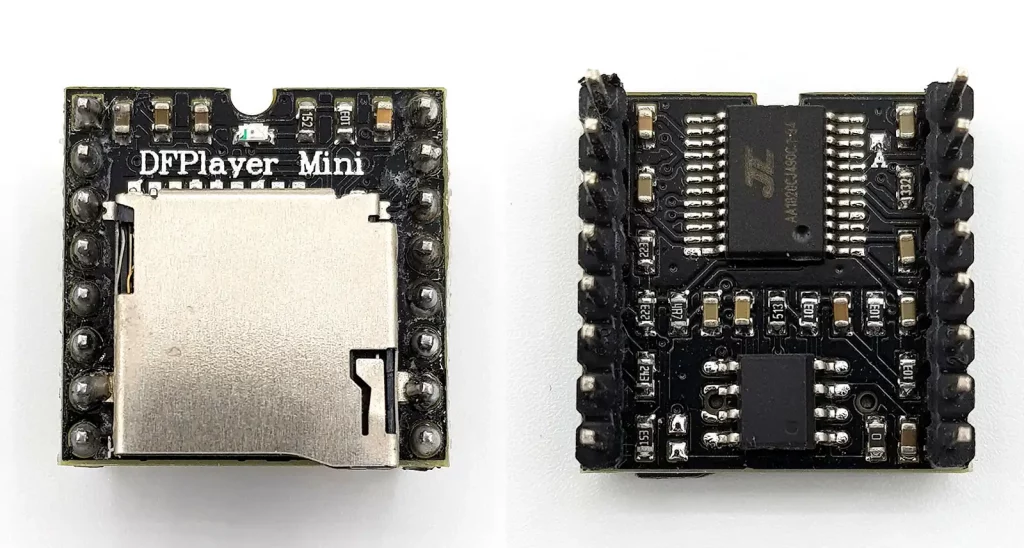
Specifications / Features of the DFPlayer Mini
Overview
The DFPlayer Mini is available for 5–10 euros on Amazon or other online stores. The module’s small size is truly impressive, as it’s barely larger than the micro SD card slot. I find it equally impressive that it even includes an amplifier, allowing you to connect speakers rated up to 3 watts directly. You can find a datasheet for the DFPlayer Mini online, for example, here. Here are a few key specs:
| Voltage supply | 3.2 – 5.0 V |
| Current consumption (standby) | ~ 20 mA |
| Supported file types | MP3 and WAV |
| Supported SD cards | Micro SD(HC) up to 32 GB |
| Format | FAT16 / FAT 32 |
| Communication | Seriell RX/TX, baud rate: 9600 |
| USB port | USB 2.0 (Flashdrive / PC) |
| Audio outputs | Speakers – up to 3W (built-in amplifier) DAC (for headphones or an amplifier) |
Pinout


Please note that you must connect a 1-kΩ resistor in front of the RX input; otherwise, a very unpleasant, loud hum will occur.
The Adkeyx and IOx connectors are a pretty ingenious feature that allows you to control the DFPlayer Mini largely using buttons. More on that below.
Folder and file structure of the SD card
The DFPlayer Mini expects directory and file names to follow a specific format. The rules for file naming and the maximum number of files per directory depend on the type of directory.
Note: If you’re having problems with the SD card, check to see if it has multiple partitions. Sometimes the SD card has a small boot partition that can cause issues. I described how to fix the problem in my last post.
1. Root directory
The root directory of the SD card can hold up to 3,000 WAV or MP3 files. They must be named 0001.mp3 (or 0001.wav), 0002.mp3 … 3000.mp3. However, there is a peculiar issue here: the files must be copied in the exact order of their names. If you tell the module to play 0001.mp3, but 0007.mp3 was copied first, then 0007.mp3 will be played. Personally, I would avoid copying files to the root directory. Other directories do not have this problem.
2. Standard folders
You can create 99 standard folders, which must be named according to the pattern 01, 02, 03 … 99. Each folder can hold up to 3,000 files, but only the first 255 can be accessed directly via serial commands. This means that a command like “play file number 627” is not possible in the standard folders, and you would have to navigate through them using “next” commands. The file names must follow the structure 001xxxxx.mp3 (or wav), 002xxxxx.mp3, … 255xxxxx.mp3. Here, “xxxxx” can be chosen freely and may have more than the 5 digits indicated here. Spaces are also allowed.
3. Special folder “MP3”
This folder must be named exactly “MP3”. It can hold up to 3,000 files with the naming convention 0001.mp3 (or wav), 0002.mp3, … 3000.mp3. Unlike the main directory, all files are directly accessible, and there are no issues with the order.
4. Special folder “ADVERT”
The same rules apply as for the MP3 directory. The ADVERT directory has a special function. If you play a song from one of the other directories and call a file from the ADVERT directory, the former song is only interrupted. After the ADVERT play is finished, the former song continues. It’s like an advertisement and that’s how the name of the directory already suggests it.
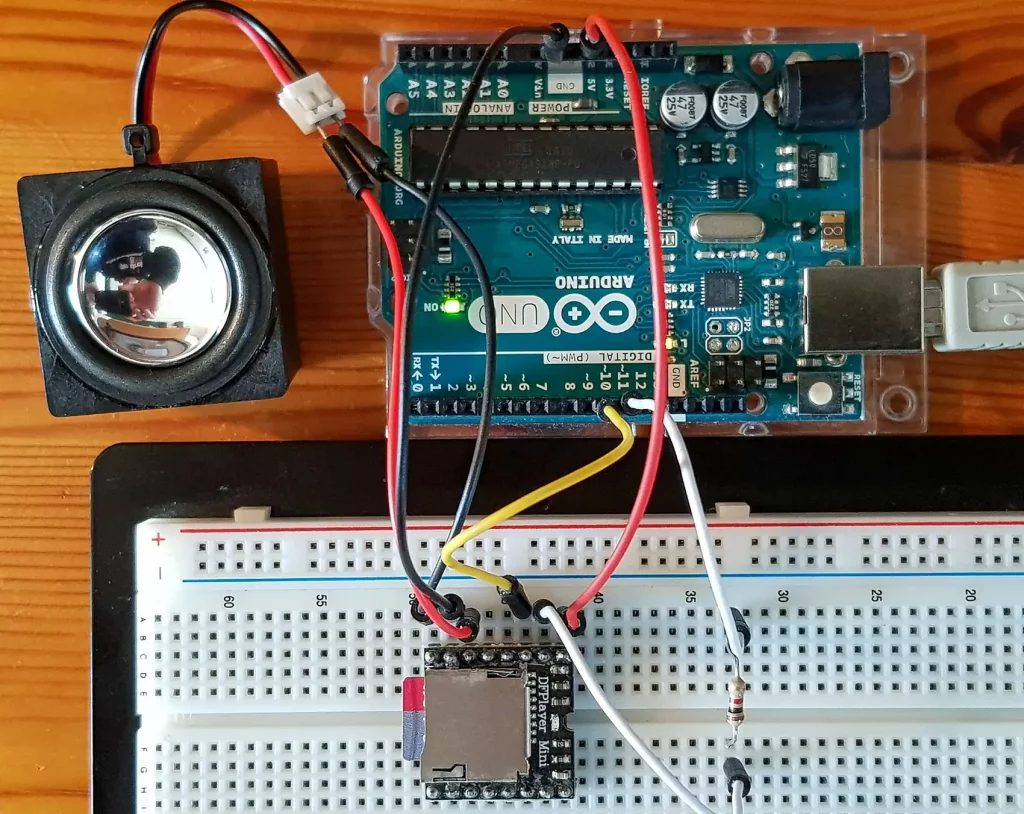
The circuit for serial operation
The circuit for operation via the serial interface is relatively simple. Note that a 1 kΩ resistor must be placed in front of the DFPlayer module’s RX input.
Note: In my circuit, I power the DFPlayer using power from the Arduino. When using larger speakers, up to the max. 3 watts, keep in mind that the Arduino’s total power consumption should not exceed 500 mA.

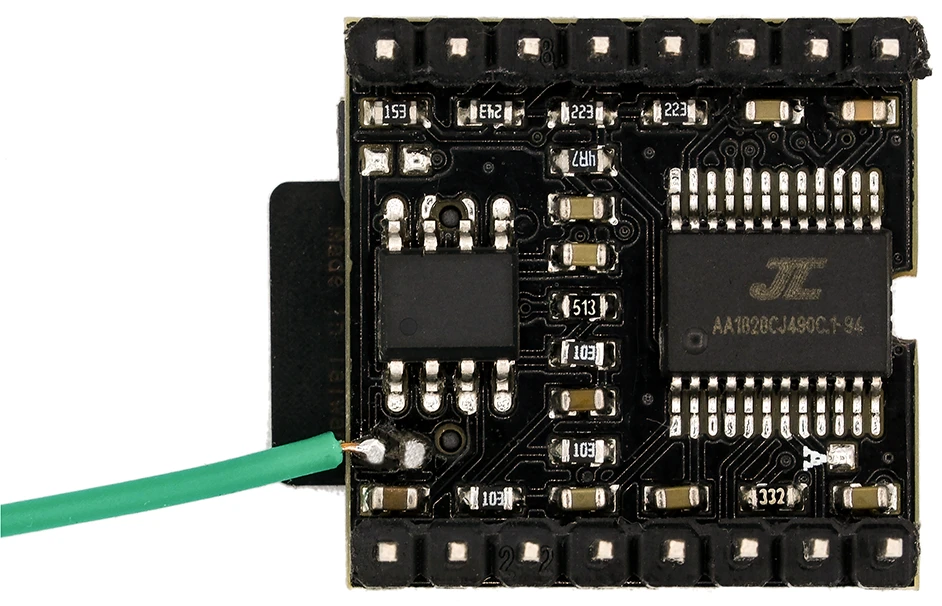
Fixing the initial crackling noise
When you power on the module or reset it, you will initially hear an unpleasant crackling sound. You can prevent this with a simple hardware hack (thanks to Tomas for the tip!). The amplifier on the board has a mute pin that’s connected to GND via a 0Ω resistor. Carefully remove this resistor and solder a wire to the contact facing the outside of the module. Connect the wire to an Arduino pin. Use OUTPUT/HIGH to mute the module before initialization, then activate the amplifier with OUTPUT or INPUT/LOW.
Control via the library
DFRobotDFPlayerMini
Controlling the DFPlayer Mini with an Arduino isn’t difficult, since there are a number of libraries available on GitHub. I use the DFRobotDFPlayerMini library, but that doesn’t mean the others are bad. I simply tried it first and stuck with it.
As usual, you install the library by downloading the ZIP file and extracting it into the “Arduino\libraries” folder. The included example sketch, “FullFunction.ino,” provides a good overview of all the functions. I’ve modified it slightly so that you can call up the commands via the serial monitor. Here is the result:
/***************************************************
 FullFunction.ino example of the DFRobotDFPlayerMini library.
 Modified by Wolfgang Ewald.

 DFPlayer - A Mini MP3 Player For Arduino
 <https://www.dfrobot.com/product-1121.html>

 ***************************************************
 This example shows the all the function of library for DFPlayer.

 Created 2016-12-07
 By [Angelo qiao](Angelo.qiao@dfrobot.com)

 GNU Lesser General Public License.
 See <http://www.gnu.org/licenses/> for details.
 All above must be included in any redistribution
 ****************************************************/

/***********Notice and Trouble shooting***************
 1.Connection and Diagram can be found here
<https://www.dfrobot.com/wiki/index.php/DFPlayer_Mini_SKU:DFR0299#Connection_Diagram>
 2.This code is tested on Arduino Uno, Leonardo, Mega boards.
 ****************************************************/

#include "Arduino.h"
#include "SoftwareSerial.h"
#include "DFRobotDFPlayerMini.h"

SoftwareSerial mySoftwareSerial(10,11); // RX, TX
DFRobotDFPlayerMini myDFPlayer;
void printDetail(uint8_t type, int value);

void setup()
{
  mySoftwareSerial.begin(9600);
  Serial.begin(9600);

  Serial.println();
  Serial.println(F("DFRobot DFPlayer Mini Demo"));
  Serial.println(F("Initializing DFPlayer ... (May take 3~5 seconds)"));

  if (!myDFPlayer.begin(mySoftwareSerial)) {  //Use softwareSerial to communicate with mp3.
    Serial.println(F("Unable to begin:"));
    Serial.println(F("1.Please recheck the connection!"));
    Serial.println(F("2.Please insert the SD card!"));
    while(true);
  }
  Serial.println(F("DFPlayer Mini online."));
  printHelp();

  myDFPlayer.setTimeOut(500); //Set serial communication time out 500ms

  //----Set volume----
  myDFPlayer.volume(10);  //Set volume value (0~30).
 // myDFPlayer.volumeUp(); //Volume Up
 // myDFPlayer.volumeDown(); //Volume Down

  //----Set different EQ----
  myDFPlayer.EQ(DFPLAYER_EQ_NORMAL);
//  myDFPlayer.EQ(DFPLAYER_EQ_POP);
//  myDFPlayer.EQ(DFPLAYER_EQ_ROCK);
//  myDFPlayer.EQ(DFPLAYER_EQ_JAZZ);
//  myDFPlayer.EQ(DFPLAYER_EQ_CLASSIC);
//  myDFPlayer.EQ(DFPLAYER_EQ_BASS);

  //----Set device we use SD as default----
//  myDFPlayer.outputDevice(DFPLAYER_DEVICE_U_DISK);
  myDFPlayer.outputDevice(DFPLAYER_DEVICE_SD);
//  myDFPlayer.outputDevice(DFPLAYER_DEVICE_AUX);
//  myDFPlayer.outputDevice(DFPLAYER_DEVICE_SLEEP);
//  myDFPlayer.outputDevice(DFPLAYER_DEVICE_FLASH);

  //----Mp3 control----
//  myDFPlayer.sleep();     //sleep
//  myDFPlayer.reset();     //Reset the module
//  myDFPlayer.enableDAC();  //Enable On-chip DAC
//  myDFPlayer.disableDAC();  //Disable On-chip DAC
//  myDFPlayer.outputSetting(true, 15); //output setting, enable the output and set the gain to 15
}

void loop(){
  if(Serial.available()){
    readCommand();
  }

  if (myDFPlayer.available()) {
    printDetail(myDFPlayer.readType(), myDFPlayer.read()); //Print the detail message from DFPlayer to handle different errors and states.
  }
}

void readCommand(){
  char cmd = ' ';
  int value1, value2 = 0;
  cmd = Serial.read();
  value1 = Serial.parseInt();
  value2 = Serial.parseInt();

  switch(cmd){
    case 'h':
      printHelp();
      break;

    case '>':
      myDFPlayer.next();
      break;

    case '<':
      myDFPlayer.previous();
      break;

    case 'p':
      if(value2 == 0) myDFPlayer.play(value1);
      else if(value1 != 0) myDFPlayer.playFolder(value1, value2);
      break;

    case 'P':
      if(value2 == 0) myDFPlayer.playMp3Folder(value1);
      else if(value1 != 0)myDFPlayer.playLargeFolder(value1, value2);
      break;

    case '+':
      myDFPlayer.volumeUp();
      break;

    case '-':
      myDFPlayer.volumeDown();
      break;

    case 'v':
      myDFPlayer.volume(value1);
      break;

    case 'b':
      myDFPlayer.pause();
      break;

    case 's':
      myDFPlayer.start();
      break;

    case 'z':
      myDFPlayer.sleep();
      break;

    case 'L':
      if(value1 == 0) myDFPlayer.enableLoopAll();
      else myDFPlayer.loopFolder(value1);
      break;

    case 'l':
      if(value1 == 0) myDFPlayer.disableLoopAll();
      else myDFPlayer.loop(value1);
      break;

    case 'A':
      myDFPlayer.advertise(value1);
      break;

    case 'a':
      myDFPlayer.stopAdvertise();
      break;

    case 'q':
      if(value1 == 1) Serial.println(myDFPlayer.readState());
      else if(value1 == 2) Serial.println(myDFPlayer.readVolume());
      else if(value1 == 3) Serial.println(myDFPlayer.readEQ());
      else if(value1 == 4) Serial.println(myDFPlayer.readFileCounts());
      else if(value1 == 5) Serial.println(myDFPlayer.readFolderCounts());
      else if(value1 == 6) Serial.println(myDFPlayer.readCurrentFileNumber());
      break;
    default:
      Serial.println("Ungültiges Kommando");
      break;
  }

}

void printHelp(){
  Serial.println(F("DFPlayer Commands:"));
  Serial.println(F(" h - help"));
  Serial.println(F(" > - next "));
  Serial.println(F(" < - previous"));
  Serial.println(F(" p3 - play file 3"));
  Serial.println(F(" p3,5 - play folder 3, file 5"));
  Serial.println(F(" P3,5 - play large folder 3, file 5"));
  Serial.println(F(" P3 - play file 3 in MP3 folder"));
  Serial.println(F(" + - volume up"));
  Serial.println(F(" - - volume down"));
  Serial.println(F(" v10 - set volume to 10"));
  Serial.println(F(" b - Pause"));
  Serial.println(F(" s - start "));
  Serial.println(F(" z - sleep "));
  Serial.println(F(" L - enable loop all"));
  Serial.println(F(" l - disable loop all"));
  Serial.println(F(" L3 - loop folder 3"));
  Serial.println(F(" l3 - loop file 3"));
  Serial.println(F(" A3 - advertise file 3"));
  Serial.println(F(" a - stop advertise "));
  Serial.println(F(" qx - query No. x"));
  Serial.println(F("     x = 1 - read state"));
  Serial.println(F("     x = 2 - read volume"));
  Serial.println(F("     x = 3 - read equalizer"));
  Serial.println(F("     x = 4 - read file counts"));
  Serial.println(F("     x = 5 - read current file number"));
  Serial.println(F("     x = 6 - read file counts in folder"));
  Serial.println(F("     x = 7 - read folder counts"));
}

void printDetail(uint8_t type, int value){
  switch (type) {
    case TimeOut:
      Serial.println(F("Time Out!"));
      break;
    case WrongStack:
      Serial.println(F("Stack Wrong!"));
      break;
    case DFPlayerCardInserted:
      Serial.println(F("Card Inserted!"));
      break;
    case DFPlayerCardRemoved:
      Serial.println(F("Card Removed!"));
      break;
    case DFPlayerCardOnline:
      Serial.println(F("Card Online!"));
      break;
    case DFPlayerUSBInserted:
      Serial.println("USB Inserted!");
      break;
    case DFPlayerUSBRemoved:
      Serial.println("USB Removed!");
      break;
    case DFPlayerPlayFinished:
      Serial.print(F("Number:"));
      Serial.print(value);
      Serial.println(F(" Play Finished!"));
      break;
    case DFPlayerError:
      Serial.print(F("DFPlayerError:"));
      switch (value) {
        case Busy:
          Serial.println(F("Card not found"));
          break;
        case Sleeping:
          Serial.println(F("Sleeping"));
          break;
        case SerialWrongStack:
          Serial.println(F("Get Wrong Stack"));
          break;
        case CheckSumNotMatch:
          Serial.println(F("Check Sum Not Match"));
          break;
        case FileIndexOut:
          Serial.println(F("File Index Out of Bound"));
          break;
        case FileMismatch:
          Serial.println(F("Cannot Find File"));
          break;
        case Advertise:
          Serial.println(F("In Advertise"));
          break;
        default:
          break;
      }
      break;
    default:
      break;
  }
}
In my last post, I showed how to control the YX5300 MP3 module using a smartphone. This could be adapted here with relatively little effort.
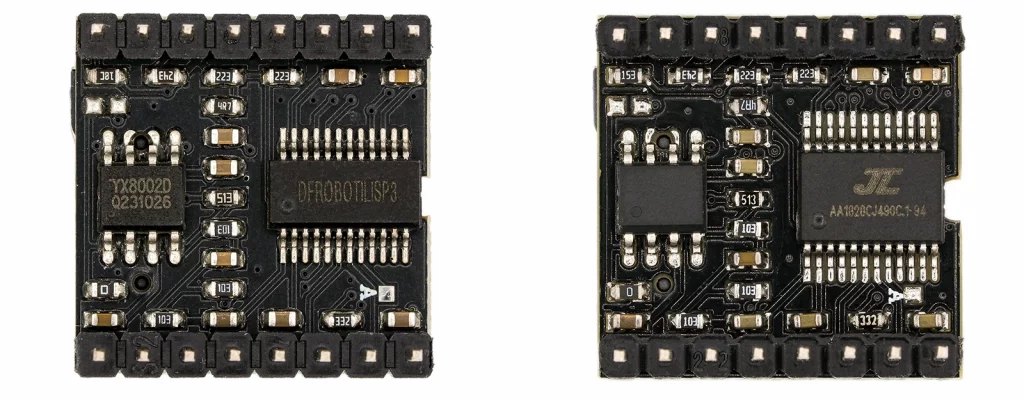
If the query does not work
As with so many components, there are also inexpensive knockoff versions of the DFPlayer Mini. These generally work, but fail when queried (“q-commands”). Visually, the original and the knockoff usually differ only in the labeling on the ICs on the back of the module:
Does it work without a library?
Controlling the DFPlayer Mini with Arduino isn’t rocket science, even without a library, since the datasheet is fairly easy to understand. Here’s what the command structure looks like:

Each command sequence begins with “7E”. This is followed by VER (version), which is always “FF”. “Len” indicates the command length in bytes. The start byte, end byte, and checksum are not included in this count. Normally, this results in six bytes. “CMD” is the actual command; a list of commands can be found in the datasheet. “Feedback” controls whether you want a response from the module. There is only “01” for feedback and “00” for no feedback. “para1” and “para2” are—not surprisingly—the command parameters. These are also listed in the datasheet. The checksum provides additional security, but it can also be omitted. The datasheet explains how to calculate the checksum.
Here is an example. To play a specific file in a default directory, the command 0x0F is used. If file 002 is to be played in folder 01 and no feedback is required, the command sequence without a checksum is:
7E FF 06 0F 00 01 02 EF
The bytes are transmitted one by one using “Serial.write(x-th byte)”. Here, “Serial” should be replaced with “SoftwareSerial”. Implementing the commands is quite a labor-intensive task, so it’s a relief that libraries exist. But personally, I always like to understand what’s happening behind the scenes.
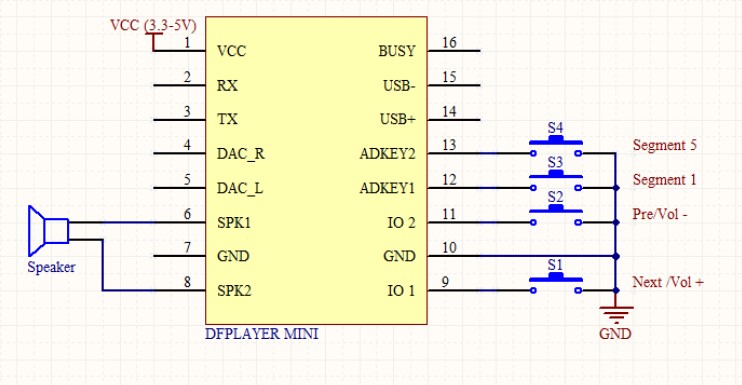
Control via pushbuttons
Controlling the DFPlayer Mini with an Arduino or other microcontrollers isn’t the only option. As mentioned above, many functions can also be accessed via the Adkeyx and IOx connections on pins 9, 11, 12, and 13.
The IOx pins are connected to GND via buttons. Depending on whether you press the button briefly or hold it down, the next track will play or the volume will increase, or the previous track will play or the volume will decrease.
With ADKEYx connectors, you can achieve various functions by adding additional resistors. I tried it, and it works perfectly.
By the way, “Segment X” refers to “play file No. X.” However, the order in which the files are copied is crucial here, regardless of the directory type.
Connecting pushbuttons to ADKEY and IO without resistors

DFPlayer Mini vs. YX5300
Now that I’ve tested both modules, I have to say that they are quite similar in terms of functionality. However, the DFPlayer Mini offers significantly more flexibility thanks to its pushbutton functions than the YX5300 module. Another advantage of the DFPlayer Mini is that it has pins for connecting speakers or an amplifier. Plus, the module is very compact. The advantage of the YX5300 module, on the other hand, is the 3.5mm jack, to which you can connect headphones or (active) speakers directly. If you don’t like too much DIY, the YX5300 might be a better fit for you.
Support requested
Did you enjoy this post? And did you notice that this website is ad-free? If you’d like to help me keep it that way, then follow this link.
Hi Elze,
no concrete idea but some things you could check are:
* Do you have an appropriate SD-card ( <= 32 GByte, SD or SDHC)? * Is the SD-card correctly formatted (FAT16 or FAT32)? See also: https://wolles-elektronikkiste.de/en/mp3-player-yx5300 , chapter: “Problems with the SD card?”. Maybe format it with the freeware “SD card formatter”.
* Is the file structure correct? Are the file names correct?
* Is the SD card inserted correctly – you should hear a “click”?
* Are RX / TX connected correctly?
* If it does not work using my sketches, have you also tried the example sketches of the lib? In theory, updates of the library could make problems with my sketches if the changes are not downward compatible.
* In seldom cases, libraries are incompatible and cause problems, even if you don’t use them. Do you get any warnings during compilation? Activate “Show verbose output during: compilation” in the preferences. You can also send the output to me (wolfgang.ewald@wolles-elektronikkiste.de). Maybe I see something.
* You can also try to connect ADKEY1 with a pushbutton to GND. If you press it then it should play directly without connection to the Arduino. Does that work?
That’s it for the moment. I am sure this can be fixed.
Last question: Which Arduino have you tried (UNO, Nano,…?).
Cheers, Wolfgang
Hey!
I’ve been trying to make this work, but for some reason it doesn’t.
The wiring seems to be ok (re-did it many times and tried different wires), tried different arduinos and formatted my sd card several times. Still, it doesn’t seem to work. Every time I try to start it, the serial motor says:
Unable to begin:
1.Please recheck the connection!
2.Please insert the SD card!
What do you think the problem could be?
Hoping for an answer!
Thank you 🙂
Elze!