About the post
In this article I would like to introduce an MP3 player module based on the YX5300 chip. I will deal with the following topics:
- Features / Specification
- SerialMP3Player Library
- circuit
- Ardu_XY5300_MP3_Player – smartphone control
- Problems with the SD card?
- Alternative MP3 modules

Features / Specification
The MP3 player YX5300 module is available for 5-10 Euro e.g. on Amazon. The supplied documentation is – as mostly with electronic components – very poor, but there is a data sheet on the net. The main features are:
| Power supply | 3.2 – 5.2 V |
| Power consumption | max. 200 mA |
| File types | WAV / MP3 |
| SD card | Micro SD (<= 2 GB) |
| Format | FAT16 / FAT 32 |
| Communication | Serial via RX/TX |
| Max. voltage for TX/RX | 3.3 V / 5 V |
| Baud rate | 9600 |
| Loudspeaker/headphone jack | 3.5mm jack |
I successfully tested the module with a 2GB SD card and a 16GB SDHC card. If you have a problem with your SD card, just like me at first, then maybe the chapter below about this issue will help you.
The module expects the directory names in the format “01”, “02”, “03”, etc. on the SD card. The files in the directories must have the format “001xxx.mp3”, “002xxx.mp3”, … Have. “xxx” is freely selectable (apart from special characters).
The jack connection can be seen as a positive or negative feature. Additional pins for connecting to self-built amplifiers or loudspeakers would have made sense. But first of course it is very convenient to be able to connect a headphone or (active) speaker directly.
The module is addressed serially and has implemented a set of instructions that one would expect from an MP3 player. I do not want to go through the instructions individually. Either you look in the data sheet or in the example sketch of the library, which I would like to introduce in a moment. The only thing I miss a little is a function to switch from single song mode to playlist mode (or back), which does not interrupt the currently played song.
SerialMP3Player library
Actually, it is not very difficult to control the module without a library, but it is a lot of work to copy all the commands from the data sheet manually. Using the SerialMP3Player library, you don’t need to do this and therefore you can get started right away. Nevertheless, I recommend to look at data sheets sometimes, e.g. in order to be able to improve libraries if necessary.
With the help of the example sketch BasicCommands, the module can be tested extensively. The sketch lists the available commands on the serial monitor, which can then be executed accordingly. It is nice that the raw data that are sent or received are displayed on the serial monitor. You can change this in line 42 by replacing the “1” with a “0” and commenting the lines 67-69.
The sketch is easy to understand and I don’t think it needs any great explanations. The loop function checks whether entries have been made on the serial monitor. The inputs are evaluated by the “decode_c” function and then passed to the “menu” function. The menu function then calls the functions defined in the library.
/******************************************************************************
  Basic Commands examples for the SerialMP3Player YX5300 chip.

  Copy the files of "SDcard_example" to an empty SD card
  Connect the Serial MP3 Player to the Arduino board
    GND → GND
    VCC → 5V
    TX → pin 11
    RX → pin 10

  After compile and upload the code,
  you can test some basic commands by sending the letters
  ? - Display Menu options.
  P01 - Play 01 file
  F01 - Play 01 folder
  S01 - Play 01 file in loop
  p - play
  a - pause
  s - stop
  > - Next
  < - Previous
  ...

  Some commands like 'P' must be followed by two digits.

  This example code is in the public domain.

  https://github.com/salvadorrueda/ArduinoSerialMP3Player

  by Salvador Rueda
 *******************************************************************************/

#include "SerialMP3Player.h"

#define TX 11
#define RX 10

SerialMP3Player mp3(RX,TX);


void setup() {
  mp3.showDebug(1);       // print what we are sending to the mp3 board.

  Serial.begin(9600);     // start serial interface
  mp3.begin(9600);        // start mp3-communication
  delay(500);             // wait for init

  mp3.sendCommand(CMD_SEL_DEV, 0, 2);   //select sd-card
  delay(500);             // wait for init

  menu('?',0); // print the menu options.
}

 char c;  // char from Serial
 char cmd=' ';
 char cmd1=' ';


// the loop function runs over and over again forever
void loop() {

  if (Serial.available()){
    c = Serial.read();
    decode_c(); // Decode c.
  }
  // Check for the answer.
  if (mp3.available()){
    Serial.println(mp3.decodeMP3Answer()); // print decoded answers from mp3
  }
}

void menu(char op, int nval){
  // Menu
  switch (op){
    case '?':
    case 'h':
        Serial.println("SerialMP3Player Basic Commands:");
        Serial.println(" ? - Display Menu options. ");
        Serial.println(" P01 - Play 01 file");
        Serial.println(" F01 - Play 01 folder");
        Serial.println(" S01 - Play 01 file in loop");
        Serial.println(" V01 - Play 01 file, volume 30");
        Serial.println(" p - Play");
        Serial.println(" a - pause");
        Serial.println(" s - stop ");
        Serial.println(" > - Next");
        Serial.println(" < - Previous");
        Serial.println(" + - Volume UP");
        Serial.println(" - - Volume DOWN");
        Serial.println(" v15 - Set Volume to 15");
        Serial.println(" c - Query current file");
        Serial.println(" q - Query status");
        Serial.println(" x - Query folder count");
        Serial.println(" t - Query total file count");
        Serial.println(" r - Reset");
        Serial.println(" e - Sleep");
        Serial.println(" w - Wake up");
        break;

    case 'P':
        Serial.println("Play");
        mp3.play(nval);
        break;

    case 'F':
        Serial.println("Play Folder");
        mp3.playF(nval);
        break;

    case 'S':
        Serial.println("Play loop");
        mp3.playSL(nval);
        break;

    case 'V':
        Serial.println("Play file at 30 volume");
        mp3.play(nval,30);
        break;


    case 'p':
        Serial.println("Play");
        mp3.play();
        break;

    case 'a':
        Serial.println("Pause");
        mp3.pause();
        break;

    case 's':
        Serial.println("Stop");
        mp3.stop();
        break;

    case '>':
        Serial.println("Next");
        mp3.playNext();
        break;

    case '<':
        Serial.println("Previous");
        mp3.playPrevious();
        break;

    case '+':
        Serial.println("Volume UP");
        mp3.volUp();
        break;

    case '-':
        Serial.println("Volume Down");
        mp3.volDown();
        break;

    case 'v':
        Serial.println("Set to Volume");
          mp3.setVol(nval);
          mp3.qVol();
        break;

    case 'c':
        Serial.println("Query current file");
        mp3.qPlaying();
        break;

    case 'q':
        Serial.println("Query status");
        mp3.qStatus();
        break;

    case 'x':
        Serial.println("Query folder count");
        mp3.qTFolders();
        break;

    case 't':
        Serial.println("Query total file count");
        mp3.qTTracks();
        break;

    case 'r':
        Serial.println("Reset");
        mp3.reset();
        break;

    case 'e':
        Serial.println("Sleep");
        mp3.sleep();
        break;

    case 'w':
        Serial.println("Wake up");
        mp3.wakeup();
        break;
  }
}

void decode_c(){
  // Decode c looking for a specific command or a digit

  // if c is a 'v', 'P', 'F', 'S' or 'V' wait for the number XX
  if (c=='v' || c=='P' || c=='F' || c=='S' || c=='V'){
    cmd=c;
  }else{
    // maybe c is part of XX number
    if(c>='0' && c<='9'){
      // if c is a digit
      if(cmd1==' '){
        // if cmd1 is empty then c is the first digit
        cmd1 = c;
      }else{
        // if cmd1 is not empty c is the second digit
        menu(cmd, ((cmd1-'0')*10)+(c-'0'));
        cmd = ' ';
        cmd1 = ' ';
      }
    }else{
      // c is not a digit nor 'v', 'P', 'F' or 'S' so just call menu(c, nval);
      menu(c, 0);
    }
  }
}
Connection to Arduino and Co
It couldn’t be easier: GND to GND, VCC to 5V or 3.3V, RX to TX and TX to RX. RX and TX are set as PIN 10 and PIN 11 in the example sketch via SoftwareSerial.

Smartphone control for the MP3 player YX5300
Alternative control of the YX5300
Being able to control the MP3 player YX5300 via the serial monitor is already a first success experience, but in the long run you probably want to work independently of the PC. In essence, I can think of three alternatives:
- Install a button for each function, if necessary in conjunction with a small membrane switch keyboard.
- Use a touch display, available for < €20 on Amazon
- Smartphone control via Bluetooth
Since I find the smartphone variant particularly exciting, I will go into this in more detail.
The functionality of the smartphone app
I have developed a small app (“Ardu YX5300 MP3 Player”) that has implemented the most important functions for the player. You can also easily expand the app and add more features. As a special feature, I added a voice control (“Talk2Me” button).

The “Continuous” Check Box switches from single song mode to folder mode or back. Unfortunately, this is interrupting of the current song.
What exactly the app does in the background and how you can develop something like this without special knowledge in the app programming, I explain below.
Setup of the Arduino side
First, however, let’s have a look into the Arduino side. We add Bluetooth capabilities to the Arduino with an HC-05 or HC-06 module. How to deal with these modules I have described here. The Bluetooth module communicates with the Arduino via a SoftwareSerial connection. In my sketch (below) I defined pin 5 and 6 as RX or TX. I used a small active loudspeaker. On the breadboard, it looks like this:

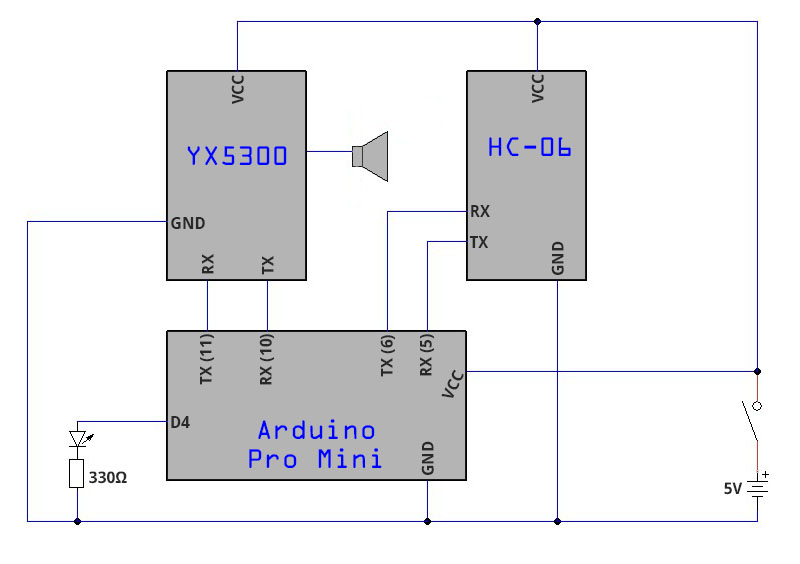
To make the MP3 player independent of the PC, I replaced the Arduino Uno with a Pro Mini, put it in a case, switched to battery operation and added a control LED for the power supply. The battery power supply is external and is plugged in via a socket. How to program a Pro Mini I have described here. The circuit looks like this:

Preparation – Adaptation of the sketch
For the sketch, I take the BasicCommand sketch as the basis and use its “infrastructure”. I renamed it Ardu_YX5300_MP3_player.ino. You find the sketch below.
The connection to the Bluetooth module is defined in line 40:
SoftwareSerial BT_Module(5,6);
In the loop function, rows 74-76 check whether there is data for retrieval:
if(BT_Module.available()){ decode_BT(); }.
The new function “decode_BT” in lines 206 – 216 evaluates the commands received so that the menu function understands them. The first character is expected to be “BT_START_CMD_CHAR” and is defined as “*” at the beginning of the sketch.
void decode_BT(){
  char cmdType = ' ';
  int value = 0;
  char getChar = ' ';  //read serial
  if(BT_Module.find(BT_START_CMD_CHAR)){
    while(BT_Module.available()<1);
    cmdType = BT_Module.read(); // read the command
    value = BT_Module.parseInt();
  }
  menu(cmdType,value);
}
Here’s what the full sketch looks like:
/******************************************************************************
  Salavdor Rueda's Basic Commands examples for the SerialMP3Player YX5300 chip.

  Modified by Wolfgang Ewald in order to communicate with a smartphone app.

    GND → GND
    VCC → 5V
    YX 5300 TX → pin 10
    YX 5300 RX → pin 11
    BT Modul TX → pin 5
    BT Modul RX → pin 6

  After compile and upload the code,
  you can test some basic commands by sending the letters
  ? - Display Menu options.
  P01 - Play 01 file
  F01 - Play 01 folder
  S01 - Play 01 file in loop
  p - play
  a - pause
  s - stop
  > - Next
  < - Previous
  ...

  Original:
  "This example code is in the public domain.
  https://github.com/salvadorrueda/ArduinoSerialMP3Player
  by Salvador Rueda"

 *******************************************************************************/

#include "SerialMP3Player.h"
#define TX 11
#define RX 10
#define BT_START_CMD_CHAR '*'
int statusLEDPin = 4;

SerialMP3Player mp3(RX,TX);
SoftwareSerial BT_Module(5,6);

void setup() {
  mp3.showDebug(0);       // print what we are sending to the mp3 board. 1= active
  Serial.begin(9600);     // start serial interface
  mp3.begin(9600);        // start mp3-communication
  BT_Module.begin(9600);   // start serial connection to BT Modul
  delay(500);             // wait for init
  pinMode(statusLEDPin, OUTPUT);
  digitalWrite(statusLEDPin, HIGH);

  mp3.sendCommand(CMD_SEL_DEV, 0, 2);   //select sd-card
  mp3.setVol(15);
  mp3.playF(1);  // Folder 1, cycle play
  delay(500);    // wait for init

  menu('?',0); // print the menu options.
}

 char c;  // char from Serial
 char cmd=' ';
 char cmd1=' ';


// the loop function runs over and over again forever
void loop() {
  if (Serial.available()){
    c = Serial.read();
    decode_c(); // Decode c.
  }
  // Check for the answer.
//  if (mp3.available()){
//    Serial.println(mp3.decodeMP3Answer()); // print decoded answers from mp3
//  }
  if(BT_Module.available()){
    decode_BT();
  }
}

void menu(char op, int nval){
  // Menu
  switch (op){
    case '?':
    case 'h':
        Serial.println("SerialMP3Player Basic Commands:");
        Serial.println(" ? - Display Menu options. ");
        Serial.println(" P01 - Play 01 file");
        Serial.println(" F01 - Play 01 folder");
        Serial.println(" S01 - Play 01 file in loop");
        Serial.println(" V01 - Play 01 file, volume 30");
        Serial.println(" p - Play");
        Serial.println(" a - pause");
        Serial.println(" s - stop ");
        Serial.println(" > - Next");
        Serial.println(" < - Previous");
        Serial.println(" + - Volume UP");
        Serial.println(" - - Volume DOWN");
        Serial.println(" v15 - Set Volume to 15");
        Serial.println(" c - Query current file");
        Serial.println(" q - Query status");
        Serial.println(" x - Query folder count");
        Serial.println(" t - Query total file count");
        Serial.println(" r - Reset");
        Serial.println(" e - Sleep");
        Serial.println(" w - Wake up");
        break;

    case 'P':
        Serial.println("Play");
        mp3.play(nval);
        break;

    case 'F':
        Serial.println("Play Folder");
        mp3.playF(nval);
        break;

    case 'S':
        Serial.println("Play loop");
        mp3.playSL(nval);
        break;

    case 'V':
        Serial.println("Play file at 30 volume");
        mp3.play(nval,30);
        break;


    case 'p':
        Serial.println("Play");
        mp3.play();
        break;

    case 'a':
        Serial.println("Pause");
        mp3.pause();
        break;

    case 's':
        Serial.println("Stop");
        mp3.stop();
        break;

    case '>':
        Serial.println("Next");
        mp3.playNext();
        break;

    case '<':
        Serial.println("Previous");
        mp3.playPrevious();
        break;

    case '+':
        Serial.println("Volume UP");
        mp3.volUp();
        break;

    case '-':
        Serial.println("Volume Down");
        mp3.volDown();
        break;

    case 'v':
        Serial.println("Set to Volume");
          mp3.setVol(nval);
          //mp3.qVol();
        break;

    case 'c':
        Serial.println("Query current file");
        mp3.qPlaying();
        break;

    case 'q':
        Serial.println("Query status");
        mp3.qStatus();
        break;

    case 'x':
        Serial.println("Query folder count");
        mp3.qTFolders();
        break;

    case 't':
        Serial.println("Query total file count");
        mp3.qTTracks();
        break;

    case 'r':
        Serial.println("Reset");
        mp3.reset();
        break;

    case 'e':
        Serial.println("Sleep");
        mp3.sleep();
        break;

    case 'w':
        Serial.println("Wake up");
        mp3.wakeup();
        break;
  }
}

void decode_BT(){
  char cmdType = ' ';
  int value = 0;
  char getChar = ' ';  //read serial
  if(BT_Module.find(BT_START_CMD_CHAR)){
    while(BT_Module.available()<1);
    cmdType = BT_Module.read(); // read the command
    value = BT_Module.parseInt();
  }
    menu(cmdType,value);
}

void decode_c(){
  // Decode c looking for a specific command or a digit

  // if c is a 'v', 'P', 'F', 'S' or 'V' wait for the number XX
  if (c=='v' || c=='P' || c=='F' || c=='S' || c=='V'){
    cmd=c;
  }else{
    // maybe c is part of XX number
    if(c>='0' && c<='9'){
      // if c is a digit
      if(cmd1==' '){
        // if cmd1 is empty then c is the first digit
        cmd1 = c;
      }else{
        // if cmd1 is not empty c is the second digit
        menu(cmd, ((cmd1-'0')*10)+(c-'0'));
        cmd = ' ';
        cmd1 = ' ';
      }
    }else{
      // c is not a digit nor 'v', 'P', 'F' or 'S' so just call menu(c, nval);
      menu(c, 0);
    }
  }
}
An adjustment has to be made in the library in SerialMP3Player.cpp, but nothing complicated. The library requires a time span of one second between two statements. This causes problems with the volume slider in the app, because each small move immediately triggers a corresponding instruction. That means, moving the slider from e.g. volume level 10 to 20 would take 10 seconds. All you have to do is comment line 185 (the delay command) in SerialMP3Player.cpp and that’s it.
Before connecting to the smartphone, you can test the whole thing by sending the instructions from the smartphone via a terminal app such as Bluetooth Terminal. The app is available here on Google Play. For example, a “*F*1” should play all songs in directory 01.
Development of the smartphone app
If you have read my last post Controlling Arduino with your smartphone, you can rush through the following explanations.
Actually, learning to develop smartphone apps is quite time-consuming. If you really want to deep-dive into this topic, you should learn Java and deal with development environments like Eclipse or Android Studio. The good news is that there is a simple alternative that is completely sufficient for our purposes and that is called MIT App Inventor. If you follow this link, you will get a lot of information about who is behind this project, how it works, which tutorials tare available (highly recommended as an introduction) and much more. A step-by-step guide would go beyond the scope of this post, but I will try to convey the essential points to you.
How does MIT App Inventor work?
First of all, MIT App Inventor is an online solution, i.e. no program installation is required on your PC. One does not write a single program line during app development, but constructs program blocks visually from prefabricated individual parts. If you’ve ever worked with Scratch, you’ll find yourself here quickly.
What is particularly cool is that you can follow the creation of your apps in real time on your smartphone. This applies to both design and functionality. It is not necessary to compile code in between and beam apk files to the smartphone. You don’t do that until you’re satisfied with your result and the app is supposed to run independently of the development environment.
To connect the smartphone to MIT App Inventor, you must first install the APP MIT AI2 Companion. MIT App Inventor then provides a number or QR code for the connection. Very convenient! I had some problems with Edge, but Chrome did a wonderful job.
Following this link you will get to the development environment (log on with your Google account).
The Designer screen
As already mentioned, I can’t provide step-by-step instructions here, but only explain the concept because it would be too big. The app development takes place in two basic steps, first the design development and then the definition of the functions behind it. For this purpose there are two screens between which you can switch, namely “Designer” and “Blocks”. The designer screen for the Ardu_YX5300_MP3_Player app looks like this:

On the left side you see the menu for the different elements that can be inserted. In the submenu “User Interface” you find buttons, checkboxes, sliders, etc. Under “Layout” there are elements such as horizontal and vertical arrangements, which serve to keep defined spaces between the elements. As expected, the Bluetooth function can be found under connectivity. Just take a look.
The Components window reflects the structure of the components. Here you can also rename components, which is absolutely advisable so as not to lose track. For example, “Playbutton” is a more helpful term than the pre-set “Button1”.
In the “Properties” window you can define the properties of the components, e.g. shape, color or which values are displayed for the sliders. For example, for the Volume Slider, I specified a range from 0 to 30 because that’s the allowed range for the YX5300.
The Blocks screen
The components assembled in the Designer screen can’t do anything at first. What they trigger and under what conditions or how they should change is specified in the Blocks screen:

In the “Blocks” window, you can click on one of the components to get a selection of different blocks to choose from. The selected block will be transferred into the viewer window where it can be moved freely. For example, because a slider can only do certain things, only the corresponding blocks are suggested. This allows you to work quite intuitively and quickly. In addition, under “Built-In” there are general blocks e.g. for text, if-then-else constructs and much more.
Another help is that the blocks are shaped like puzzle pieces. As a result, only certain components fit together and everything must be completed. This avoids syntax errors, but you have to pay attention to the logic errors yourself.
Save and install the app
Finally, you can generate an apk file under the menu item “Build”, which can be conveniently transferred to the smartphone via a QR code.
The project is saved online. You can also export it as a .aia file, save it to your PC, share it with others, and then import it again. You can download the “.aia” file for the Ardu_YX5300_MP3_Player app presented here (click on the link and then on the download symbol on the right side) and customize it as you wish. Alternatively, you can find the project in the gallery of MIT App Inventor if you follow this Link.
Problems with the SD card?
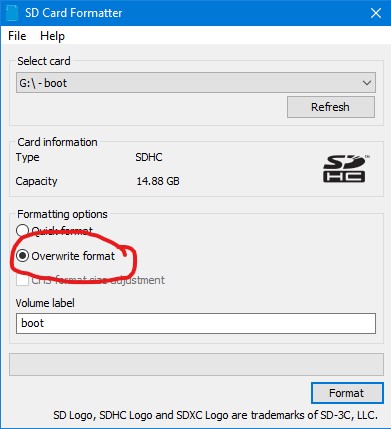
The SD card is not working? I experienced this problem and it took me quite some time to figure out why it happened. If the player does not want to play even though the audio format is correct, the directory structure has been created as required, the wiring is correct, etc., then it may be because of the partitioning of the card. An SD card can have a small boot partition ex works or if it was previously used for other purposes. Accordingly, there are two drives in File Explorer:

Right-clicking and formatting is useless, as the partitions are preserved. When the problem occurred to me, I solved it with the small tool called SD Card Formatter, which is available here, for example. After installation, select the small boot partition (it doesn’t necessarily need to be called “boot”) and activate the “Overwrite Format” formatting option. The process takes several minutes. After that you only have one partition and everything works wonderfully.
Alternative MP3 modules

There are a number of alternatives to the YX5300 MP3 player. You will come across these, e.g. if you search for “MP3 module Arduino” on Amazon. I tried the WTV020M01 module (top right of the photo) and the no-name player on the left side of the photo.
I would very much advise against the WTV020M01, because this device is very tricky in terms of the file format and the details of the audio recording. For example, the level and noise must meet certain specifications. If you still want to do this, there is a very compact instruction available here.
In a separate post I explained the details of the DFPlayer Mini (here). In terms of control, it is very similar to the YX5300. The main advantages are the small size and that it can be operated very easily with buttons. The jack for the headphones is an advantage of the MP3 player YX5300.
The no-name modulet works perfectly, but apparently can only be operated manually. At least I haven’t found a way to communicate with it via software. However, since it starts immediately when it is supplied with power, you could attach an arduino-controlled on/off switch.
I haven’t tried (at least so far) modules based on the VS1053 chip. These are available in various designs, e.g. as shields, with or without SD card slot, with or without microphone, etc. This may also find its way on my to-do list.
Anyone who has had good or bad experiences with these or other alternative modules is welcome to share it as a comment.
Díky moc. Pěkný tutoriál jak přehrávač YX5300 funguje pomocí arduina. Já to mám udělané na arduinu nano a ovládám přehrávač YX5300 IR dálkovým ovládáním. Funguje to perfektně. Bylo by dobré to nějak aplikovat na esp32 a ovládat YX5300 pomocí dat z WIFI a MQTT.
Translation added by Wolfgang: Thank you very much. Nice tutorial on how the YX5300 player works with Arduino. I have it set up on Arduino Nano and control the YX5300 IR player with a remote control. It works perfectly. It would be good to apply this to esp32 and control the YX5300 using data from WIFI and MQTT.
Thank you for your comment. Indeed, this would be a nice extension. But I’m not sure if I will find the time to do this.
After you send a serial command to start playing a track, how long does it take for the track to start playing? Thanks! 🙂
Honest answer: I don’t know. At least I can say I have not noticed a delay and have not measured it. I would guess something it’s something in the range of millisecond range.