About this post
In my last post, I reported on how you use the TCA9548A or simple MOSFETs to control multiple devices with the same I2C address. In this article, I’ll stick to the topic and show you how to use the I2C interfaces of the ESP32. You may also be able to avoid address conflicts this way. This article is not an introduction to the ESP32. I will catch up on this in a separate post. So, I assume you’ve already integrated the ESP32 into your development environment.
Another point that I am particularly concerned about in the article is the options of passing objects to functions or other objects.
I2C interfaces of the ESP32
There are a number of different ESP32 boards available. However, the I2C interfaces of the ESP32 are organized in the same way for all versions (that I am aware of!). The default interface is located at pins 21 (SDA) and 22 (SCL). It can also be assigned to other pins. The second interface is not predefined regarding the pins, i.e. you have to set them before you can use them.

How to use the standard I2C interface
If you only use the default I2C interface, there is no big difference in handling to the Arduino or ESP8266 boards (e.g. Wemos or ESP-01). In most cases, you will use a library for the controlled I2C part.
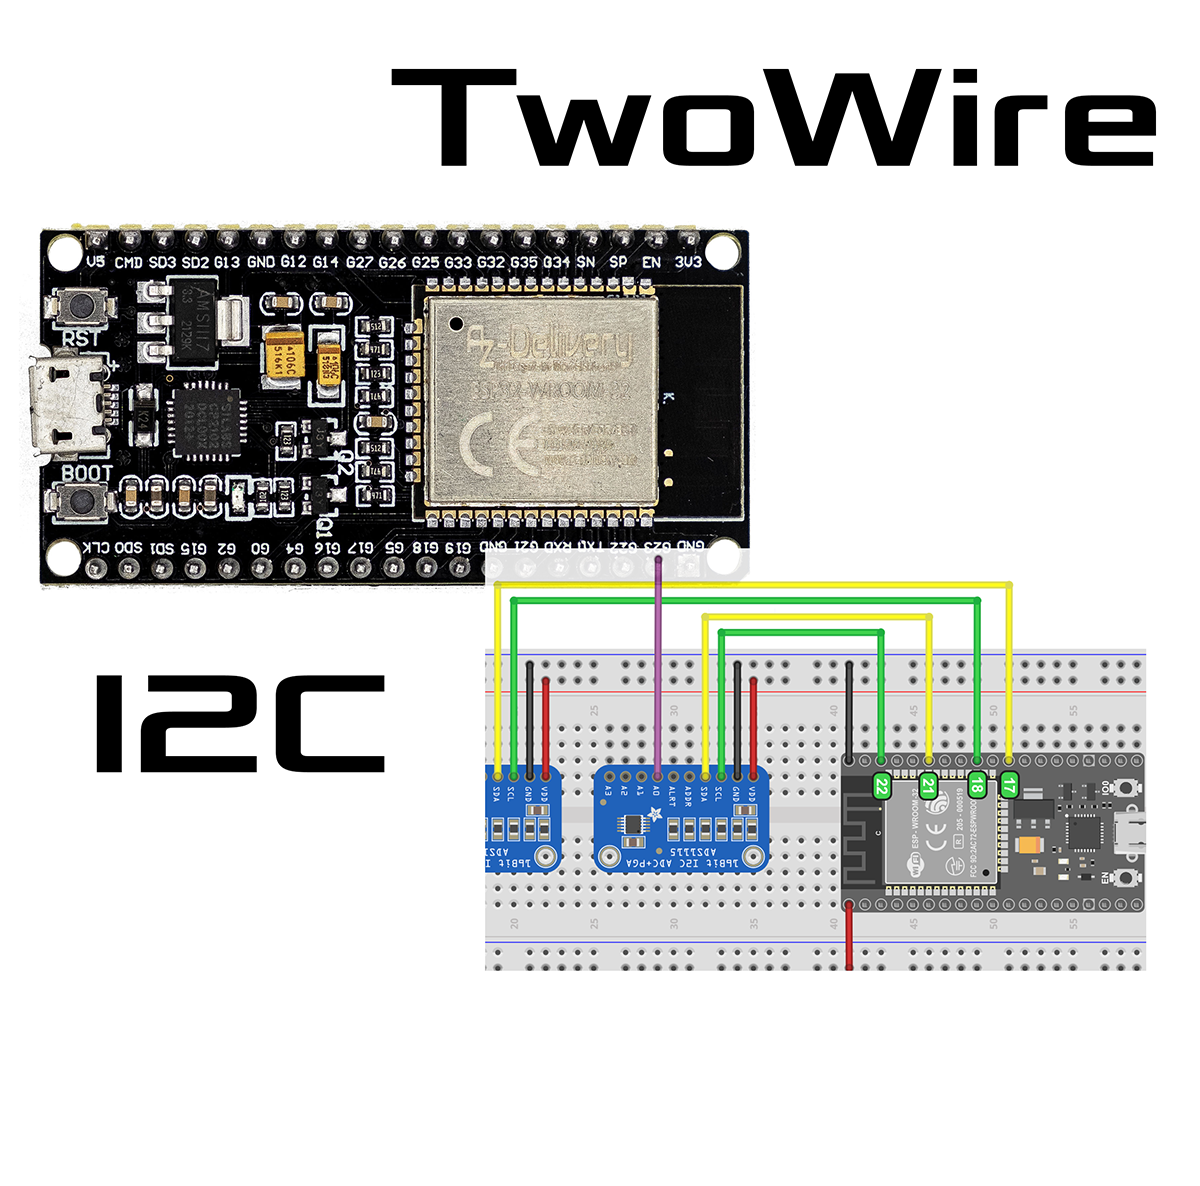
As an example for an I2C device, I use the A/D converter ADS1115again. You don’t have to deal with it in depth to understand the post. Just note that this module requires some initial settings and then converts voltages that are attached to the A0 port. No pull-ups are required for the circuit, since the ADS1115 already provides them.
I use my library ADS1115_WE. The ADS1115 object adc is created with ADS1115_WE adc = ADS1115_WE (ADS1115_I2C_ADDRESS). As usual, the I2C communication is initialized with Wire.begin().
#include<ADS1115_WE.h>
#include<Wire.h>
#define ADS1115_I2C_ADDRESS  0x48

ADS1115_WE adc = ADS1115_WE(ADS1115_I2C_ADDRESS);

void setup() {
  Wire.begin();
  Serial.begin(9600);
  setupAdc();
}

void loop() {
  float voltage = 0.0;

  voltage = adc.getResult_V();
  Serial.print("Voltage [V]: ");
  Serial.println(voltage);

  Serial.println("*********************************");
  delay(1000);
}

void setupAdc(){
  if(!adc.init()){
      Serial.print("ADS1115 not connected!");
    }
    adc.setVoltageRange_mV(ADS1115_RANGE_6144);
    adc.setCompareChannels(ADS1115_COMP_0_GND);
    adc.setMeasureMode(ADS1115_CONTINUOUS);
}
How to use the two I2C interfaces of the ESP32
Variant 1: Define two interfaces
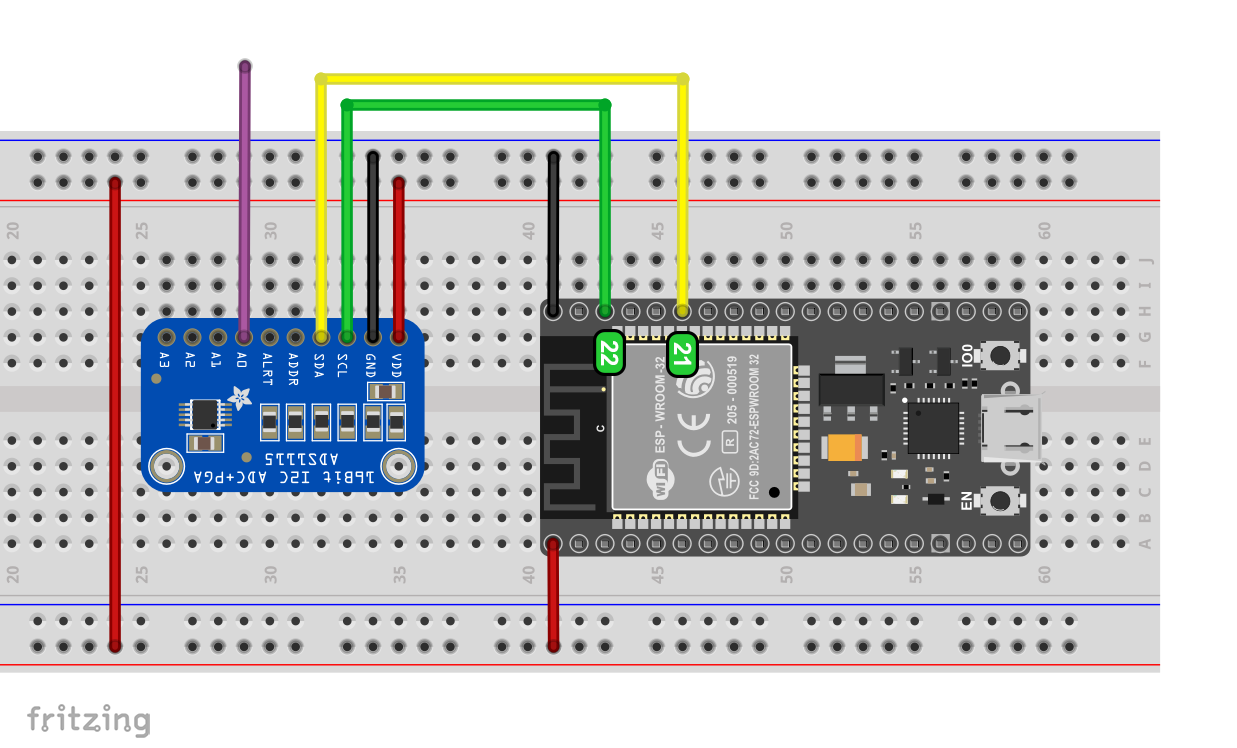
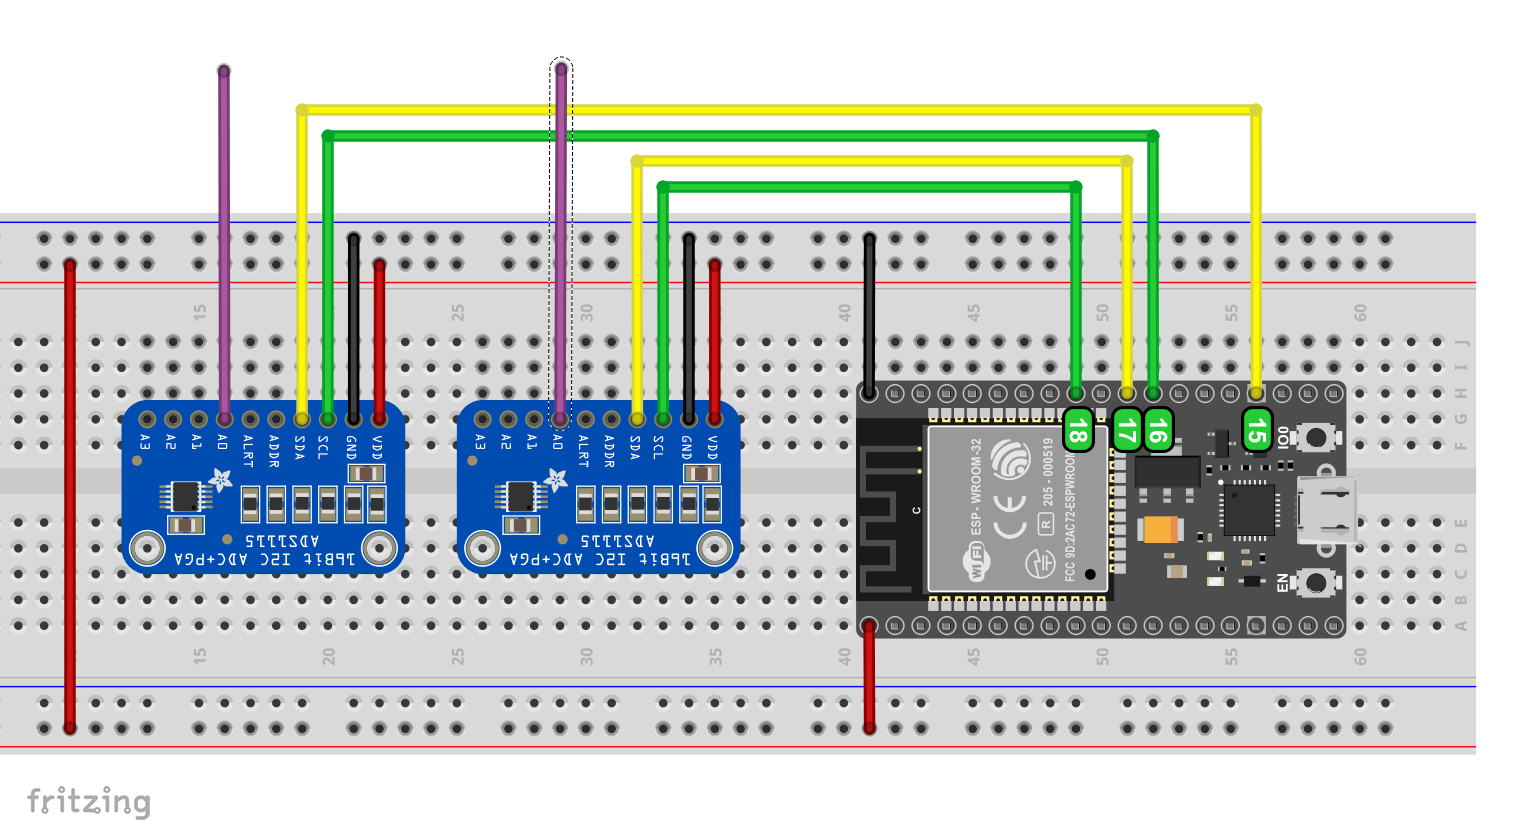
If you want to use both I2C interfaces of the ESP32, you first have to choose two SDA and two SCL pins. They are freely selectable. My choice fell on pins 15, 16, 17 and 18. The wiring of two ADS1115 is not surprising:
For programming you need to know that Wire is an object of the TwoWire class. You don’t usually care, because the object Wire is created with the inclusion of Wire.h. In the first example, instead of wire, we use two self-created objects that we call I2C_1 and I2C_2:
TwoWire I2C_1 = TwoWire(0);
TwoWire I2C_2 = TwoWire(1);
Before you say: Super, then I can create more TwoWire objects (TwoWire I2C_3 = TwoWire(2), etc.) according to this scheme, I have to disappoint you. That doesn’t work. Only 0 and 1 work.
Then you have to assign the SDA and SCL pins to I2C_1 and I2C_2. You do this by calling the begin() function. Optionally, you can pass the I2C frequency. This is what it looks like:
#define SDA_1 15
#define SCL_1 16
#define SDA_2 17
#define SCL_2 18
#define I2C_FREQ 400000
....
....
I2C_1.begin(SDA_1, SCL_1, I2C_FREQ);
I2C_2.begin(SDA_2, SCL_2, I2C_FREQ);
Now you have to assign the I2C interfaces to the objects of your I2C device (which is not supported by every library!). To do this you pass I2C_1 and I2C_2. Depending on the library, this usually has to be done when you initialize the object or with functions like begin() or init(). In most cases, example sketches of the libraries explain the procedure. For the ADS1115_WE library, passing the TwoWire object looks like this:
ADS1115_WE adc_1 = ADS1115_WE(&I2C_1, ADS1115_I2C_ADDRESS);
ADS1115_WE adc_2 = ADS1115_WE(&I2C_2, ADS1115_I2C_ADDRESS);
A TwoWire object has a significant size. Therefore, to save memory space, most libraries do not work with local copies of the objects, but with the objects themselves. For this purpose, the TwoWire object is passed as a pointer, i.e. the receiving function uses pointers as parameters. In the function call I2C_1 and I2C_2 must be preceded by the address operator “&”. If you don’t have any experience with it, it’s certainly confusing at first. I will come back to that further down.
And this is what the complete sketch looks like:
#include<ADS1115_WE.h>
#include<Wire.h>
#define ADS1115_I2C_ADDRESS  0x48
#define I2C_FREQ 400000

#define SDA_1 15
#define SCL_1 16
#define SDA_2 17
#define SCL_2 18

TwoWire I2C_1 = TwoWire(0);
TwoWire I2C_2 = TwoWire(1);

ADS1115_WE adc_1 = ADS1115_WE(&I2C_1, ADS1115_I2C_ADDRESS);
ADS1115_WE adc_2 = ADS1115_WE(&I2C_2, ADS1115_I2C_ADDRESS);

void setup() {
  Serial.begin(9600);

  I2C_1.begin(SDA_1, SCL_1, I2C_FREQ);
  I2C_2.begin(SDA_2, SCL_2, I2C_FREQ);

  setupAdc_1();
  setupAdc_2();
}

void loop() {
  float voltage = 0.0;

  voltage = adc_1.getResult_V();
  Serial.print("Voltage [V], ADS1115 No 1: ");
  Serial.println(voltage);

  voltage = adc_2.getResult_V();
  Serial.print("Voltage [V], ADS1115 No 2: ");
  Serial.println(voltage);

  Serial.println("*********************************");
  delay(1000);
}

void setupAdc_1(){
  if(!adc_1.init()){
    Serial.println("ADS1115 No 1 not connected!");
  }
  adc_1.setVoltageRange_mV(ADS1115_RANGE_6144);
  adc_1.setCompareChannels(ADS1115_COMP_0_GND);
  adc_1.setMeasureMode(ADS1115_CONTINUOUS);
}

void setupAdc_2(){
  if(!adc_2.init()){
    Serial.println("ADS1115 No 2 not connected!");
  }
  adc_2.setVoltageRange_mV(ADS1115_RANGE_6144);
  adc_2.setCompareChannels(ADS1115_COMP_0_GND);
  adc_2.setMeasureMode(ADS1115_CONTINUOUS);
}
The code can be shortened because there are some identical function calls for adc_1 and adc_2. Thus, I introduce functions to which I pass these objects. Again, I don’t work with local copies of the objects, but with the originals. However, here I choose a different method to achieve this, namely using references as parameters. In the function call, for example:
setupAdc(adc_1, 1);
the use of references is not visible. However, in the function itself you can see the difference, and that is the address operator:
void setupAdc(ADS1115_WE &adc, byte i)
This introduces only another identifier for the object within the function.
#include<ADS1115_WE.h>
#include<Wire.h>
#define ADS1115_I2C_ADDRESS  0x48
#define I2C_FREQ 400000

#define SDA_1 15
#define SCL_1 16
#define SDA_2 17
#define SCL_2 18

TwoWire I2C_1 = TwoWire(0);
TwoWire I2C_2 = TwoWire(1);
ADS1115_WE adc_1 = ADS1115_WE(&I2C_1, ADS1115_I2C_ADDRESS);
ADS1115_WE adc_2 = ADS1115_WE(&I2C_2, ADS1115_I2C_ADDRESS);

void setup() {
  Serial.begin(9600);

  I2C_1.begin(SDA_1, SCL_1, I2C_FREQ);
  I2C_2.begin(SDA_2, SCL_2, I2C_FREQ);

  setupAdc(adc_1, 1);
  setupAdc(adc_2, 2);
}

void loop() {
  queryAdc(adc_1, 1);
  queryAdc(adc_2, 2);

  Serial.println("*********************************");
  delay(1000);
}

void setupAdc(ADS1115_WE &adc, byte i){
  if(!adc.init()){
    Serial.print("ADS1115 No ");
    Serial.print(i);
    Serial.println(" not connected!");
  }
  adc.setVoltageRange_mV(ADS1115_RANGE_6144);
  adc.setCompareChannels(ADS1115_COMP_0_GND);
  adc.setMeasureMode(ADS1115_CONTINUOUS);
}

void queryAdc(ADS1115_WE &adc, byte i){
  float voltage = 0.0;

  voltage = adc.getResult_V();
  Serial.print("Voltage [V], ADS1115 No ");
  Serial.print(i);
  Serial.print(": ");
  Serial.println(voltage);
}
Variant 2: Use of Wire and an additional interface
Not because it would have advantages, but for completeness I would like to show that you can also use the predefined Wire object and an additionally created TwoWire object. Compared to the last circuit, only the I2C pins change:

I have called the additional TwoWire object Wire1. It must be created with TwoWire(1). In some places I have read that Wire1 is also predefined just like Wire. But without TwoWire Wire1 = TwoWire(1); it didn’t work for me.
Here’s what the sketch looks like:
#include<ADS1115_WE.h>
#include<Wire.h>
#define ADS1115_I2C_ADDRESS  0x48
#define I2C_FREQ 400000
#define SDA_2 17
#define SCL_2 18

TwoWire Wire1 = TwoWire(1);

ADS1115_WE adc_1 = ADS1115_WE(ADS1115_I2C_ADDRESS);
ADS1115_WE adc_2 = ADS1115_WE(&Wire1, ADS1115_I2C_ADDRESS);

void setup() {
  Serial.begin(9600);

  Wire.begin();
  Wire1.begin(SDA_2, SCL_2, I2C_FREQ);

  setupAdc(adc_1, 1);
  setupAdc(adc_2, 2);
}

void loop() {
  queryAdc(adc_1, 1);
  queryAdc(adc_2, 2);
  Serial.println("*********************************");
  delay(1000);
}

void setupAdc(ADS1115_WE &adc, byte i){
  if(!adc.init()){
      Serial.print("ADS1115 No ");
      Serial.print(i);
      Serial.println(" not connected!");
    }
    adc.setVoltageRange_mV(ADS1115_RANGE_6144);
    adc.setCompareChannels(ADS1115_COMP_0_GND);
    adc.setMeasureMode(ADS1115_CONTINUOUS);
}

void queryAdc(ADS1115_WE &adc, byte i){
  float voltage = 0.0;

  voltage = adc.getResult_V();
  Serial.print("Voltage [V], ADS1115 No ");
  Serial.print(i);
  Serial.print(": ");
  Serial.println(voltage);
}
How to use I2C interfaces of the ESP32 without libraries
In previous examples, the I2C device was defined as an object via a library. If you work without a library, things are easier. Nevertheless, I will show an example using the I2C multiplexer TCA9548A because with this, I can explain the passing of pointers in more detail.
I chose the TCA9548A because it allows you to control additional I2C devices with the same address. So, we’ll stay on topic. In addition, in terms of control, it is the simplest I2C device I could find.
Since I covered the TCA9548A in my last post, I describe it here only roughly: The TCA9548A has an I2C input and eight I2C outputs. The channels are turned on and off by setting or deleting the corresponding bit in the control register. In this way, eight I2C components with the same address can be controlled addressed with one TCA9548A.
This is what it looks like when you connect two TCA9548A to the ESP32:

The following sketch turns on channel 3 of one module and channel 7 of the other:
#include<Wire.h>
#define TCA_I2C_ADDRESS  0x70
#define TCA_1_CHANNEL  3
#define TCA_2_CHANNEL  7
#define I2C_FREQ_1 400000
#define I2C_FREQ_2 400000

#define SDA_1 15
#define SCL_1 16
#define SDA_2 17
#define SCL_2 18

TwoWire I2C_1 = TwoWire(0);
TwoWire I2C_2 = TwoWire(1);

void setup() {
  I2C_1.begin(SDA_1, SCL_1, I2C_FREQ_1);
  I2C_2.begin(SDA_2, SCL_2, I2C_FREQ_2);
  setTCAChannel_1(TCA_1_CHANNEL);
  setTCAChannel_2(TCA_2_CHANNEL);
}

void loop() {
}

void setTCAChannel_1(byte i){
  I2C_1.beginTransmission(TCA_I2C_ADDRESS);
  I2C_1.write(1 << i);
  I2C_1.endTransmission();
}

void setTCAChannel_2(byte i){
  I2C_2.beginTransmission(TCA_I2C_ADDRESS);
  I2C_2.write(1 << i);
  I2C_2.endTransmission();
}
The two setTCAChannel() functions can be merged by passing the TwoWire object as a reference:
void setTCAChannel(byte i, TwoWire &I2C){
  I2C.beginTransmission(TCA_I2C_ADDRESS);
  I2C.write(1 << i);
  I2C.endTransmission();
}
How to pass pointers
However, there is another method, namely passing the objects as pointers. The receiving function looks as follows:
void setTCAChannel(byte i, TwoWire *I2C){
  TwoWire *wire = I2C;
  wire->beginTransmission(TCA_I2C_ADDRESS);
  wire->write(1 << i);
  wire->endTransmission();
}
Passing the object as a pointer has two consequences:
- You cannot apply the point operator to pointers. If you want to use a function of the object to which the pointer points, the equivalent is the arrow operator.
- When calling the above function, the object to be passed must be preceded by the address operator.
And why do I tell all this? Because passing the TwoWire object works this way with most libraries and I can best show it in such a simple example.
The full sketch looks like this:
#include<Wire.h>
#define TCA_I2C_ADDRESS  0x70
#define TCA_1_CHANNEL  3
#define TCA_2_CHANNEL  7
#define I2C_FREQ_1 400000
#define I2C_FREQ_2 400000

#define SDA_1 15
#define SCL_1 16
#define SDA_2 17
#define SCL_2 18

TwoWire I2C_1 = TwoWire(0);
TwoWire I2C_2 = TwoWire(1);

void setup() {
  I2C_1.begin(SDA_1, SCL_1, I2C_FREQ_1);
  I2C_2.begin(SDA_2, SCL_2, I2C_FREQ_2);
  setTCAChannel(TCA_1_CHANNEL, &I2C_1);
  setTCAChannel(TCA_2_CHANNEL, &I2C_2);
}

void loop() {
}

void setTCAChannel(byte i, TwoWire *I2C){
  TwoWire *wire = I2C;
  wire->beginTransmission(TCA_I2C_ADDRESS);
  wire->write(1 << i);
  wire->endTransmission();
}
Update of my libraries
I’ve published a number of libraries on GitHub. With one exception, I’ve revised them over the last few weeks to allow TwoWire objects to be passed as an option. You find the libraries here.
Acknowledgement
I found the Fritzing component for the ESP32 here in the Fritzing Forum. Thanks to the designers.
Soooo, the max adcs I can connect to an esp32 is 2? Or can I connect 4 adcs to each I2C interfaces? Having in the end 8 adcs total connected to an esp32. You wrote that in your gitHub page and I was wondering how is that possible..?
Hi, as long as the I2C devices have different I2C addresses, you can attach as many of them as you want to the two interfaces. Most I2C devices have 7-bit addresses, which would mean there are 128 (0 – 127) different addresses. Since some are reserved, the number is reduced to 112 as far as I know. So, this is the number of I2C devices you can attach to one I2C interface – at least in theory.
In the case of the ADS1115, the limiting factor is the number of different I2C-addresses you can set, which is 4. So, 8 in total. If you need more, you can use an I2C multiplexer like the tca9548:
https://wolles-elektronikkiste.de/en/tca9548a-i2c-multiplexer
Thank you for your fast reply!
I see what you mean but how can I assign the I2C interfaces to the objects of my I2C device, since I can only create 2 TwoWire objects (TwoWire(0) and TwoWire(1)) ? Or I can create various TwoWire(0) and TwoWire(1), two for each adress? Like so:
#define I2C_ADDRESS_1 0x48
#define I2C_ADDRESS_2 0x49
#define I2C_FREQ 400000
(…)
TwoWire I2C_1 = TwoWire(0);
TwoWire I2C_2 = TwoWire(1);
ADS1115_WE adc_1 = ADS1115_WE(&I2C_1, I2C_ADDRESS_1);
ADS1115_WE adc_2 = ADS1115_WE(&I2C_2, I2C_ADDRESS_1);
TwoWire I2C_3 = TwoWire(0);
TwoWire I2C_4 = TwoWire(1);
ADS1115_WE adc_3 = ADS1115_WE(&I2C_3, I2C_ADDRESS_2);
ADS1115_WE adc_4 = ADS1115_WE(&I2C_4, I2C_ADDRESS_2);
Hi,
yes, it should work like this. Maybe a bit less confusing version:
#define ADS1115_I2C_ADDRESS_A  0x48
#define ADS1115_I2C_ADDRESS_B  0x49
#define I2C_FREQ 400000

#define SDA_1 15
#define SCL_1 16
#define SDA_2 17
#define SCL_2 18

TwoWire I2C_1 = TwoWire(0);
TwoWire I2C_2 = TwoWire(1);

ADS1115_WE adc_1A = ADS1115_WE(&I2C_1, ADS1115_I2C_ADDRESS_A);
ADS1115_WE ads_1B = ADS1115_WE(&I2C_1, ADS1115_I2C_ADDRESS_B);
ADS1115_WE adc_2A = ADS1115_WE(&I2C_2, ADS1115_I2C_ADDRESS_A);
ADS1115_WE_adc_2B = ADS1115_WE(&I2C_2, ADS1115_I2C_ADDRESS_B);

void setup() {
  Serial.begin(9600);

  I2C_1.begin(SDA_1, SCL_1, I2C_FREQ);
  I2C_2.begin(SDA_2, SCL_2, I2C_FREQ);

  setupAdc_1A();
  setupAdc_1B();
  setupAdc_2A();
  setupAdc_2B();
}
Or, even better, you create an array of objects:
#include<ADS1115_WE.h> #include<Wire.h> #define ADS1115_I2C_ADDRESS_A 0x48 #define ADS1115_I2C_ADDRESS_B 0x49 #define I2C_FREQ 400000 #define SDA_1 15 #define SCL_1 16 #define SDA_2 17 #define SCL_2 18 TwoWire I2C_1 = TwoWire(0); TwoWire I2C_2 = TwoWire(1); ADS1115_WE adc[4]; void setup() { Serial.begin(9600); adc[0] = ADS1115_WE(&I2C_1, ADS1115_I2C_ADDRESS_A); adc[1] = ADS1115_WE(&I2C_1, ADS1115_I2C_ADDRESS_B); adc[2] = ADS1115_WE(&I2C_2, ADS1115_I2C_ADDRESS_A); adc[3] = ADS1115_WE(&I2C_2, ADS1115_I2C_ADDRESS_B); I2C_1.begin(SDA_1, SCL_1, I2C_FREQ); I2C_2.begin(SDA_2, SCL_2, I2C_FREQ); for(int i=0; i<4; i++){ setupAdc(&adc[i], i); } } void loop() { for(int i=0; i<4; i++){ float voltage = adc[i].getResult_V(); Serial.print("ADC["); Serial.print(i); Serial.print("]: "); Serial.println(voltage); } delay(1000); } void setupAdc(ADS1115_WE *adcElement, int i){ if(!adcElement->init()){ Serial.print("ADS1115 No "); Serial.print(i); Serial.println(" not connected!"); } adcElement->setVoltageRange_mV(ADS1115_RANGE_6144); adcElement->setCompareChannels(ADS1115_COMP_0_GND); adcElement->setMeasureMode(ADS1115_CONTINUOUS); }Hey again, sorry for the silence but I had to back up from this project for a bit. Thank you again for the fast answers!
Now I’m back and I have a question regarding the wiring. In this case, I am creating two objects from the same sda and scl pins. So how do I do the wiring? Do i connect two adcs to the same pins? How will the esp-32 distinguish that?
Maybe I got everything wrong, but in the cript you sent we were trying to connect 4 adc’s to one esp-32 right? So physically I do not know how to wire the 4 adc’s to the esp32. Can you help me please?
You connect all SDA pins of your adcs to the SDA pin (21 in most cases) of the ESP32, and you connect all SCLs of your adcs to the SCL pin (22 in most cases) of your ESP32. Your adcs need to have different addresses. For most I2C devices it is possible to set different I2C addresses. When you use ADS1115 modules, you can set their address by connecting their address pin to certain other pins:
GND – 0x48
VCC – 0x49
SDA – 0x4A
SCL – 0x4B
You can check the correct setting with an I2C scanner sketch: https://wolles-elektronikkiste.de/en/i2c-scanner
For two ADS1115 modules, the sketch would start like this:
#include<ADS1115_WE.h> #include<Wire.h> #define ADS1115_I2C_ADDRESS_1 0x48 #define ADS1115_I2C_ADDRESS_2 0x49 ADS1115_WE adc1 = ADS1115_WE(ADS1115_I2C_ADDRESS_1); ADS1115_WE adc2 = ADS1115_WE(ADS1115_I2C_ADDRESS_2); void setup() { if(!adc1.init()){ Serial.print("ADS1115 #1 not connected!"); } if(!adc2.init()){ Serial.print("ADS1115 #2 not connected!"); } .........Thank you. But for 5 adcs I need to use the twowire objects. And for that I need to define the sda and scl pins:
#define SDA_1 15
#define SCL_1 16
#define SDA_2 17
#define SCL_2 18
#define SDA_3 19
#define SCL_3 20
But still connect them all to the 21 and 22 pins like you said? I tried it with the following script and does not work. And I know that for this esp32 the 21 and the 22 pins work for 1 adc. So I do not understand what is wrong.
#include
#include
#define I2C_ADDRESS_1 0x48
#define I2C_ADDRESS_2 0x49
#define I2C_ADDRESS_3 0x4A
#define I2C_FREQ 400000
#define SDA_1 15
#define SCL_1 2
#define SDA_2 4
#define SCL_2 16
#define SDA_3 17
#define SCL_3 5
//first address, can have two interfaces
TwoWire I2C_1 = TwoWire(0);
TwoWire I2C_2 = TwoWire(1);
ADS1115_WE adc[5];
void setup() {
Serial.begin(9600);
adc[0] = ADS1115_WE(&I2C_1, I2C_ADDRESS_1);
adc[1] = ADS1115_WE(&I2C_1, I2C_ADDRESS_2);
adc[2] = ADS1115_WE(&I2C_1, I2C_ADDRESS_3);
adc[3] = ADS1115_WE(&I2C_2, I2C_ADDRESS_1);
adc[4] = ADS1115_WE(&I2C_2, I2C_ADDRESS_2);
I2C_1.begin(SDA_1, SCL_1, I2C_FREQ); //e os outros pins??
I2C_2.begin(SDA_2, SCL_2, I2C_FREQ);
for(int i=0; i<5; i++){
setupAdc(&adc[i], i);
}
}
………
Meanwhile I got it! Thank you very much.
🙂 Happy to hear that!
Great post! I appreciated the detailed explanation of the I2C interface on the ESP32. The examples were super helpful for my own projects. Looking forward to more tips and tricks!
Thank you so much, this is very kind!
Hello
I have a problem of connecting the TCA9548A and the LCD screen simultaneously to esp32 using two I2C interfaces, i try with this tutorial to resolve this problem but in vain, either the LCD work alone or the TCA9548A.
Do you have any information about this issue
Thanks in advance
Hello, I think I need some more information. In theory, if you are using the two interfaces the devices connected should not interfere. What is the issue? Do you get compiler errors?
No i don’t have any compiler errors.
In fact in my project, i used TCA9548A to control 3 distance sensors VL53L0X in order to mesure the dimensions of an object and the LCD screen is used to display values of this dimensions.
i defined (GPIO 21 and GPIO 22) as the first I2C bus for the TCA9548A, and (GPIO 33 and GPIO 32) as the second I2C bus for the LCD.
The problem is either TCA9548A works correctly and i have correct values on the serial monitor but the LCD does not display anything or i have a display of wrong values that’s mean in this case TCA9548A does not work.
I have no immediate idea what could be the problem. If you like, you can send me your sketch by e-mail: wolfgang.ewald@wolles-elektronikkiste.de. Maybe I find the issue in the code.
Any thoughts on how to send data (i.e. jpeg frames) from an ESP32CAM to another device via i2c? Since the camera (and sdcard) use i2c some tweaking is needed and perhaps your expertise can assist?
I have not yet tried something like this. In theory it should be possible. If the data is for example on an sd card you can read it from there in chunks send it by I2C and store it on the other side. One issue is the limit of the wire.write() buffer which is 32 bytes. That means between begin.transmission() and end.transmission() only 32 bytes can be put into write commands. For a big jpeg file this might be quite a lengthy process. Sorry this is all I can say at the moment. I would have to try myself.
Thanks so much for the quick response Wolfgang.
The ’32 byte buffer’ is an interesting note that I hadn’t realized – that’s a show stopper considering one single jpeg frame is several thousand bytes depending on resolution.
Makes me wonder how it handles xfering the stream to sdcard since that is done via i2c?
My goal is to xfer the jpeg frames in realtime to a rpi via wired connection. Any thoughts on an alternate way to go about this? Just plain UART?
Hi Jay, I have to correct myself. For the ESP32 the wire.write buffer is bigger. It’s 128 bytes:
https://forum.arduino.cc/t/what-is-the-wire-buffer-limit-on-the-esp32/649989
I am not sure about the limits for Serial or SPI. Need to dig in the net.
Hi, thanks for the tutorial, In my case when compiling I get the following error:
C:\Users\C4R3HL\Documents\Arduino\ADS1115_ESP32_EJEMPLO_LIBRERIA_WE\ADS1115_ESP32_EJEMPLO_LIBRERIA_WE.ino: In function ‘void setup()’:
ADS1115_ESP32_EJEMPLO_LIBRERIA_WE:20:37: error: call of overloaded ‘begin(int, int, int)’ is ambiguous
I2C_1.begin(SDA_1, SCL_1, I2C_FREQ);
^
In file included from C:\Users\C4R3HL\Documents\Arduino\libraries\ADS1115_WE-master\src/ADS1115_WE.h:33,
from C:\Users\C4R3HL\Documents\Arduino\ADS1115_ESP32_EJEMPLO_LIBRERIA_WE\ADS1115_ESP32_EJEMPLO_LIBRERIA_WE.ino:1:
C:\Users\C4R3HL\AppData\Local\Arduino15\packages\esp32\hardware\esp32\2.0.4\libraries\Wire\src/Wire.h:79:10: note: candidate: ‘bool TwoWire::begin(int, int, uint32_t)’
bool begin(int sda=-1, int scl=-1, uint32_t frequency=0); // returns true, if successful init of i2c bus
^~~~~
C:\Users\C4R3HL\AppData\Local\Arduino15\packages\esp32\hardware\esp32\2.0.4\libraries\Wire\src/Wire.h:80:10: note: candidate: ‘bool TwoWire::begin(uint8_t, int, int, uint32_t)’
bool begin(uint8_t slaveAddr, int sda=-1, int scl=-1, uint32_t frequency=0);
^~~~~
ADS1115_ESP32_EJEMPLO_LIBRERIA_WE:21:37: error: call of overloaded ‘begin(int, int, int)’ is ambiguous
I2C_2.begin(SDA_2, SCL_2, I2C_FREQ);
^
In file included from C:\Users\C4R3HL\Documents\Arduino\libraries\ADS1115_WE-master\src/ADS1115_WE.h:33,
from C:\Users\C4R3HL\Documents\Arduino\ADS1115_ESP32_EJEMPLO_LIBRERIA_WE\ADS1115_ESP32_EJEMPLO_LIBRERIA_WE.ino:1:
C:\Users\C4R3HL\AppData\Local\Arduino15\packages\esp32\hardware\esp32\2.0.4\libraries\Wire\src/Wire.h:79:10: note: candidate: ‘bool TwoWire::begin(int, int, uint32_t)’
bool begin(int sda=-1, int scl=-1, uint32_t frequency=0); // returns true, if successful init of i2c bus
^~~~~
C:\Users\C4R3HL\AppData\Local\Arduino15\packages\esp32\hardware\esp32\2.0.4\libraries\Wire\src/Wire.h:80:10: note: candidate: ‘bool TwoWire::begin(uint8_t, int, int, uint32_t)’
bool begin(uint8_t slaveAddr, int sda=-1, int scl=-1, uint32_t frequency=0);
^~~~~
exit status 1
call of overloaded ‘begin(int, int, int)’ is ambiguous
What could I do in that case?
Thanks in advance.
Hi Carlos,
there are quite a lot of sketches in this tutorial – which one is not working? Or have modified one of the sketches and after modification it is not working anymore? In this case, if you want, you can send me your sketch and I have a look. My e-mail is: wolfgang.ewald@wolles-elektronikkiste.de
Regards, Wolfgang
Did you create two new interfaces because both devices have the same I2C address?
If I want to use an RTC and a BME280 with different addresses can I use one extra interface?
Yes, the same I2C address – that’s the advantage of using the two interfaces!