
About the post
In my series about light, gesture, motion and distance sensors, I will introduce the ambient light and proximity sensor module AP3216. This can be found in online shops also as “CJMCU 3216”. I explain the operating principle, go into the technical data and then present my Arduino library AP3216_WE, which is available here on Github. Or you install it via the Arduino IDE library management.
A summary of this series of posts can be found here.
The operating principle
In terms of functionality and range, the AP3216 is very reminiscent of the VL6180X, which I presented in an earlier post. However, the AP3216 has a different operating principle.
The AP3216 has two photo diodes. One detects light in the visible, the other in the infrared range. The photodiode voltages are amplified and digitized with an A/D converter. The result for the visible light is stored by the AP3216 as a 16 bit value in the ALS data register (ALS = ambient light sensor). The result from the IR measurement is stored as a 10 bit value in the IR data register.
For the distance measurement, an LED emits infrared light. The IR photodiode detects the reflected radiation in addition to the ambient IR light. From this, the AP3216 calculates the distance as a 10 bit value and stores it in the PS data register (PS = proximity sensor).
The data stored in the ALS data register can be converted into lux values using factors listed in the data sheet. The PS value, on the other hand, cannot be converted directly into a distance.
Specifications of the AP3216 sensor
Strictly speaking, the actual sensor of the module is the AP3216C. A data sheet for this component can be found here, for example. I found a few inconsistent information in it and also an error. Overall, the data sheet therefore seems somehow “unfinished” (perhaps this is why version 0.86?). Nevertheless, one can work with it.
The most important technical data or properties are:
- Ambient light sensor:
- four adjustable lux ranges
- calibration function
- proximity sensor (PS):
- Range: 2 cm up to approx. 30 cm, depending on the settings
- calibration function
- four gain levels
- adjustable measuring times
- IR LED:
- setting the number of pulses per measurement
- setting the LED current
- Interrupt function: for PS and ALS or both; active-low
- continuous or single shot measurements
- supply voltage VCC and VLED: 2.4 – 3.6 volts
- communication: I2C, address 0x1E (not variable)
- power consumption:1.7 mA, measured for the AP3216_Continuous sketch using the circuit shown below (i.e. including level converter)
- power down function
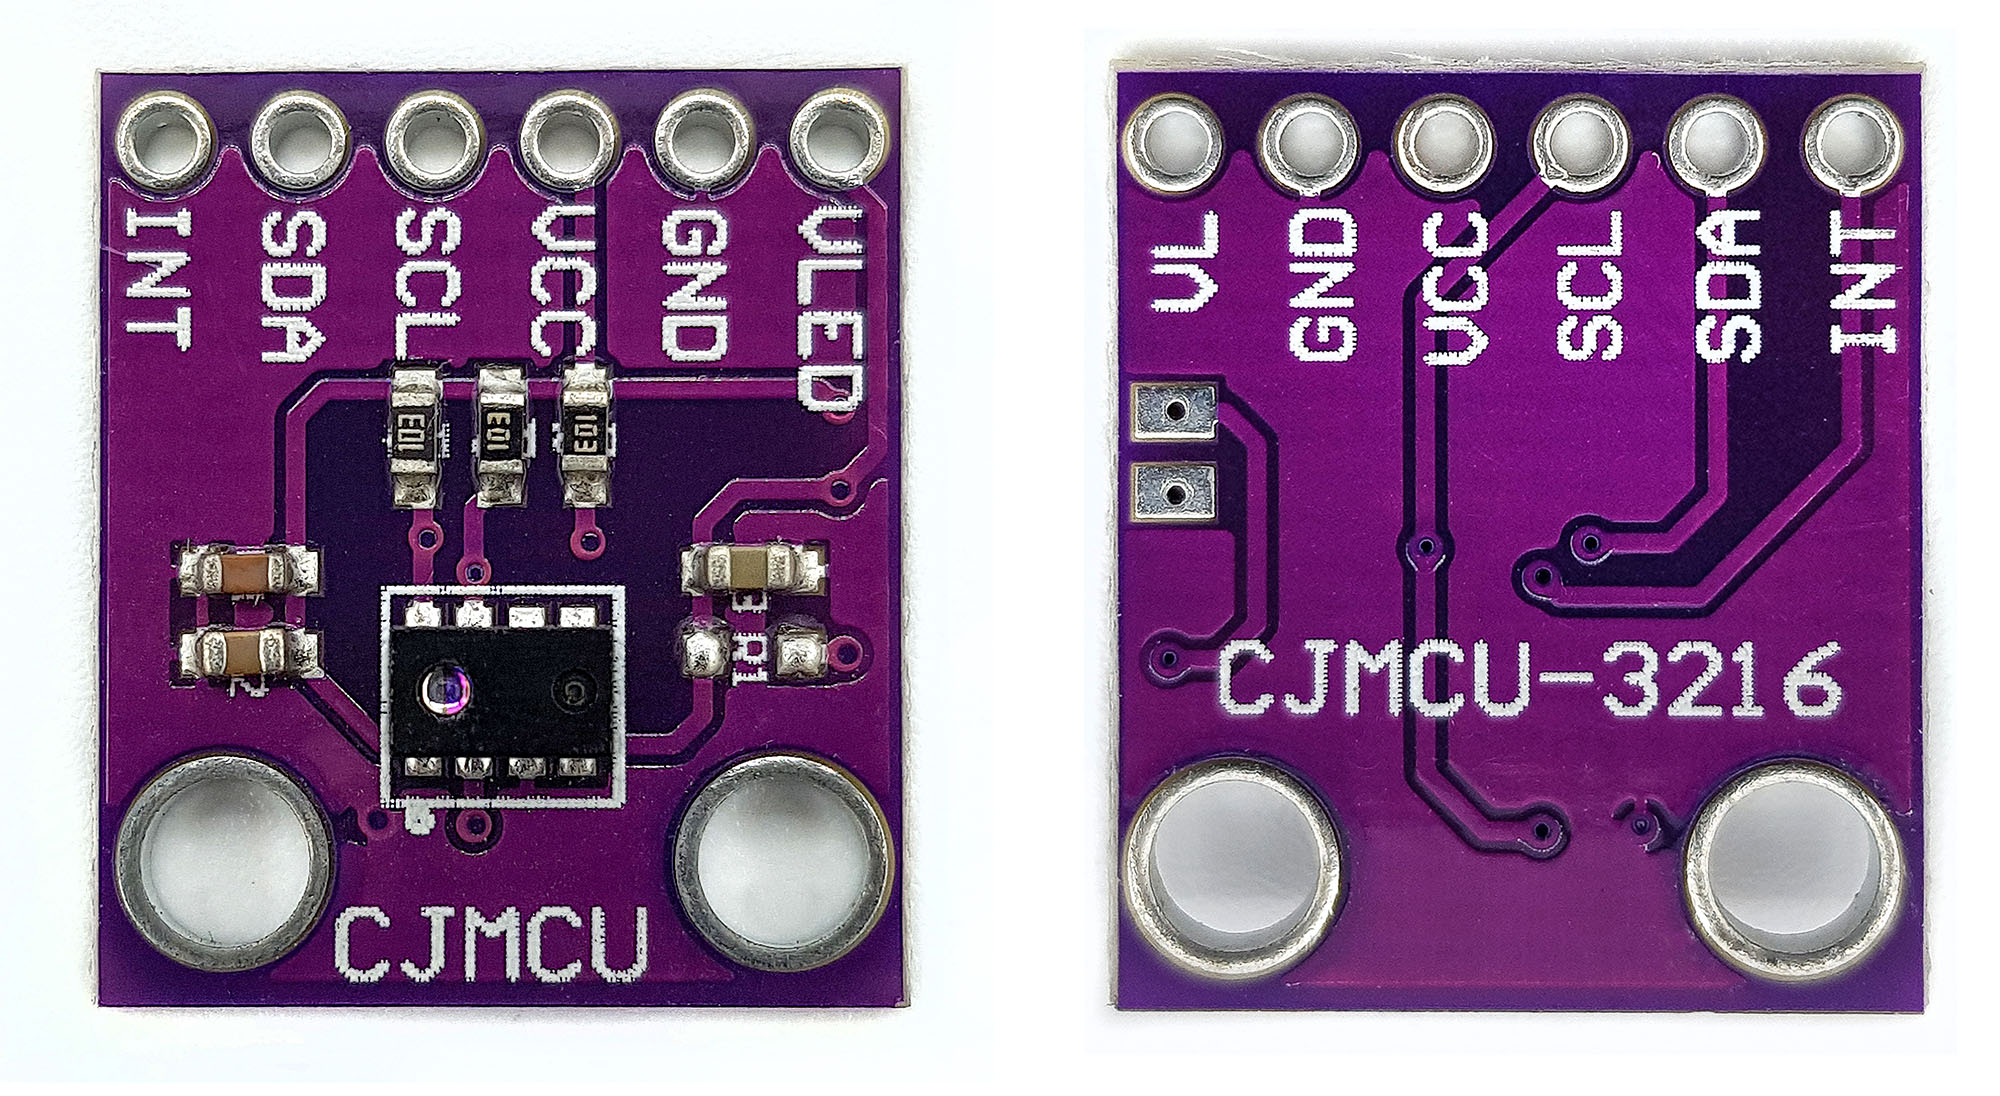
Special features of the AP3216 module
The module appears to have implemented the typical circuit listed in the data sheet. These include capacitors to stabilize the power supply and pull-up resistors for the I2C lines and the interrupt pin. VCC and VLED (i.e. the power supply of the IR LED) have separate inputs. However, they can be connected by connecting the two jumper connectors on the back of the module. In this case, you can do without one of the connections.

The module has no voltage control. Accordingly, the voltage at VCC/VLED is directly connected to the sensor. Therefore, 5 volts must not be used. This applies to both VCC/VLED and I2C lines. For this reason, when using an Arduino UNO or other 5V board, you should use a voltage divider or logic level converter.
You can get the module in a fairly wide price range (€1.50 – €6.50) on Amazon or in a slightly larger selection on eBay. The shops are mainly located in China. You must therefore expect a longer delivery time.
Measurements and parameters of the AP3216
If the following section gets too boring, install the library first and just try the example sketches. If you have any questions, you can come back to this section.
ALS measurement
For the ALS measurement you can choose between four ranges. Unfortunately, the range information on the first page of the data sheet differs from later ones. For various reasons, the range information from the back seems to be the right one. That’s why I implemented this in my library.
A wide range allows the measurement of high lux values, but the resolution is lower. A narrower range, on the other hand, offers a correspondingly high resolution:
- 0 – 20661 lux (default): 0.35 lux / count
- 0 – 5162 lux: 0.788 lux / count
- 0 – 1291 lux: 0.0197 lux / count
- 0 – 323 lux: 0.0049 lux / count
An ALS measurement takes about 100 milliseconds. The measurement can be performed continuously or as a single shot. In single shot mode, the AP3216 enters power down mode after measurement. In power down mode, the AP3216 consumes only a few microamperes.
A query of measured values always returns the value that is currently in the data register. So, especially in single shot mode, you have to make sure that you leave enough time between initializing the measurement and reading the result.
If the AP3216 is installed behind a window, the ALS values are correspondingly lower due to absorption and reflection than without a window. Therefore, the AP3216 offers the option to store a calibration factor. You calculate this as follows:
Cal factor = (ALS value without window) / (ALS value with window)
Values between 1 (default) and 3.98 are allowed.
PS measurement
The setting options for the PS (distance) measurement are quite varied. I’ll explain it only briefly here, but you should get along with the example sketches and the function list you’ll find below.
First of all, you can choose between a continuous shot and a single shot mode for the PS measurements. It is important that ALS and PS measurements take place one after the other. Accordingly, the measuring frequency is determined by the sum of both measuring times. The measuring time (mean time) of a PS measurement can be set between 12.5 and 50 milliseconds. In my experience, a high value does offer great benefit in range or repeatability. I therefore recommend keeping the default of 12.5 milliseconds.
The integration time changes the conversion time of the A/D converter. This has a significant effect on resolution and range. You can try changing the default 1 to a new value of 8. The noise goes almost down to zero, and the range increases to a multiple.
In addition, you can set the following parameters:
- Gain factor (gain)
- brings higher PS values, but also more noise; In terms of range, I couldn’t see a big effect.
- LED current: the default value of 100% can be reduced in stages
- saves power, but also reduces range
- Waiting Time: waiting time factor x between measurements; waiting time = x times (ALS measuring time + PS measuring time)
- here is an error in the data sheet: the factor must be 6 bits wide (i.e. max 63) and not 5 as specified
- Pulse count: number of IR pulses per measurement
- Calibration value: a fixed value that is subtracted from the PS values
Interrupt settings
You can set thresholds for both the PS values and the ALS values outside which an interrupt is triggered. The interrupt pin is active-low. I have implemented a function that allows you to enter the ALS limits as Lux values. However, you must make sure that you do not exceed the lux range because the ALS limit in lux is divided by the resolution and the resulting value must not exceed 65535 (ALS threshold register).
Then you can set the interrupt mode for PS measurements:
- Zone mode: Interrupt is always triggered when measured values are outside the specified limits
- Hysteresis mode: The interrupt is not triggered until the upper threshold is exceeded. After that, interrupts are triggered again and again until the values are below the lower threshold.
In addition, you can set the following parameters:
- Interrupt deletion: Manual or deletion by reading out the data registers
- Interrupt filter: triggering the interrupt after n measurements outside the limits; separate information for ALS and PS
Infrared value measurement
There are no separate setting parameters for infrared light measurement.
The AP3216_WE Library
You can download the library including the example sketches here from Github. To make it easier to use the library, I’ve compiled a list of features:

The circuit for the examples
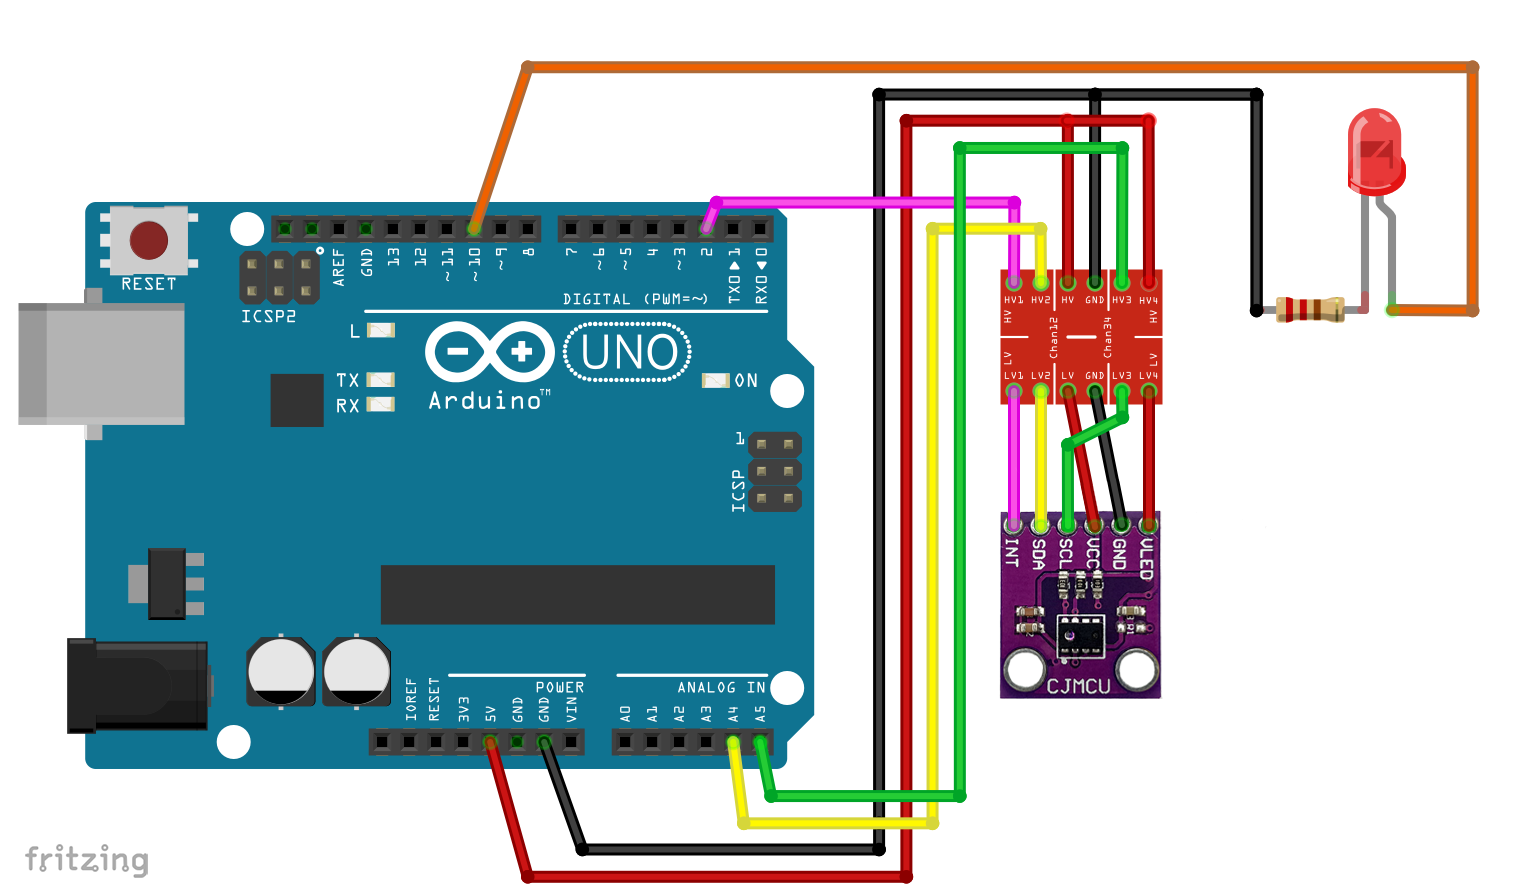
In addition to the predetermined connections for VCC, VLED, SDA and SCL, I connected the interrupt output to pin 2 of the Arduino and added an LED to pin 10 to the circuit for displaying interrupts. Everything looks a bit confusing due to the level converter. But there is also a level converter that fits perfectly to the AP3216_WE (I just didn’t have it as a Fritzing component):

A level converter with such a pin assignment is available here at Amazon.
Example sketch for the AP3216
Continuous measurement
I have added many comments to the AP3216_Continuous Sketch. It is therefore a good starting point.
The sketch uses continuous ALS, PS and IR measurement. It also uses the “Object is near” function and checks whether there is an IR overflow. Just play with the settings.
#include <Wire.h>
#include <AP3216_WE.h>

AP3216_WE myAP3216 = AP3216_WE();
// You can also pass a TwoWire object such as wire2:
// AP3216_WE myAP3216 = AP3216_WE(&wire2);

void setup() {
  Serial.begin(9600);
  Wire.begin();
  myAP3216.init();

 /*
  * Choose between the modes:
  * AP3216_ALS: ambient light continuous
  * AP3216_PS: proximity sensor continous
  * AP3216_ALS_PS: ambient Light and Proximity Sensor continuous (default)
  * AP3216_ALS_ONCE: ambient light single
  * AP3216_PS_ONCE: proximity sensor single
  * AP3216_ALS_PS_ONCE: ambient light and proximity sensor single
  * AP3216_POWER_DOWN: switch off
  * AP3216_RESET: reset
  */
  myAP3216.setMode(AP3216_ALS_PS_ONCE); // Uncomment and adjust if needed

   /*
   * Choose between 4 Lux Ranges:
   * RANGE_20661 (default), RANGE_  RANGE_5162, RANGE_1291, RANGE_323
   * RANGE_x means range is from 0 to x Lux. Smaller range = higher resolution.
   */
  myAP3216.setLuxRange(RANGE_20661);

   /*
   * Choose between 4 gain values: 1, 2(default), 4, 8
   * higher gain increases sensitivity as well as noise - 2 is good.
   */
  myAP3216.setPSGain(2);

  /*
   * Choose between 1(default),2,3,4 pulses of LED IR for proximity
   * more pulses increase (slightly) the max. distance
   */
  myAP3216.setNumberOfLEDPulses(1);

  /*
   * Choose meantime for proximity measurement: PS_MEAN_TIME_50, PS_MEAN_TIME_37_5, PS_MEAN_TIME_25, PS_MEAN_TIME_12_5
   * ==> 50, 37.5, 25 or 12.5 milliseconds; longer meantime provides less spreaded values
   */
  myAP3216.setPSMeanTime(PS_MEAN_TIME_50);

  /*
   * Choose lower and upper proximity threshold for "objectIsNear" function, not needed if function is not used
   */
  myAP3216.setPSThresholds(300, 800);

  /*
   * If you want to increase the max distance, this function helps. Choose value between 1 and 16.
   *
   */
  myAP3216.setPSIntegrationTime(1);

  /*
   * the PS calibration value is substracted from the measured proximity value. Choose value between 0 and 512.
   */
  //myAP3216.setPSCalibration(150);

  /*
   * Choose between INT_MODE_HYSTERESIS (default) and INT_MODE_ZONE. The "objectIsNear" function only works with this mode.
   */
  myAP3216.setPSInterruptMode(INT_MODE_HYSTERESIS);

  /*
   * ALS calibration is necessary when the sensor is installed behind a window. E.g. if an ALS value is 80% behind a window
   * then select 100/80 = 1.25 as calibration factor.
   */
  //myAP3216.setALSCalibrationFactor(1.25); // uncomment if needed

  delay(1000); // without delay the first values will be zero
}

void loop() {
  float als = myAP3216.getAmbientLight();
  unsigned int prox = myAP3216.getProximity();
  unsigned int ir = myAP3216.getIRData(); // Ambient IR light
  bool isNear = myAP3216.objectIsNear();
  bool irIsValid = !myAP3216.irDataIsOverflowed();

  Serial.print("Lux: "); Serial.print(als);
  Serial.print("  Proximity: "); Serial.print(prox);
  Serial.print("  Object near? ");

  if(isNear){
    Serial.print("Yes");
  }
  else{
    Serial.print("No");
  }
  Serial.print("  Infrared: "); Serial.print(ir);
  Serial.print("  Valid: "); Serial.println(irIsValid);

  delay(1000);
}
Single shot measurements
In single shot mode (“Once”) each measurement is triggered manually via the setMode function. The getAmbientLight and getProximity functions simply read out what they currently find in the datastore. Try it by disabling line 20. You always get the same values measured at the beginning.
If you do not wait long enough between triggering the measurement and reading the result, you will get the previously determined value. A sufficiently long delay can prevent this. Alternatively, you can set PS / ALS thresholds, which measured values will definitely exceed. You will then be informed by interrupt when the measured value is available and then you query it.
#include <Wire.h>
#include <AP3216_WE.h>

AP3216_WE myAP3216 = AP3216_WE();
// You can also pass a TwoWire object such as wire2:
// AP3216_WE myAP3216 = AP3216_WE(&wire2);

void setup() {
  Serial.begin(9600);
  Wire.begin();
  myAP3216.init();
  myAP3216.setLuxRange(RANGE_20661);
  myAP3216.setMode(AP3216_ALS_PS_ONCE);
  delay(1000);
}

void loop() {
  float als = myAP3216.getAmbientLight();
  unsigned int prox = myAP3216.getProximity();
  Serial.print("Lux: "); Serial.print(als);
  Serial.print("  Proximity: "); Serial.println(prox);
  myAP3216.setMode(AP3216_ALS_PS_ONCE); // initiates next measurement
  delay(1000);
}
Using the interrupt function
In this sketch I implemented the interrupt function for both the PS and the ALS measurement. The sketch also detects and reports when the interrupt conditions for ALS and PS are met in a measurement cycle.
Unless you do not uncomment lines 39 and 40, no data will be read out. Therefore, the interrupt must be deleted manually.
#include <Wire.h>
#include <AP3216_WE.h>
byte interruptPin=2;
byte ledPin=10;
volatile bool event = false;

AP3216_WE myAP3216 = AP3216_WE();
// You can also pass a TwoWire object such as wire2:
// AP3216_WE myAP3216 = AP3216_WE(&wire2);

void setup() {
  pinMode(ledPin, OUTPUT);
  pinMode(interruptPin, INPUT);
  attachInterrupt(digitalPinToInterrupt(interruptPin), blink, FALLING);
  Serial.begin(9600);
  Wire.begin();
  myAP3216.init();
  myAP3216.setLuxRange(RANGE_20661);

  /*
   * Interrupts can be cleared manually if CLR_INT_MANUALLY (or 1) is chosen
   * Interrupts will be cleared by reading PS or ALS data if CLR_INT_BY_DATA_READ (or 0) is chosen
   */
  myAP3216.setIntClearManner(CLR_INT_MANUALLY);
  myAP3216.setPSThresholds(0, 200); // Outside this window an interrupt is triggered

  /*
   * Outside the following window (lux values) an interrupt is triggered. Ensure that
   * you don't chose values outside the defined lux range (setLuxRange).
   */
  myAP3216.setALSThresholds(3, 500); //
  myAP3216.setPSIntegrationTime(8);
  myAP3216.setPSInterruptMode(INT_MODE_ZONE);
  delay(1000);
}

void loop() {
/*
 * Uncomment the following lines if you want to see the measured values
 */
//  float als = myAP3216.getAmbientLight();
//  unsigned int prox = myAP3216.getProximity();
//  Serial.print("Lux: "); Serial.print(als);
//  Serial.print("  Proximity: "); Serial.println(prox);
  if(event){
    interruptAction();
  }
  /*
   * without the following delay you will not detect ALS and PS interrupts together.
   */
  delay(1000);
}

void interruptAction(){
  byte intType = NO_INT;
  intType = myAP3216.getIntStatus();

  switch(intType){
    case(ALS_INT):
      Serial.println("Ambient Light Interrupt!");
      break;
    case(PS_INT):
      Serial.println("Proximity Interrupt!");
      break;
    case(ALS_PS_INT):
      Serial.println("Ambient Light and Proximity Interrupt!");
      break;
    default:
      Serial.println("Something went wrong...");
      break;
  }

  digitalWrite(ledPin, HIGH);
  delay(1000);
  digitalWrite(ledPin, LOW);

  intType = myAP3216.getIntStatus();
  myAP3216.clearInterrupt(intType);
  event = false;
}

void blink(){
  event = true;
}
Acknowledgement
The background in which I inserted the AP3216 for the post image is by Alejandro Faletti on Pixabay.