About the post
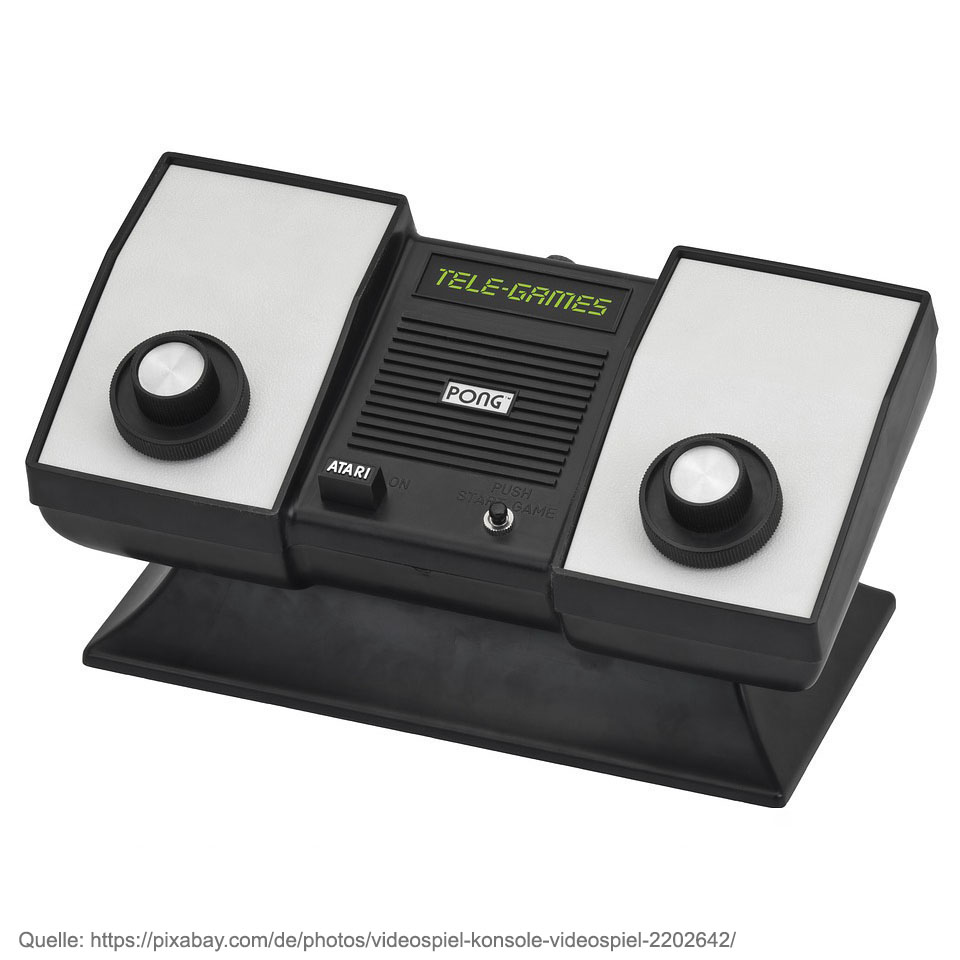
In this post I would like to introduce you to my “Pong for Arduino”, inspired by the classic from the last century and for a 1.8 inch display. Some may have got to know the game under different names, but everyone (from my age group) knows it and a lot of people associate nostalgic feelings with it.
In the video you can see it in action. Unfortunately, the quality of filming the TFT display has suffered a little. In the original it looks more beautiful, especially the “pull-up effect” of the ball is not so pronounced.
And of course, my Pong for Arduino lacks the typical old look. In the first step, however, I was already happy to be able to implement it in principle. Maybe you want to develop a more “original” version of it.
The hardware
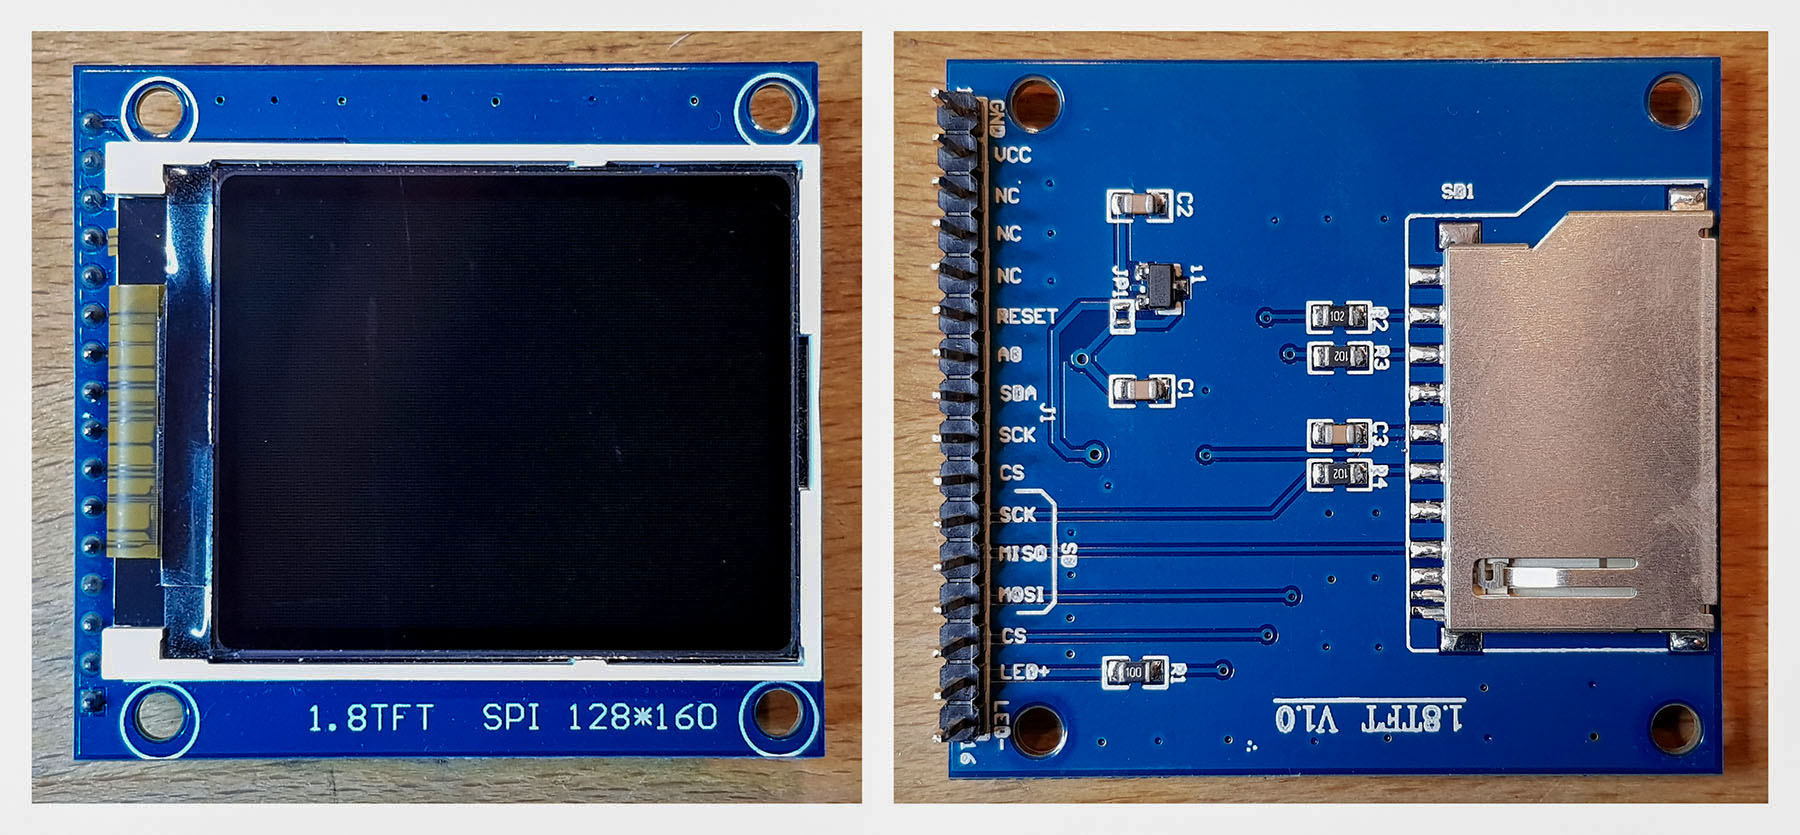
The circuit for Pong for Arduino is not very complex. Two 10 kΩ potentiometers serve as control for the rackets. A LOW-active button provides the signal for the start of the game or the restart. The screen is a 1.8 inch display with a fabulous 128×160 pixels, as you can get for less than ten euros e.g. on Amazon. I used a version with SD card slot because I just had it in my drawer – of course you don’t need it.
As a microcontroller I used an Arduino Nano. This is nicely small and can be powered via its USB port. For this purpose, I like to use a power bank. The power consumption is large enough that it does not turn off. The USB socket is also handy if you want to change the sketch again. You don’t even have to screw up the housing.
I put it all in a plastic case. The main board is mounted on spacers. For the USB socket of the Arduino I sawed out a hole. Plastic is not a nice material for sawing or milling as it melts quickly, and thus the hole looks a bit ugly. I screwed in the display and cut a (even not perfect) slot into the case for its pins. For the pushbutton I drilled four small holes and fixed it with superglue. For strain relieve of the cables connecting the control units I have used cable ties:


The two control units are small plastic housings on which I have mounted the 10 kΩ potentiometers. As you can see, there is actually nothing in the case. It is only for the purpose of strain relieve and for the feel. The control units are connected to the main unit via three-pole cables.

The wiring for Pong for Arduino
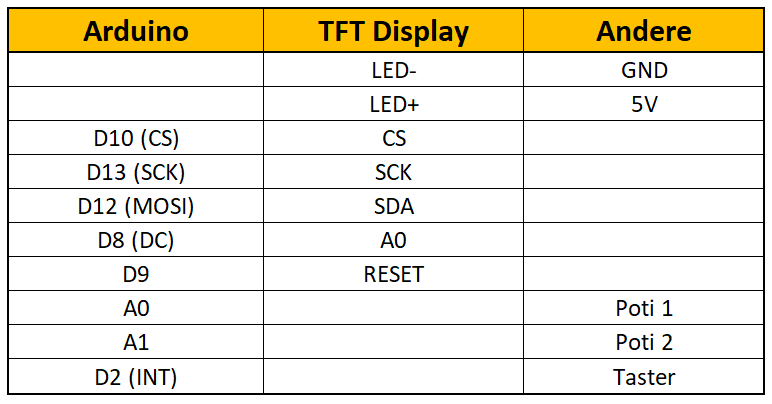
The display is controlled via SPI. The display only accepts data and does not send anything back, thus MISO (D12) remains unconnected. An active-LOW interrupt with internal pull-up is set up at D2. A push button triggers the interrupt. Between the 10 kΩ Potis and GND there is still a 1 kΩ resistor, in order to limit current at the end stop. The potentiometer voltage is read at A0 or A1.

The Pong for Arduino Sketch
The programming of the sketch took me a lot more time than I thought and it has also become much more complex than I expected at first. I will try to guide you through the code in broad strokes so that you can customize it – if you want – to your own liking. I hope you can follow my logic!
The program code of Pong for Arduino consists of four parts:
- pong.ino: contains definitions, setup, the main loop and some functions
- draw.ino: contains functions that primarily have something to do with the display
- Ball.h/Ball.cpp: the class for the ball
- Racket.h/Racket.cpp: the class for the two rackets
You can download the code from Github via this link. Unpack it into your library folder. Open Pong.ino in the Arduino IDE and save the sketch in your sketch folder.
In addition, the two libraries SPI and TFT, are used. The TFT library extends the Adafruit libraries GFX and ST7735. These should already be in place. But also no problem to install them later. Most of the TFT library functions I used should be self-explanatory. For more details check here.
Fundamental considerations
- Note that the TFT display originates at the top left. This means that the x-values of the pixels increase from left to right, the y-values increase from top to bottom, which takes getting used to.
- The ball is four by four pixels. When I talk about the position of the ball, it refers to the origin (upper left corner). With regard to the reference point, the same applies to the rackets.
- The ball has four directions of movement, Right-Up (DIR_RU), Right-Down (DIR_RD), Left-Up (DIR_LU) and Left-Down (DIR_LD). The direction is defined in Ball.h as enum:
enum BallDir {DIR_LU = 1, DIR_LD, DIR_RU, DIR_RD, NEW_BALL}. A new ball does not initially have a defined direction, for this NEW_BALL is needed. - A motion step consists of two pixels in horizontal and one step in the vertical direction. The angle vs. the horizontal is therefore always the same (the absolute value). My good old Pong for TV had besides the “normal” angle a bigger one. This was activated when you hit the ball with the edge of the racket – that’s maybe something I could implement in a Pong for Arduino 2.0.
- If a point has been scored, the game status is briefly displayed, then the game will automatically continue.
- The game ends when one of the players has 15 points.
pong.ino
The main sketch pong.ino starts with definitions and the integration of the libraries. I hope that the code is understandable by the many comments (sorry, still only in German) inserted.
#include <TFT.h>
#include <SPI.h>
#include <Ball.h>   // Bibliothek für den Ball
#include <Racket.h>   // Bibliothek für den Schläger
#define CS   10  // Chip Select Pin
#define DC   8   // Data / Command Pin
#define RESET  9   // Reset Pin
#define TAST_PIN 2   // Taster Pin für Game Reset
#define RED 1   // Farbendefinition -> siehe colour Funktion
#define BLUE 2
#define GREEN 3
#define BLACK 4
#define LIGHTBLUE 5
#define GREY 6
#define RIGHT_RACKET_XPOS 148   // x-Position rechter Schlaeger
#define RIGHT_RACKET_POTI_PIN 1 // der Pin für den Poti vom rechten Schlaeger
#define LEFT_RACKET_XPOS 10  // x-Position linker Schlaeger
#define LEFT_RACKET_POTI_PIN 0  // der Pin für den Poti vom linken Schlaeger
#define WINSCORE 15  // Bei 15 gewinnt man
#define BALLDELAY 1000  // Verzögerungswert 1 in microseconds
#define BALLDELAY2 6500 // Verzögerungswert 2

volatile bool gameReset; // steuert den Spielreset, wird "TRUE" bei Tasterdruck (Interrupt)
const int RACKET_WIDTH = 2; // Schlaeger Breite
const int RACKET_HEIGHT = 12; // Schlaeger Hoehe
const int BALL_WIDTH = 4; // Der Ball ist 4x4 Pixel groß
int currentLeftRacketYPos; // y Position linker Schlaeger
int currentRightRacketYPos; // y Position rechter Schlager
int currentBallXPos; // x Position Ball
int currentBallYPos; // y Position Ball
// Position bedeutet: Koordinaten der linken oberen Ecke
int score[2]={0,0}; // Spielstand
BallDir currentFlightDir; // Flugrichtung des Balls (in Ball.h definiert)

TFT myScreen = TFT(CS, DC, RESET);
Ball myBall;
Racket leftRacket(LEFT_RACKET_XPOS, LEFT_RACKET_POTI_PIN);
Racket rightRacket(RIGHT_RACKET_XPOS, RIGHT_RACKET_POTI_PIN);
enum racketSide {LEFT=0,RIGHT} racket;

void setup(){
  pinMode(TAST_PIN, INPUT_PULLUP); // Tasterpin: bei Low ist aktiv
  attachInterrupt(digitalPinToInterrupt(TAST_PIN), gameResetPress, FALLING);
  myScreen.begin();  // Bildschirm wird initialisiert
  myScreen.setRotation(1); // Portrait -> Landscape, 0/0 = oben links
  myScreen.setTextSize(4); // Textgroesse fuer Spielstand
  myScreen.background(0,0,0);  // einmal Bildschirm schwarz machen
  showScore(); // Spielstand (hier 0:0) wird angezeigt
  resetField(); // das Spielfeld wird angelegt, die Schläger erscheinen
  myBall.newBall(); // jetzt kommt der Ball ins Spiel
  gameReset = false; // kein Reset bis Tasterduck
}

void loop(){
  myBall.move(); // Der Ball macht einen Schritt
  checkPositions(); // die Position der Schläger, des Balls und die Flugrichtung werden ermittelt
  drawBall(); // der Ball wird an der neuen Position "gemalt" und die alten Pixel gelöscht
  myBall.fenceCheck(); // Check ob der Ball die Bande berührt
  // Check, ob der Ball einen Schläger (von der richtigen Seite!) berührt:
  myBall.racketHitCheck(LEFT_RACKET_XPOS, currentLeftRacketYPos, RIGHT_RACKET_XPOS, currentRightRacketYPos, BALL_WIDTH, RACKET_HEIGHT, RACKET_WIDTH);
  moveRacketsToNewPos(false); // der Schläger bewegt sich zur aktuellen Position
  if(myBall.goalCheck()){ // Wenn der Ball ueber die Linie geht, dann.....
    deleteBall(); // Randpixel beseitigen
    if((currentFlightDir==DIR_RU)||(currentFlightDir==DIR_RD)) score[0]++; // wessen Punkt?
    else score[1]++;
    showScore();
    if(!gameReset){ // nächste Runde innerhalb eines Spiels
      resetField();
      myBall.newBall();
    }
    else newGame(); // neues Spiel
  }
}

void gameResetPress(){  // Routine für den Interrupt
  gameReset=true;
}

void newGame(){ // Routine für neues Spiel - selbsterklärend
   myBall.newBall(NEW_BALL);
   score[0]=0; score[1]=0;
   showScore();
   resetField();
   gameReset=false;
}

void checkPositions(){ // Positionsermittlungen
  currentLeftRacketYPos = leftRacket.getYPos();
  currentRightRacketYPos = rightRacket.getYPos();
  currentBallXPos = myBall.getXPos();
  currentBallYPos = myBall.getYPos();
  currentFlightDir = myBall.getFlightDir();
}
draw.ino
Most functions in the draw.ino program section should be reasonably understandable. The functions drawBall and moveRacketsToNewPos are somewhat more complex. They are explained in detail below.
void colour(int farbe){  // Farbdefinitionen - selbsterklärend
  switch(farbe){
    case RED:
      myScreen.fill(0,0,255);
      myScreen.stroke(0,0,255); break;
    case GREEN:
      myScreen.fill(0,255,0);
      myScreen.stroke(0,255,0); break;
    case BLUE:
      myScreen.fill(255,0,0);
      myScreen.stroke(255,0,0); break;
    case LIGHTBLUE:
      myScreen.fill(255,128,128);
      myScreen.stroke(255,128,128);break;
    case GREY:
      myScreen.fill(64,64,64);
      myScreen.stroke(64,64,64);break;
    case BLACK:
      myScreen.fill(0,0,0);
      myScreen.stroke(0,0,0); break;
    default:
      myScreen.stroke(0,0,255);
  }
}

void drawBall() { // Das Bedarf einer gesonderten Erklärung, siehe Beitrag
  int formerBallXPos, formerBallYPos;
  switch (currentFlightDir) {
    case DIR_LU:
      formerBallXPos = currentBallXPos + 2;
      formerBallYPos = currentBallYPos + 1;
      myScreen.rect(formerBallXPos - 2, formerBallYPos, BALL_WIDTH, BALL_WIDTH);
      colour(BLACK);
      myScreen.rect(formerBallXPos + 2, formerBallYPos, 2, 4);
      delayMicroseconds(BALLDELAY);
      colour(GREEN);
      myScreen.rect(formerBallXPos - 2, formerBallYPos - 1, BALL_WIDTH, BALL_WIDTH);
      colour(BLACK);
      myScreen.line(formerBallXPos - 2, formerBallYPos + 3, formerBallXPos + 2, formerBallYPos + 3);
      delayMicroseconds(BALLDELAY2);
      break;

    case DIR_LD:
      formerBallXPos = currentBallXPos + 2;
      formerBallYPos = currentBallYPos - 1;
      myScreen.rect(formerBallXPos - 2, formerBallYPos, BALL_WIDTH, BALL_WIDTH);
      colour(BLACK);
      myScreen.rect(formerBallXPos + 2, formerBallYPos, 2, 4);
      delayMicroseconds(BALLDELAY);
      colour(GREEN);
      myScreen.rect(formerBallXPos - 2, formerBallYPos + 1, BALL_WIDTH, BALL_WIDTH);
      colour(BLACK);
      myScreen.line(formerBallXPos - 2, formerBallYPos, formerBallXPos + 2, formerBallYPos);
      delayMicroseconds(BALLDELAY2);
      break;

    case DIR_RU:
      formerBallXPos = currentBallXPos - 2;
      formerBallYPos = currentBallYPos + 1;
      myScreen.rect(formerBallXPos + 2, formerBallYPos, BALL_WIDTH, BALL_WIDTH);
      colour(BLACK);
      myScreen.rect(formerBallXPos, formerBallYPos, 2, 4);
      delayMicroseconds(BALLDELAY);
      colour(GREEN);
      myScreen.rect(formerBallXPos + 2, formerBallYPos - 1, BALL_WIDTH, BALL_WIDTH);
      colour(BLACK);
      myScreen.line(formerBallXPos + 2, formerBallYPos + 3, formerBallXPos + 6, formerBallYPos + 3);
      delayMicroseconds(BALLDELAY2);
      break;

    case DIR_RD:
      formerBallXPos = currentBallXPos - 2;
      formerBallYPos = currentBallYPos - 1;
      myScreen.rect(formerBallXPos + 2, formerBallYPos, BALL_WIDTH, BALL_WIDTH);
      colour(BLACK);
      myScreen.rect(formerBallXPos, formerBallYPos, 2, 4);
      delayMicroseconds(BALLDELAY);
      colour(GREEN);
      myScreen.rect(formerBallXPos + 2, formerBallYPos + 1, BALL_WIDTH, BALL_WIDTH);
      colour(BLACK);
      myScreen.line(formerBallXPos + 2, formerBallYPos, formerBallXPos + 6, formerBallYPos);
      delayMicroseconds(BALLDELAY2);
      break;
  }
  colour(GREEN);
}

void deleteBall(){ // Geht ein Ball über die "Torlinie", muss er komplett gelöscht werden
  colour(BLACK);
  myScreen.rect(currentBallXPos, currentBallYPos, BALL_WIDTH, BALL_WIDTH);
}

void drawRacket(racketSide racket) { // zeichnet einen neuen Schläger
  colour(GREEN);
  switch (racket) {
    case LEFT:
      myScreen.rect(LEFT_RACKET_XPOS, currentLeftRacketYPos, RACKET_WIDTH, RACKET_HEIGHT);
      break;
    case RIGHT:
      myScreen.rect(RIGHT_RACKET_XPOS, currentRightRacketYPos, RACKET_WIDTH, RACKET_HEIGHT);
      break;
  }
}

void moveRacketsToNewPos(bool newField) {  // zieht den Schläger in die aktuelle Position
  static int prevLeftYPos = currentLeftRacketYPos;
  static int prevRightYPos = currentRightRacketYPos;

  if(newField){
    prevLeftYPos = currentLeftRacketYPos;
    prevRightYPos = currentRightRacketYPos;
  }

  while (prevLeftYPos < currentLeftRacketYPos) { //fuege Balken oben zu, loesche untere Balken
    colour(GREEN);
    myScreen.line(LEFT_RACKET_XPOS, prevLeftYPos + RACKET_HEIGHT, LEFT_RACKET_XPOS + RACKET_WIDTH , prevLeftYPos + RACKET_HEIGHT);
    colour(BLACK);
    myScreen.line(LEFT_RACKET_XPOS, prevLeftYPos, LEFT_RACKET_XPOS + RACKET_WIDTH , prevLeftYPos);
    prevLeftYPos++;
  }
  while (currentLeftRacketYPos < prevLeftYPos) { // andersrum
    colour(BLACK);
    myScreen.line(LEFT_RACKET_XPOS, prevLeftYPos + RACKET_HEIGHT, LEFT_RACKET_XPOS + RACKET_WIDTH , prevLeftYPos + RACKET_HEIGHT);
    colour(GREEN);
    myScreen.line(LEFT_RACKET_XPOS, prevLeftYPos, LEFT_RACKET_XPOS + RACKET_WIDTH , prevLeftYPos);
    prevLeftYPos--;
  }
  while (prevRightYPos < currentRightRacketYPos) { //fuege Balken oben zu, loesche untere Balken
    colour(GREEN);
    myScreen.line(RIGHT_RACKET_XPOS, prevRightYPos + RACKET_HEIGHT, RIGHT_RACKET_XPOS + RACKET_WIDTH , prevRightYPos + RACKET_HEIGHT);
    colour(BLACK);
    myScreen.line(RIGHT_RACKET_XPOS, prevRightYPos, RIGHT_RACKET_XPOS + RACKET_WIDTH , prevRightYPos);
    prevRightYPos++;
  }
  while (currentRightRacketYPos < prevRightYPos) { // andersrum
    colour(BLACK);
    myScreen.line(RIGHT_RACKET_XPOS, prevRightYPos + RACKET_HEIGHT, RIGHT_RACKET_XPOS + RACKET_WIDTH , prevRightYPos + RACKET_HEIGHT);
    colour(GREEN);
    myScreen.line(RIGHT_RACKET_XPOS, prevRightYPos, RIGHT_RACKET_XPOS + RACKET_WIDTH , prevRightYPos);
    prevRightYPos--;
  }
  colour(GREEN);
}

void showScore(){ // zeige den Spielstand
  char buf[3];
  int leftScoreXPos;// x Position der Punkte des linken Spielers
  int rightScoreXPos;
  (score[0]<10)?(leftScoreXPos=35):(leftScoreXPos=20); // Position in Abhaengigkeit ein-/zweistellig
  (score[1]<10)?(rightScoreXPos=115):(rightScoreXPos=100);
  myScreen.background(0,0,0);
  colour(LIGHTBLUE);
  if(score[0]<WINSCORE && score[1]<WINSCORE){ //wenn noch kein Endstand erreicht ist
    itoa(score[0], buf, 10);
    myScreen.text(buf,leftScoreXPos,50);
    itoa(score[1], buf, 10);
    myScreen.text(buf,rightScoreXPos,50);
    myScreen.text(":",75,50);
    delay(1500);
  }
  else{
    if(score[0]==WINSCORE) colour(GREEN); // Endstand erreicht
    else colour(RED);
    itoa(score[0], buf, 10);
    myScreen.text(buf,leftScoreXPos,50);
    colour(LIGHTBLUE);
    myScreen.text(":",75,50);
    if(score[1]==WINSCORE) colour(GREEN);
    else colour(RED);
    itoa(score[1], buf, 10);
    myScreen.text(buf,rightScoreXPos,50);
    while(!gameReset){/*WAIT*/}
  }
}

void resetField(){
  unsigned long prevTime = millis();
  myScreen.background(0,0,0);
  delay(100);
  colour(GREEN);
  checkPositions();
  drawRacket(LEFT);
  drawRacket(RIGHT);
  moveRacketsToNewPos(true);
  while((millis()-prevTime) < 1000){ // Schlaeger sind beweglich während auf den Ball gewartet wird
    delay(5);
    checkPositions();
    moveRacketsToNewPos(false);
  }
}
The drawBall function
During the development of the sketch, I spent a lot of time finding a way to move the ball across the screen as smoothly as possible and with minimal “tail”. My first approach was the most obvious: you clear the ball at the old position (paint it over black) and redraw it at the new position. It looked really modest. What worked was to expand the ball in the x-direction, then delete the excess pixels and repeat the same in the y-direction.
The disadvantage of this method is that it depends on the direction, i.e. you need a separate procedure for each direction. This is what the schematic for the movement DIR_RU, i.e. to the top right:

Here’s what the instructions for each step are:
myScreen.rect(formerBallXPos + 2, formerBallYPos, BALL_WIDTH, BALL_WIDTH);colour(BLACK); myScreen.rect(formerBallXPos, formerBallYPos, 2, 4);colour(GREEN); myScreen.rect(formerBallXPos + 2, formerBallYPos - 1, BALL_WIDTH, BALL_WIDTH);colour(BLACK); myScreen.line(formerBallXPos + 2, formerBallYPos + 3, formerBallXPos + 6, formerBallYPos + 3);
So rectangles are simply flanged and cut off. The BALLDELAYS after steps 2 and 4 can be used to control the speed of the game and the appearance of the tail that cannot be completely prevented. Just try it yourself.
The moveRacketsToNewPos function
In order to make the movement of the racket fluid, the pixels are attached line by line and cut off at the bottom until the racket is in the current position during an upward movement. For the downward movement, the procedure is correspondingly reversed. With the rackets, just like the ball, a simple deletion and drawing from scratch looked quite modest.
The Racket Library
Now to the more relevant parts of the Racket library. Essentially, it is about translating the voltage at the potentiometers into the respective y-position of the racket. Here is the class definition from Racket.h:
class Racket{
  public:
    Racket();
    Racket(int, int);
    void setXPos(int);
    int getXPos();
    int getYPos();
    void move();

  private:
    int xPos;
    int yPos;
    int potiPin;
    const int racketHeight = 12;
    const int topScreenBorder = 0;
    const int downScreenBorder = 127;
    const int minPotiVal = 160;
    const int maxPotiVal = 700;
};
The function in Racket.cpp to determine the y-position is called getYPos:
int Racket::getYPos(){
  int yPosRaw;
  yPosRaw = analogRead(potiPin);
  if (yPosRaw<minPotiVal) yPosRaw = minPotiVal;
  if (yPosRaw>maxPotiVal) yPosRaw = maxPotiVal;
  return(map(yPosRaw,minPotiVal,maxPotiVal,0,downScreenBorder-racketHeight));
}
Not the entire voltage range of the potentiometer is used, as the control must be usable. Above and below maxPotiVal and minPotiVal, the racket stops at the limit.
The Ball library
The Ball Library is again a bit more complex and needs some explanations. I would like to explain a few functions in more detail.
Function newBall
void Ball::newBall(){
  int randomNumber;
  randomNumber = random(0,999);
  yPos = 6 +(random((downScreenBorder-6)/2))*2;
  if(flightDir==NEW_BALL) (((random(0,999))%2)==0)?(flightDir = DIR_LU):(flightDir = DIR_RD);
  if((flightDir==DIR_LD) || (flightDir==DIR_LU)){
    (((randomNumber)%2)==0)?(flightDir = DIR_RU):(flightDir = DIR_RD);
    xPos=leftScreenBorder;
  }
  else if((flightDir==DIR_RD) || (flightDir==DIR_RU)){
    (((randomNumber)%2)==0)?(flightDir = DIR_LU):(flightDir = DIR_LD);
    xPos=rightScreenBorder;
  }
}
If a new ball comes into play at the beginning of the game, then it has no direction (NEW_BALL). It then gets the direction DIR_LU or DIR_RD by random generator. If there is no start to the game, then the ball has already got a direction and one side has just made a point. The direction should then change (start for the player who did not get the last point). The second if construct also ensures that not only DIR_LU or DIR_RD is set as direction at the start of the game, which is the result of the first if construct.
Functions fenceCheck and goalCheck
void Ball::fenceCheck(){
  if(yPos==0){
    if(flightDir==DIR_LU) flightDir = DIR_LD;
    else if(flightDir==DIR_RU) flightDir = DIR_RD;
  }
  else if(yPos==124){
    if(flightDir==DIR_LD) flightDir = DIR_LU;
    else if(flightDir==DIR_RD) flightDir = DIR_RU;
  }
}

bool Ball::goalCheck(){
  if((xPos==leftScreenBorder)&&((flightDir==DIR_LD)||(flightDir==DIR_LU))) return true;
  else if ((xPos==rightScreenBorder)&&((flightDir==DIR_RU)||(flightDir==DIR_RD))) return true;
  else return false;
These functions are relatively simple. The fenceCheck function checks whether the ball has hit the top or bottom boarder. In this case, the direction must be changed accordingly. Note the extent of the ball and the position of its reference pixel at the top left. At the top, the ball hits directly with its reference point, i.e. at y = 0. At the bottom, the ball hits at y = 124 and not at 127. At first I thought that would happen at 127 – ball edge length, so at 123. Mistake in thinking!
The function goalCheck checks whether the goal line has been crossed. In contrast to the fenceCheck, the line should actually be crossed. The ball crosses halfway the line and then disappears completely. Therefore, in Ball.h leftScreenBorder is defined as -2 and rightScreenBorder as 158.
Function racketHitCheck
void Ball::racketHitCheck(const int &left_xp, int &left_yp, const int &right_xp, int &right_yp,
                          const int &ball_width, const int &height, const int &width){
  if((xPos==(left_xp + width)) && (yPos>=(left_yp-ball_width)) && (yPos<=(left_yp+height))){
    if(flightDir==DIR_LU) flightDir = DIR_RU;
    else if(flightDir==DIR_LD) flightDir = DIR_RD;
  }
  else if(xPos==(right_xp-ball_width) && (yPos>=(right_yp-ball_width)) && (yPos<=(right_yp+height))){
    if(flightDir==DIR_RU) flightDir = DIR_LU;
    else if(flightDir==DIR_RD) flightDir = DIR_LD;
  }
}
The racketHitCheck function checks whether a racket has been hit. The current position of the racket must be passed to the racketHitCheck function and the dimensions of the racket and the ball must be taken into account. In addition, the racket should only be active into the direction of the playing field. When a new ball comes into play and hits the racket from the other side, it shall be ignored. However, in this case he tears a hole in the racket, which is “healed” again when the racket moves. Shuting down this behaviour was simply too cumbersome for me.
Final words
As you may have seen, the programming of Pong for Arduino is a bit more complex than you might imagine at first. At least for me as a hobby programmer this was quite challenging. Originally, I had the idea to program the whole thing in a way that you can also use other screen sizes or easily switch between tennis and a one-player squash mode. Perhaps others may continue to do so.
I also realize that one or the other place is not completely “clean” programmed although it works. Nevertheless, I hope that it is a useful and above all fun suggestion for you. I welcome any feedback!