
About this post
This article is aimed at those who have experience in programming Arduino boards, but want to take a look beyond the horizon with MicroPython. For this purpose, I use the ESP32 as a microcontroller and uPyCraft as a MicroPython IDE.
I will cover the following topics:
- Installing Python and uPyCraft
- Setting up uPyCraft for the ESP32
- Crash course in MicroPython
- Simple GPIO operations with MicroPython
- Appendix: Installing Thonny as an alternative to uPyCraft
By the end of working through this post, you will be able to write simple MicroPython programs. In addition, you will be able to control the ESP32’s GPIOs with the counterparts of digitalWrite() and digitalRead(). In the next post I will show you how to use other functions of the ESP32 like PWM, A/D converter, timer, etc. with MicroPython.
It’s a lot of knowledge in a small space that I’m trying to impart here. In programming books, this would fill dozens of pages. So try things out and vary the examples, although many things may be boring at first. But only by practicing can you learn the language.
Helpful, but not absolutely necessary, is previous experience with the ESP32. Here you can find more information on the ESP32.
Python and MicroPython
Python is an object-oriented high-level language that is comparatively easy to learn. Python code is easy to read and very compact. The language is quite young – it was developed in the early 90s by Guido van Rossum. He is apparently a Monty Python fan because that’s where the name comes from. Among hobby electronics engineers, Python has spread mainly through its use on the Raspberry Pi.
But Python also has disadvantages: the programs are interpreted and not compiled. This is very noticeable in the speed. Python is much slower than C++. In addition, it is more difficult to find bugs. Syntax errors are detected only when the interpreter encounters the corresponding line.
You could say that in terms of Python, MicroPython is what the “Arduino language” is for C++, namely an adaptation for microcontrollers. Since the programs you create always require the MicroPython interpreter, this language is only suitable for microcontrollers with correspondingly large memory and sufficient computing power. MicroPython is available for the ESP32 and the ESP8266 among others.
On https://docs.micropython.org/en/latest/index.html you will find the excellently structured documentation for MicroPython.
Preparation: Installing Python
You have to install Python first, because MicroPython is based on it.
- On https://www.python.org/ you will find the download link for the latest version.
- In the Files section (scroll down a bit on the page), you select the correct installation file. For Windows, the best option is “Windows installer (64-bit)”.
- Run the installation file, and choose “Add Python version to PATH”.
Installing uPyCraft and setting up the ESP32
Installation
If you are using Windows, you can download uPyCraft here. There is no installation file, but you get the executable program directly as an “.exe” file. Copy it to the folder you want to work from.
When you start uPyCraft for the first time, you will probably be prompted to install SourceCodePro. After that, you will find a file called SourceCodePro.ttf on your computer. This contains the required character sets. To prevent you from being asked for it again every time you start the program, right-click on the file and select “Install for all users” (or similar – my Windows is in German).
You will also be asked if you want to install a newer version of uPyCraft. Click OK. Now you will find another file called uPyCraft_Vx.y.exe. You can now delete the original uPyCraft.exe file.
In order for MicroPython to run on the ESP32, you now have to download the firmware for the ESP32. To do this, go to https://micropython.org/download/esp32/ and choose the latest, stable “GENERIC” version:

It is best to store the firmware file in your uPyCraft folder.
The uPyCraft user interface
The user interface of uPyCraft consists of five sections:
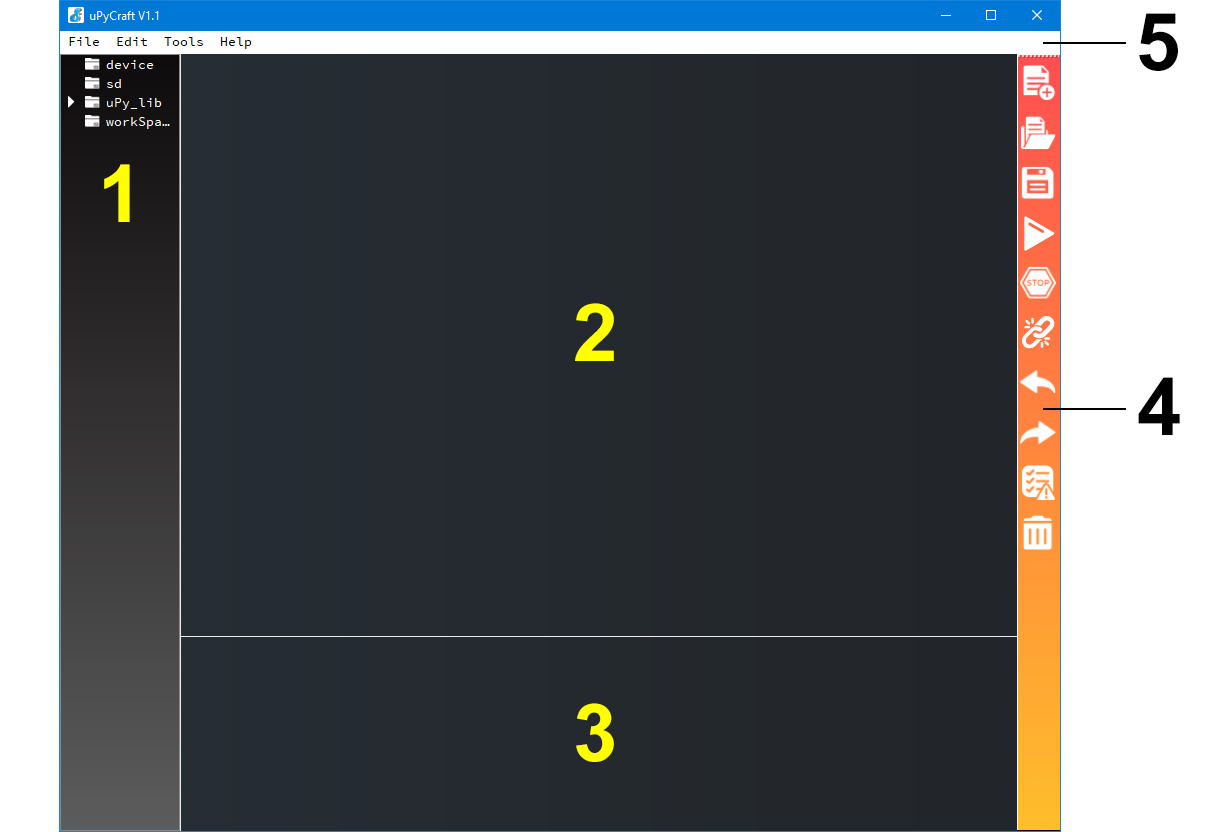
- File management
- Program Editor
- Shell (Input / Output)
- Toolbar
- Menu bar
Explanations will follow – I just want to make sure at this point that you know what I’m talking about when I refer to these sections.
Setting up the ESP32
Connect the ESP32 to your computer. Go to the menu bar → Tools → Serial, select the port to which your ESP32 is connected. Click on it. If the port does not appear, you may be missing a driver for the USB-to-UART adapter on the ESP32. In this case you can find the driver here.
Burning the Firmware
Now you have to burn the firmware on your ESP32. To do this, go to Tools → BurnFirmware. Select the firmware file you downloaded earlier. The correct settings look like this (your port must of course be adjusted):
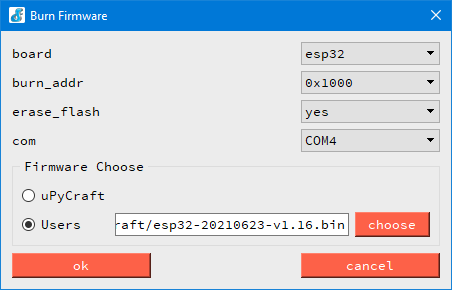
If the burning process does not work, you may have to press the boot button first. This depends on your board.
If everything went well, the prompt “>>>” appears. You may need to reset the ESP32 or disconnect it from power briefly. When you plug it back in, you have to select the serial port again. uPyCraft is not particularly smart in this regard.
With that, you have made it and can finally get started.
Getting Started
Python allows you to enter and test code directly in the shell (input/output window). This is called REPL for “Read-Evaluate-Print Loop”. REPL is a great thing that wouldn’t be possible with a compiler-based language in this form.
Try it out by typing a = 42 (or your favorite number) first and confirming with Enter. The next statement is print("a =", a). As output you get a = 42. Use type(a) to query the variable type of a. Now, enter a *= 1.0, then a and finally again type(a):
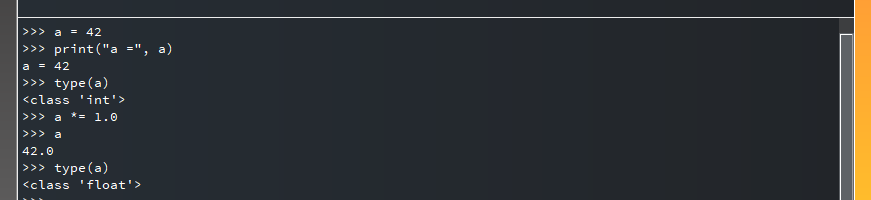
You’ve already learned a lot about Python:
- You don’t have to declare any variable types. Python interprets the type based on the format of the input:
a = 42.0would be a float.- With
a = "42"a would be a string.a = '42'is equivalent.
- Statements are not completed by a semicolon, but by a line break.
- Variable types are defined as a class.
print()creates a line break in the output.- In the shell it is sufficient to enter the variable name + Enter to get the value of the variable.
- Variable types are converted implicitly to a greater extent than in C++.
a *= 1.0would not have triggered a conversion in C++.- Explicit conversions, e.g.
float(variable),int(variable)orstr(variable)are also possible.
- Explicit conversions, e.g.
- You can combine several outputs into one
print()statement, each separated by a comma.- Python automatically inserts spaces between the outputs.
If you want to prevent the line break, enter end = "" as last argument, for example print("a =", a, end="").
Conveniently, you can use the “up/down” arrow keys to scroll to your previous entries.
The first program
Typing code directly into the shell is nice for trying things out, but usually you will write your programs as files. We come to that now. In addition, you certainly want to learn how to control the GPIOs with MicroPython.
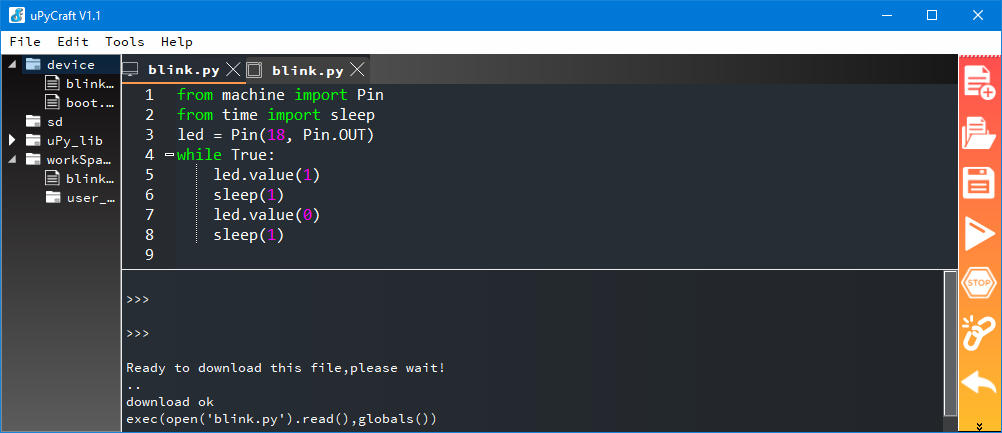
Connect an LED with resistor (remember the 3.3 volts) to a GPIO of the ESP32. I chose GPIO18. Then go to File → New in the menu bar. Alternatively, click on the top icon in the toolbar. The title “untitled” and the line numbering appear in the program editor. Enter the following program “blink.py”:
from machine import Pin
from time import sleep
led = Pin(18, Pin.OUT)
while True:
    led.value(1)
    sleep(1)
    led.value(0)
    sleep(1)
Save the program via the menu bar (File → Save) or via the floppy disk icon. In the pop-up window you enter a file name (Input File). Then you will be asked once where the workspace of uPyCraft should be created. In the selected directory (preferably your uPyCraft folder) uPyCraft creates the directory “workSpace” and the subdirectory “user_lib”. Your Python programs are stored in the workspace.
Now go to Tools → DownloadAndRun or press F5 or you click on the triangle in the toolbar. The program is then uploaded to the ESP32 and executed. The LED should now flash every second.
File Handling
Now click on Files → Reflush Directory. This will update the file directory. Then click on the triangles next to “device” and next to “workSpace”. As you will see, the file blink.py is now located both in the workspace and on the ESP32 (= device). Both files can be edited independently. Before you can open the version on the ESP32, however, you have to exit the running program with “Stop” (via toolbar or menu bar).
You can tell which version you have opened by the icon next to the file name in the program editor. I recommend to work with the version from the workspace.
If you create more programs and upload them to the ESP32 (download in the uPyCraft language), they will additionally be stored on the ESP32. If you want to delete a file on the ESP32, right-click on the file in the device directory and choose “delete”.
Automatic program start
When you leave uPyCraft, the execution of blink.py also stops. To get blink.py running again, you have to restart uPyCraft, choose the serial port, call blink.py and start DownloadAndRun. You also cannot start blink.py automatically by resetting the ESP32 or briefly disconnecting it from the power supply. This makes sense, since you can have several programs on the ESP32.
For a Python program to start automatically on the ESP32, it must be named “main.py”. Unfortunately, there is a problem with this. Because when main.py is running, you cannot connect via the serial port. And consequently you cannot stop main.py. I couldn’t find any other option with uPyCraft than to re-burn the firmware. Therefore, wait until you have finished your project before renaming it to main.py. Alternatively, you can use Thonny (see appendix). With this program, you can stop the running main.py with control / c.
Explanations about blink.py
Let’s go back to the code. With from module import class/method classes or methods are imported from modules that are not part of the basic configuration. This is similar to the #include preprocessor directive in C++. In blink.py, the class “Pin” is imported from the module “machine” and the function “sleep” is imported from the module “time”. An overview of the different ESP32-specific modules, classes and their methods can be found in the Quick Reference Guide.
The statement
led = Pin(18, Pin.OUT)
corresponds to the Arduino code:
int led = 18;
pinMode(led, OUTPUT);
However, with the difference that “led” in MicroPython is an object of the class Pin. Accordingly, the pin is switched to HIGH or LOW state using a method of the pin class:
led.value(1) or led.value(0)
Alternatively, you can also use:
led.on() or led.off()
You can pass more arguments to Pin(), e.g. the pin state:
led = Pin(18, PIN.OUT, value=1) or in short: led = Pin(18, PIN.OUT, 1)
If you want to set a pin to input and need a pull-up or pull-down resistor (e.g. to read a key), it looks like this:
buttonPin = Pin(18, Pin.IN, PIN.PULL_DOWN) # or: PULL_UP
Here you also learned that you mark comments with a “#” instead of “//”.
sleep() corresponds to delay(), but you pass seconds to function. With sleep_ms() you pass milliseconds and sleep_us() corresponds to delayMicroseconds().
loop() is replaced by while True: in MicroPython. Everything before and in setup() is placed before the while loop in MicroPython.
The condition for the while loop is not enclosed in parentheses, nor are the statements within the loop. The indentation alone indicates what belongs to the loop. With Arduino / C++ the indentation is only for readability, but with MicroPython it has a real meaning.
The last point I want to make is that as an alternative to from ... import ..., simply import ... is also allowed. However, you have to prefix the classes and methods with the module names:
import machine
import time
led = machine.Pin(18, machine.Pin.OUT)
while True:
    led.on()
    time.sleep(1)
    led.off()
    time.sleep(1)
Other general MicroPython elements
Operators
The arithmetic operators +, -, *, / are identical to those in Arduino / C++ and the same applies to the modulo %. Exponential functions can be realized with **, e.g. 2**4 for “2 to the 4”. The operator for integer division is //.
As logical operators and, or and not are available. Just written out, so not like the C++ operators ||, && and !.
The bit and shift operators &, |, ^, ~, <<, >> are again identical to the Arduino / C++ spelling. The same applies to the comparison operators: <, >, <=, >=, ==, !=.
You find an overview of mathematical functions such as sine, root, etc. here.
Number systems
As in C++, binary, octal, and hexadecimal numbers are represented as 0b..., 0o... and 0x.... If you want to output a number in a certain format, then use bin(), oct() or hex(). For example: print(bin(a)).
In addition, MicroPython can also handle complex numbers.
Lists and arrays
MicroPython offers a wide range of different data collections. These include lists, arrays, bytearrays, tuples, sets, dictionaries, and others. They differ, among other things, in:
- the types of data they can handle,
- whether they are mutable or immutable
- and whether the individual elements have a fixed order, i.e. have an index.
Lists are very flexible and are used very often. They are framed by square brackets and their elements are separated by commas. Here is an example:
l = [42, True, "abc", 66.6]
Lists are mutable, they can be expanded and sorted. You can access individual elements. Lists can be concatenated (appended to each other). Lists are also allowed as elements of lists. The following inputs and outputs are – I think – self-explanatory.
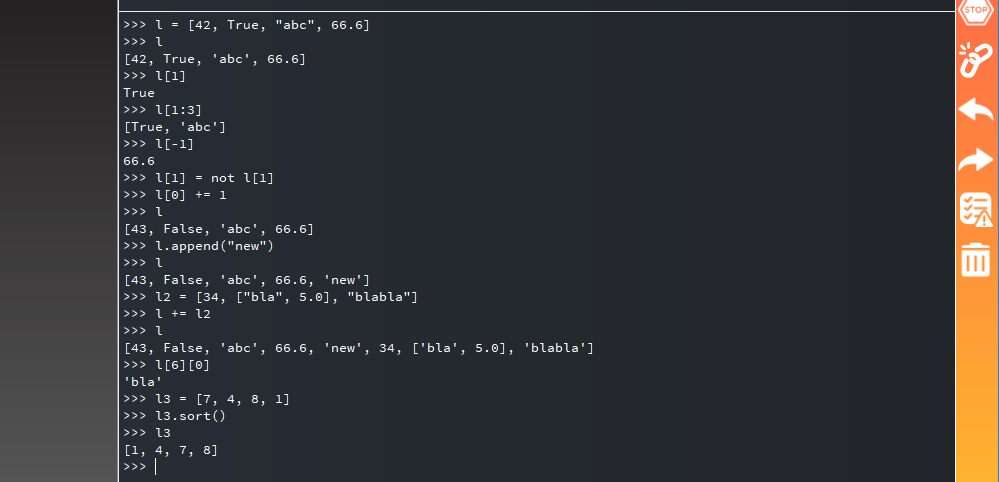
I have forgotten an important function for lists: len(l) returns the number of items in the list l.
Arrays are basically lists that allow only one data type. Otherwise, you can apply the same methods to them. Arrays work more efficiently than lists, which can become relevant for large amounts of data. Here’s an example of how to create an array:
import array as arr
a = arr.array("i", [3,7,9,25])
The “i” stands for Integer. Here, exceptionally, a data type must be specified in MicroPython. For an array of floats, you must specify “f”. It’s best to play around with lists and arrays a bit to get familiar with them.
Mutable and immutable objects
The following lines are not surprising:

However, this could be the case here:

In (Micro)Python, everything is an object. And variables are names that reference these objects. We can also say that the names are bound to the objects. MicroPython distinguishes between mutable and immutable objects. For example, a “1” is an object of the class “int” and is immutable. Sounds weird, but it is. Lists and arrays, on the other hand, are mutable.
In the first example, a and b first refer to the same object, namely “1”. With b = 2 b refers to a new object, namely “2”. “a” remains unaffected. In the second example, however, b[0] = 2 does not change the binding to the object (namely the list), but changes the object because it is mutable.
The next example does change the binding:

Each object in MicroPython has its individual ID, which you can query with id(object). Try this:
a = 1,
id(a),
a += 1 and finally this:
id(a)
As you can see, the ID of a changes. If you are still motivated, enter id(2). Consequently, id(a) is equal to id(2).
If you internalize this, you will be able to better understand various things in MicroPython. Among other things, the topic becomes important when you pass lists, arrays or other mutable objects to functions and modify them there. Because only the references are passed, and the functions work with the originals. It’s like passing references in C++.
Tuples and bytearrays
I had already mentioned tuples and byte arrays above. I need to go into more detail about these data types, as you are very likely to encounter them. It’s a bit confusing at first to distinguish lists, arrays, bytearrays and tuples. And it’s pretty boring at first. The good news is that the methods you can apply to them are repetitive.
Tuple
Basically, tuples are just immutable lists. You can add data of any type to tuples. Unlike the lists, tuples are defined in parentheses. However, you can also omit the brackets. Personally, I find it easier to read with parentheses.

As you can see, tuple_2[4] = 43 does not work. Tuples are not mutable.
Bytearrays
Not surprisingly, bytearrays are arrays that contain only bytes. Like the other arrays, they are mutable. The best way to define bytearrays is to pass a list to the function bytearray(). Here are a few examples:
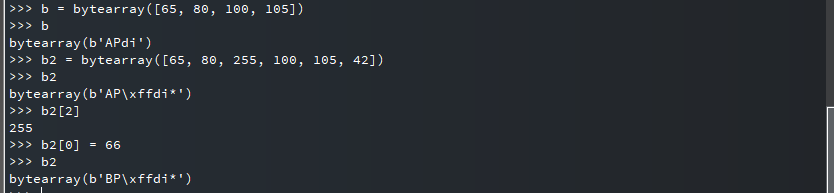
The somewhat cryptic output is noticeable when you output the byte array as a whole. If the value of an element corresponds to a printable ASCII character, the character is printed. If this is not the case, the element is output in the format \xyy, where yy is the value in hexadecimal notation.
I don’t even dare to say it: There’s more!
- Bytestrings:are immutable bytearrays which are defined with
bytes()instead ofbytearray(). Otherwise, everything is the same. - Dictionaries: resemble enum expressions. For those who still don’t have enough: look here.
- Sets: are unordered, mutable collections that do not allow duplicate elements. You will rarely need sets.
Other loops and conditions
if – else – elif statements
There is little to say about if and else. else if is called elif in MicroPython. Here’s an example, which admittedly is pretty pointless in itself:
from time import sleep
from random import randint
while True:
    n = randint(-10, 30)   # random integer between -10 and +30
    print("Random number =", n)
    if n > 0:
        if n > 20:
            print("Number is bigger than 20")
        elif n > 10:
            print("Number is bigger than 10")
        else:
            print("Number is bigger than 0")
    elif n <= 0:
        print("Number <= 0")
    print("...........")
    sleep(1.5)
In addition, you learn from this example:
- Random numbers in a range from x to y (including the limits) are generated with
randint(x,y). - The function
randint()must be imported. sleep()also works with floats.
For – statements
Enter the following in the shell:
for i in range(1,4):
    print(i)
You can see that MicroPython is smart and expects more input after the colon. You will receive:

for i in range(1,4) is therefore equivalent to the Arduino/C++ expression: for(int i=1; i<4; i++). You can pass a third parameter to range() and change the increment this way. Try range(1,10,2) and range(4,1,-1) see what happens.
Or you only pass one parameter, namely the upper limit. range(x) corresponds to range(0,x).
These statements also work:

You can see that MicroPython allows you to write fairly compact code.
Functions
The use of functions is also not significantly different from C++. Here is a small example:
def double_it(i):
    result = i * 2
    return result

n = 5
print("5 * 2 =", double_it(n))
n = 5.0
print("5.0 * 2 =", double_it(n))
n = "Hello"
print("Hello * 2 =", double_it(n))
The output is:

What you learn from it:
- Functions are defined with
def function_name(parameter):.- Multiple parameters can be passed separated by commas.
- You do not need to specify any data types for the parameters and return values. This makes the functions very flexible, as you can see.
Formatted output
In Python or MicroPython, there are many ways to output numbers and strings formatted. First, here is a non-formatted example:

And here are some formatted examples:

This is less complicated than it looks at first glance. You replace the numbers you want to format with a formatting statement in curly braces. The data to be formatted is attached with .format(...) at the end. The scheme for the formatted output is:
print(" ..... {Format_0} ...... {Format_1}.....".format(Argument_0, Argument_1,...))
The format statement Format_x is structured as follows:
{N:FTotallength.Decimal placesT} with:
- N = number of the format statement (optional)
- F = other formatting statements:
- <, >, ^ for left-aligned, right-aligned, centered
- 0 for preceding zeros
- + for signs
- T = number type:
- d = decimal (Integer)
- f = float
- b = binary
- x = hexadecimal
- Without T = string (only with N, F and Totallength)
This spelling is the modern variant in (micro)Python. There is also an obsolete notation with modulo (%), which I will not go into here.
More about formatting can be found here.
Precision / Limitations for float and integer
I’ll come back to the integer and float types. Look at the following inputs/outputs:

MicroPython uses only “int” for integers and only “float” for floating-point numbers. There is no such thing as “unsigned int”, “long” or “double”. Nevertheless, MicroPython can handle gigantic integers, as you can see above. But as generous as MicroPython is with integers, it is stingy with floats. After 7 digits is over. 10/3 is certainly not 3.3333332539.
Application / deepening of knowledge
That was a lot of theory. But you already know a lot about MicroPython. For relaxation, I have now a bit of practice for you. With the following circuit, a chaser light consisting of 5 LEDs is realized.

As long as one of the two buttons is pressed, the running light is active. Depending on which button is pressed, the light runs in one direction or the other.
from machine import Pin
from time import sleep

led = [19, 18, 5, 17, 16]
btn1 = Pin(22, Pin.IN, Pin.PULL_DOWN)
btn2 = Pin(23, Pin.IN, Pin.PULL_DOWN)

for i in range(len(led)):
    led[i] = Pin(led[i], Pin.OUT)

def chaser(reverse = True):
    if reverse:
        for i in range(4,-1,-1):
            led[i].value(1)
            sleep(0.15)
            led[i].value(0)
    else:
        for i in range(0,5):
            led[i].value(1)
            sleep(0.15)
            led[i].value(0)

while True:
    if btn1.value():
        chaser()
    elif btn2.value():
        chaser(False)
The following is new:
btn1.value()returns the state (HIGH/LOW) of btn1.- With
def chaser(reverse = True)reverse is “True” if “chaser” is called without parameters.
I would also like to turn your attention to the following line:
led[i] = Pin(led[i], Pin.OUT)
“led” is a list whose elements are initially integers. The above statement replaces the ith element with an object of the class Pin. This only works because lists are allowed to contain items of different data types. You couldn’t do something like that with an array.
Outlook
You have learned the basics of MicroPython in this post, and you know how to upload programs to the ESP32. In addition, you have gained first experience with the control of the GPIOs. In the next post, I will build on this and show how you can use other functions of the ESP32 with MicroPython. This includes PWM, the A/D converters, timers, interrupts, touch pins and much more.
Appendix: Thonny – the more comfortable IDE
uPyCraft meets the basic requirements for a MicroPython IDE. However, the program is not particularly convenient. You have only a few setting options, and even simple editing tools for commenting or indenting are missing. However, it is slim does require little space.
Very common is the alternative Thonny:
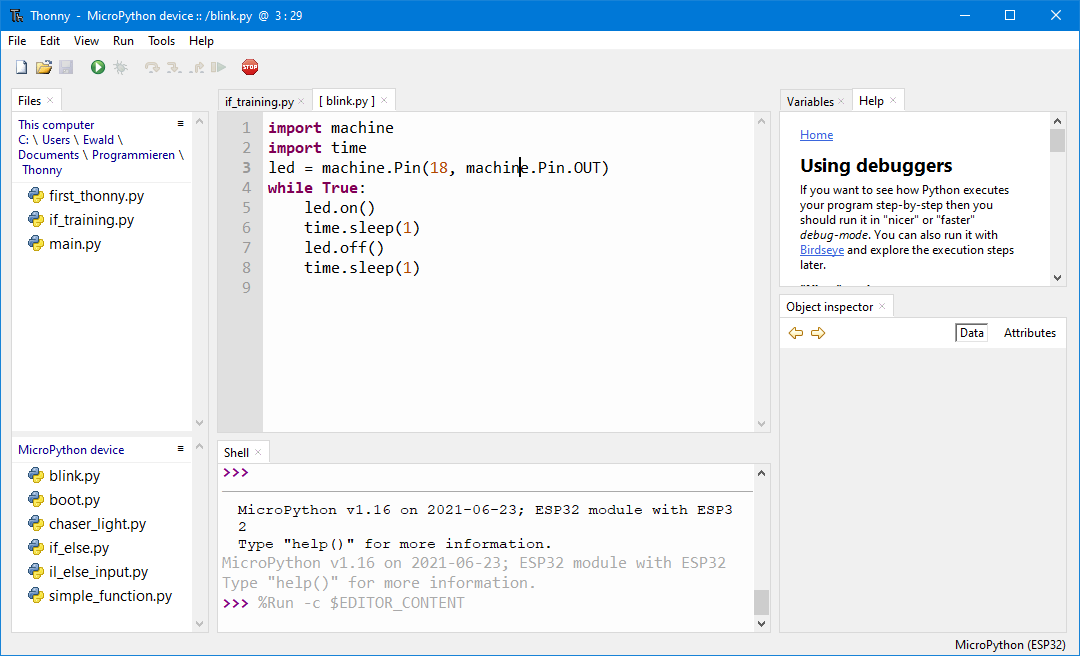
That looks a bit friendlier, doesn’t it? And although Thonny can do more, it’s not complicated to use. If you can cope with uPyCraft, you will also find your way around Thonny in a few minutes.
Installation of Thonny
- Download the installation file from https://thonny.org/ (at the top of the page).
- Run the installation file and follow the instructions.
- Connect your ESP32 to the computer.
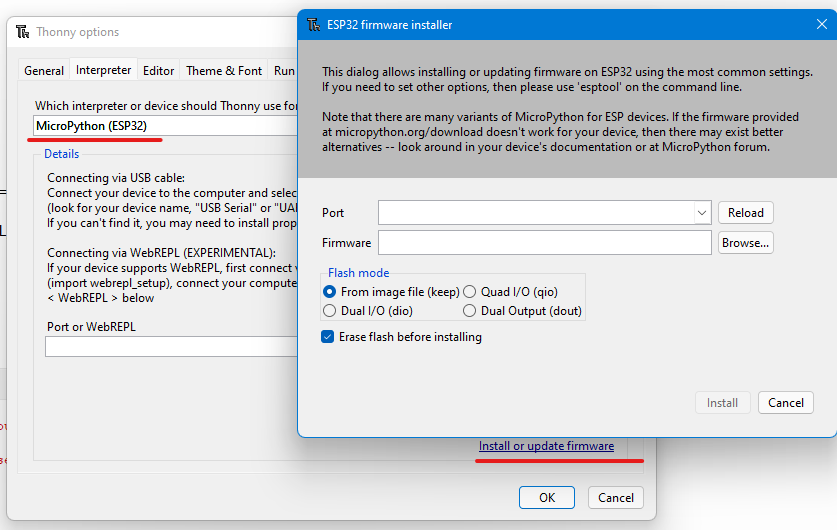
- Open Thonny and goe to Tools → Options → Interpreter.
- Select “MicroPython (generic)” and the correct port.
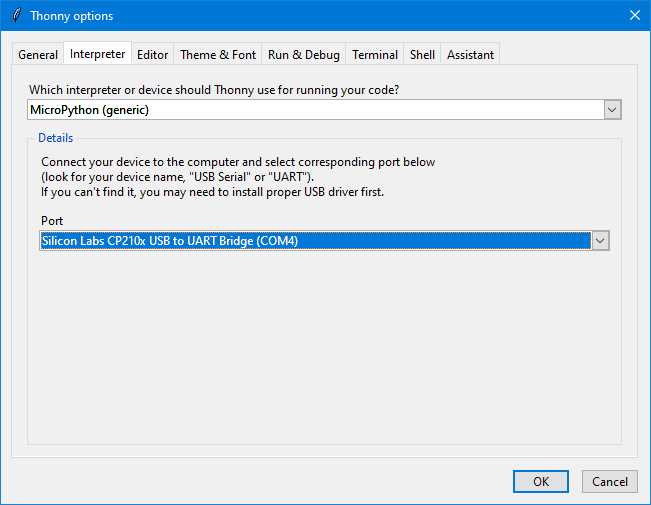
That’s it and you’re ready to go.
Uploading firmware with Thonny
To upload the firmware, go to Tools → Options → Interpreter, choose your board and click on “Install or Update Firmware”. Then choose the right port and firmware file (as described before for uPyCraft).
The input() function
Another advantage of Thonny is that the input() function is implemented here. With uPyCraft this does not work (at least with the currently latest version). With the input() function you can enter data via the shell. The input is interpreted as a string and must be explicitly converted if necessary.
while True:
    n = input("Input a number: ")
    n = int(n)
    if n > 0:
        if n > 20:
            print(n, "is bigger than 20")
        elif n > 10:
            print(n, "is bigger than 10")
        else:
            print(n, "is bigger than 0")
    elif n <= 0:
        print(n, "is <= 0")
    print("...........")
Acknowledgement
I owe the queue on my post image to Clker-Free-Vector-Images on Pixabay.