
About this post
Pointer and references – what a dry topic! So, why did I write a whole post on this subject? In my experience, not only absolute beginners occasionally have problems with it, especially with the use pointers. Therefore, I have tried to present the topic systematically, understandably and with many example sketches. This post is probably still challenging readers with less experience. But from my point of view, learning how to use pointers is worth the effort because you can’t avoid the subject and because it is essential for a real understanding of C++.
In addition, this article is intended to form the basis for the follow-up article, which will deal with the SRAM.
This is the content:
Pointers
What is a pointer?
Before we get to the question of what a pointer is, let’s take a step back: What is a variable? A variable is a reserved place for data that you can change during the execution of the program. A variable has a name, a data type, a specific address and a specific value. The data type determines the memory space to be reserved.
A pointer is also a variable. However, it is special in that its value is the (initial) memory address of another variable or object. So, the pointer does what its name suggests: It points to something else.
When defining the pointer, the data type of the “target” must be specified. Without this additional information, it would not be known at which address the target ends in memory and how to interpret it.
A simple example
Since these explanations are very theoretical, let’s have a look at a practical example.
void setup(){
Serial.begin(9600);
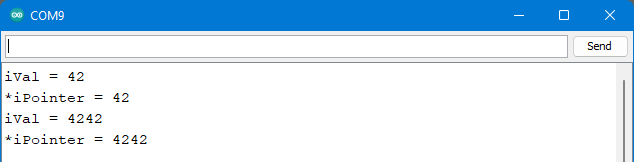
int iVal = 42;
Serial.print("iVal = ");
Serial.println(iVal);
int *iPointer; // alternative: int* iPointer;
iPointer = &iVal;
Serial.print("*iPointer = ");
Serial.println(*iPointer);
iVal += 4200;
Serial.print("iVal = ");
Serial.println(iVal);
Serial.print("*iPointer = ");
Serial.println(*iPointer);
}
void loop(){}
And this is the output:
Explanations to the sketch
First, the integer variable iVal is declared and assigned the value 42.
With int *iPointer we create the pointer iPointer. The character * specifies that this is a pointer. int specifies that the target, i.e. the object to which the pointer points, is an integer.
However, at the time of declaration, we have not yet defined where the target is, i.e. where the pointer points to. We achieve this with iPointer = &iVal;. iPointer then points to the address of iVal. The character & is the address operator.
iPointer is the pointer itself. To get the value pointed to by iPointer, you must prefix the pointer with the indirection operator *. The indirection operator is also called the dereference operator.
If we now change the variable iVal, it is still at the same address. Therefore, the instruction iVal += 4200; has no effect on iPointer, but it does on its target value *iPointer.
Going deeper
I wrote the following sketch to expand on the topic:
void setup(){
  Serial.begin(9600);
  delay(2000); // needed for some boards

  int iVal = 4242;
  int *iPointer;
  iPointer = &iVal;

  long iLongVal = 42424242;
  long *iLongPointer;
  iLongPointer = &iLongVal;

  long long iLongLongVal = 4242424242424242;
  long long *iLongLongPointer;
  iLongLongPointer = &iLongLongVal;

  Serial.print("iVal             = ");
  Serial.println(iVal);
  Serial.print("iLongVal         = ");
  Serial.println(iLongVal);
  Serial.println("Sorry, can't print iLongLongVal");
   *iLongPointer += 1;
  Serial.print("Updated iLongVal = ");
  Serial.println(iLongVal);
  Serial.println();

  Serial.print("iVal address     = ");
  Serial.println((int)&iVal);
  Serial.print("iPointer value   = ");
  Serial.println((unsigned int)iPointer);
  Serial.print("iPointer address = ");
  Serial.println((int)&iPointer);
  Serial.print("*iPointer        = ");
  Serial.println(*iPointer);
  Serial.println();

  Serial.print("Size of iVal         = ");
  Serial.println(sizeof(iVal));
  Serial.print("Size of iLongVal     = ");
  Serial.println(sizeof(iLongVal));
  Serial.print("Size of iLongLongVal = ");
  Serial.println(sizeof(iLongLongVal));
  Serial.println();

  Serial.print("Size of iVal address         = ");
  Serial.println(sizeof(&iVal));
  Serial.print("Size of iLongVal address     = ");
  Serial.println(sizeof(&iLongVal));
  Serial.print("Size of iLongLongVal address = ");
  Serial.println(sizeof(&iLongLongVal));
  Serial.println();

  Serial.print("Size of iPointer         = ");
  Serial.println(sizeof(iPointer));
  Serial.print("Size of iLongPointer     = ");
  Serial.println(sizeof(iLongPointer));
  Serial.print("Size of iLongLongPointer = ");
  Serial.println(sizeof(iLongLongPointer));
}

void loop(){/* empty */}
A hint that has nothing to do with pointers: With so many Serial.print("text") instructions, consider switching to Serial.print(F("text")) to save RAM at the expense of flash (more on this here). I have consistently refrained from doing so to focus on the essentials.
Back to the main topic: before we get to the explanations, here is the output I got when using an Arduino Nano:
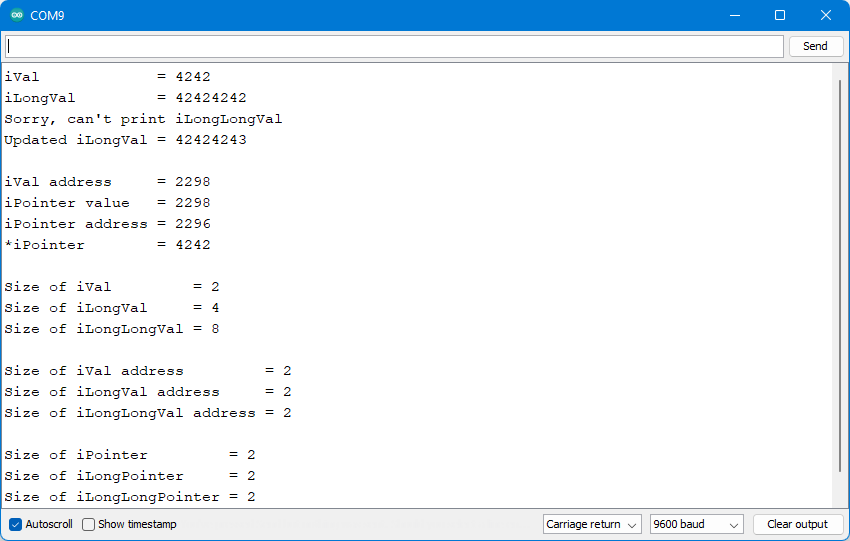
Explanations
In the sketch, three variables of type Integer, Long Integer and Long Long Integer are defined and output. Long Integer cannot be output with Serial.print(), but that is another topic. In addition to the three variables, pointers are defined that point to the variables.
In line 21, *iLongPointer is incremented. As you can see, this changes the value of iLongVal. This is basically unsurprising, since iLongPointer points to iLongVal.
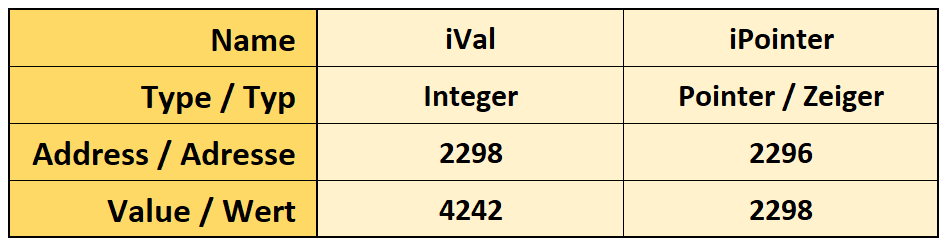
Using iVal as an example, let’s look in detail at what makes the difference between the variable itself and a pointer to it. Then value of iVal is 4242 and iVal located at memory address 2298. 2298 is the starting address. The size of iVal depends on the data type and the microcontroller used. To get the address of iVal, we use the address operator &. To output the address, it must still be explicitly converted to an integer, e.g. like this: (unsigned long)&iVal.
iPointer has its own address, namely 2296. The access to the address works the same way as with iVal. The value of the pointer, i.e. what you read at its own memory address, is the target address (i.e. the address of iVal), namely 2298.
In the following lines of the sketch determines the space needed for the different integer types (int, long, long long). On an ATmega328P based Arduino these are 2, 4 and 8 bytes. “Homework for you”: run the sketch on an ESP32, ESP8266 or SAMD board and see the difference.
The addresses of the integer values have a size of 2 bytes on an ATmega328P based board. This corresponds to the space required by the pointers. So it doesn’t matter how big the object the pointer points to is – the memory needed for the pointer is always the same.
Reading an area of memory using pointers
As you have seen, you can output the value of a variable by dereferencing the pointer to the variable with the * operator. But would it be possible to read the content of the memory at any address? The answer is: Yes and No! Reading the memory itself is no problem – but up to which address? And is it a character or an integer or a float?
You simply have to know the type of the data to be read. The reading is done indirectly using a pointer. Here are the instructions as pseudocode:
datatype *anyPointer;
anyPointer = (datatype*)address;
Value of anyPointer = *anyPointer;
// In short / kurz:
datatype anyPointer = *(datatype*)anyPointer;
In words: 1) Define a pointer and apply the correct variable type, 2) Assign the address to be read to the pointer, 3) Access the value by dereferencing the pointer.
The following sketch plays with this a bit by interpreting the content of a memory area in different ways.
void setup(){
Serial.begin(9600);
delay(2000);
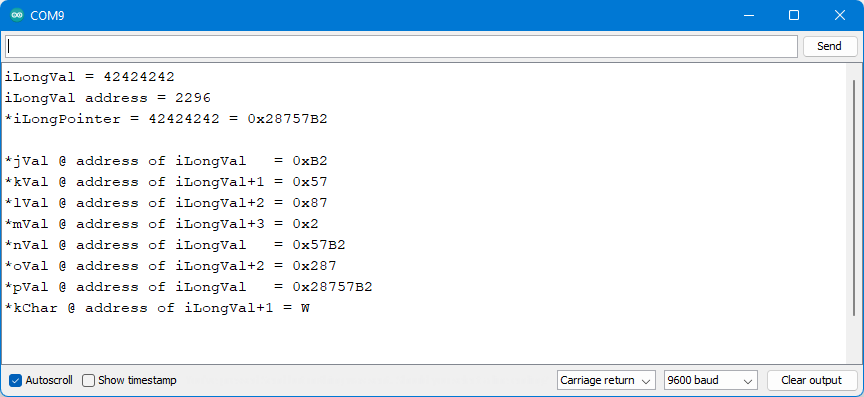
long iLongVal = 42424242;
long *iLongPointer;
iLongPointer = &iLongVal;
Serial.print("iLongVal = ");
Serial.println(iLongVal);
Serial.print("iLongVal address = ");
Serial.println((int)&iLongVal);
Serial.print("*iLongPointer = ");
Serial.print(*iLongPointer);
Serial.print(" = 0x");
Serial.println(*iLongPointer, HEX);
Serial.println();
byte *jVal; // alternative to byte: unsigned char
byte *kVal;
byte *lVal;
byte *mVal;
int *nVal;
int *oVal;
long *pVal;
char *kChar;
jVal = (byte*)&iLongVal;
kVal = (byte*)((int)&iLongVal + 1);
lVal = (byte*)((int)&iLongVal + 2);
mVal = (byte*)((int)&iLongVal + 3);
nVal = (int*)((int)&iLongVal);
oVal = (int*)((int)&iLongVal + 2);
pVal = (long*)((int)&iLongVal);
kChar = (char*)((int)&iLongVal + 1);
Serial.print("*jVal @ address of iLongVal = 0x");
Serial.println(*jVal, HEX);
Serial.print("*kVal @ address of iLongVal+1 = 0x");
Serial.println(*kVal, HEX);
Serial.print("*lVal @ address of iLongVal+2 = 0x");
Serial.println(*lVal, HEX);
Serial.print("*mVal @ address of iLongVal+3 = 0x");
Serial.println(*mVal, HEX);
Serial.print("*nVal @ address of iLongVal = 0x");
Serial.println(*nVal, HEX);
Serial.print("*oVal @ address of iLongVal+2 = 0x");
Serial.println(*oVal, HEX);
Serial.print("*pVal @ address of iLongVal = 0x");
Serial.println(*pVal, HEX);
Serial.print("*kChar @ address of iLongVal+1 = ");
Serial.println(*kChar);
}
void loop(){/* empty */}
Explanations
First, we define the variable iLongVal so that we have something to read. The variable extends over four bytes (on an ATmega328P board). In the next step we read all four bytes individually, then two each as integer and again all four as long integer. Finally, we read a single byte and interpret it as a character. As you will see, the value of this byte is 0x57 and that is a “W” according to the ASCII table.
The structure of the content of the memory area under consideration becomes clearest when using hexadecimal numbers. Here is the output:
The practical use of this approach is very limited because we should know what we have written where in the memory. Sorry that I share this only now 😉 . However, I thought that this would be quite useful to further deepen your knowledge about pointers.
Arrays
Strictly speaking, in the field of microcontrollers / Arduino one means C arrays when talking about arrays. In C++ there is the much more comfortable class vector. That C arrays are used anyway is simply a matter of limited resources. C arrays are faster and require less memory.
When you define a (C) array, the name of the array is also the identifier of the pointer to element 0 of the array. This is easier than it may sound. It just means that instead of anyArray[0] you might as well write *anyArray.
The following sketch plays a bit with the pointer properties of arrays:
void setup() {
  Serial.begin(9600);
  delay(2000); // needed for some boards

  int intArray[4] = {4, 42, 424, 4242};
  for(int i=0; i<4; i++){
    Serial.print("intArray[");
    Serial.print(i);
    Serial.print("] = ");
    Serial.println(intArray[i]);
  }
  Serial.println();
  Serial.print("*intArray       = ");
  Serial.println(*intArray);
  Serial.print("*(intArray + 2) = ");
  Serial.println(*(intArray + 2));
  int *arrayElement_3;
  arrayElement_3 = &intArray[3];
  Serial.print("*arrayElement_3 = ");
  Serial.println(*arrayElement_3);
  Serial.println();

  int *sameArray = intArray;
  Serial.println("sameArray[]:");
  for(int i=0; i<4; i++){
    Serial.print(sameArray[i]);
    Serial.print(" ");
  }
  Serial.println();
  Serial.println("Listing by pointer incrementation:");
  for(int *p=intArray; p < intArray + 4; p++){
    Serial.print(*p);
    Serial.print(" ");
  }

  Serial.println("\n");
  Serial.print("Size of intArray  = ");
  Serial.println(sizeof(intArray));
  Serial.print("Size of sameArray = ");
  Serial.println(sizeof(sameArray));
  Serial.print("Address of intArray  = ");
  Serial.println((int)&intArray);
  Serial.print("Address of sameArray = ");
  Serial.println((int)&sameArray);
  Serial.print("Value of intArray  = ");
  Serial.println((int)intArray);
  Serial.print("Value of sameArray = ");
  Serial.println((int)sameArray);
}

void loop() {}
Here is the output first:
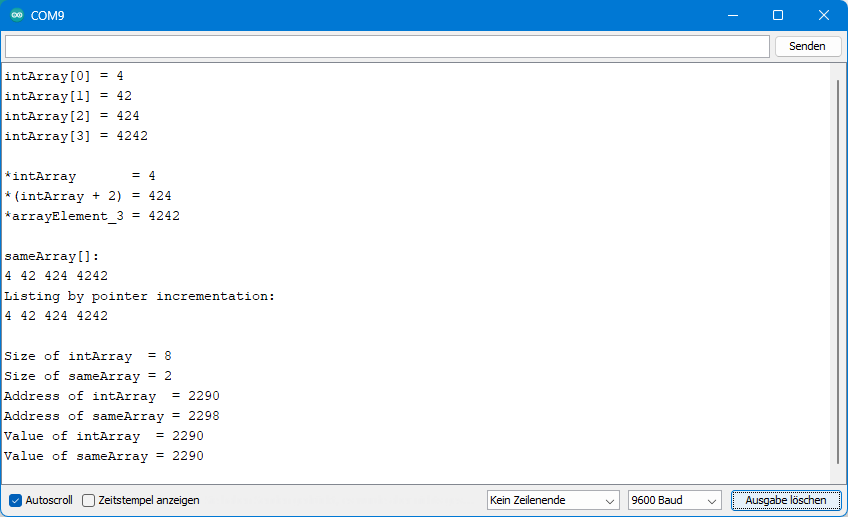
Explanations
With the knowledge, you have about pointers by now, the output of the sketch is probably not a complete surprise. Nevertheless, at least two aspects are noteworthy:
*(intArray + 2)returns the value of element 2 of the array, even though it is “4 bytes away” from the start address on the microcontroller I used (because 2 integers = 4 bytes). On an ESP32 it would work the same way, although an integer has a size of 8 bytes there.intArray + 2therefore means “second element of intArray” and not “address of intArray + 2 bytes” or similar.- Incrementing in the for-construction starting at line 29 works accordingly.
- Using the pointer sameArray you can access the elements of intArray. You will not notice any difference. Nevertheless: sameArray is not intArray, even if both point to the same address. E.g. sameArray has also only a size of 2 bytes and not 8 bytes like intArray. We will come back to this when passing arrays to functions.
References
References are considerably easier to understand than pointers. A reference is simply a different identifier for the same object. An alias, so to speak. The only confusing thing is that the & character is used again when defining references. With int &x = y you create the alias x for the integer variable y. This is not to be confused with the already known int x = &y, which assigns the variable x the value “address of y”. The character & is also called reference operator, which is more appropriate than address operator in this context.
Here is a simple example:
void setup(){
  Serial.begin(9600);

  int iVal = 42;
  int &iRef = iVal; //alternative: int& iRef = iVal;

  Serial.print("iVal = ");
  Serial.println(iVal);
  Serial.print("iRef = ");
  Serial.println(iRef);

  iRef++;
  Serial.print("Updated iVal = ");
  Serial.println(iVal);
}

void loop(){/* empty */}
After we have created an alias for iVal called iRef with int &iRef = iVal;, both identifiers can be used for the same variable. All changes to iRef affect iVal equally and vice versa because iRef is iVal.

Parameter passing to functions
Pointers and references play a major role in parameter passing to and from functions or objects. This is where their advantages really become apparent.
Call-by-Value
“Call-by-value” refers to the “normal” parameter passing to functions or objects, i.e. the way of passing that is usually learned first. Here is an example:
void setup() {
  Serial.begin(9600);
  int iVar = 42;
  Serial.print("iVar in Setup: "); Serial.println(iVar);
  passAsInteger(iVar);
  Serial.print("iVar in Setup: "); Serial.println(iVar);
}

void loop() {/* empty */}

void passAsInteger(int var){
  var *= 2;
  Serial.print("Variable in passAsInteger(): "); Serial.println(var);
}
The variable iVar is passed to the function passAsInteger() and doubled there. The sketch outputs the value before passing, within the function and after return to setup. The output should not come as a surprise:

When passed to the function, a copy of iVal is created in memory. The copy is deleted after return from the function, and the original iVar remains unchanged.
Call-by-Reference
The situation is different if we pass the parameter by reference. All you have to do is prefix the parameter with the referencing operator & in the receiving function:
void setup() {
  Serial.begin(9600);
  int iVar = 42;
  Serial.print("iVar in Setup: "); Serial.println(iVar);
  passAsReference(iVar);
  Serial.print("iVar in Setup: "); Serial.println(iVar);
}

void loop() {/* empty */}

void passAsReference(int &var){
  var *= 2;
  Serial.print("Variable in passAsReference(): "); Serial.println(var);
}
The output is:

The function uses the original with a different identifier. Accordingly, the variable remains changed after returning from the function.
Passing variables by reference has the advantage that it is not necessary to create a local copy. This saves time and memory.
Too many return values?
There is another advantage. Sometimes you want to process multiple variables in a function and use the results after returning from the function. Passing and processing are unproblematic. However, in C++ you can only return one value. We get around this problem by passing the variables by reference.
Here is a small example:
void setup() {
  Serial.begin(9600);
  int iVar_1 = 42;
  int iVar_2 = 4242;
  Serial.println("Original values:");
  Serial.print("iVar_1: "); Serial.println(iVar_1);
  Serial.print("iVar_2: "); Serial.println(iVar_2);
  swap(iVar_1, iVar_2);
  Serial.println("Swapped values:");
  Serial.print("iVar_1: "); Serial.println(iVar_1);
  Serial.print("iVar_2: "); Serial.println(iVar_2);
}

void loop() {/* empty */}

void swap(int &val_1, int &val_2){
  int temp = val_1;
  val_1 = val_2;
  val_2 = temp;
}
The sketch swaps the values of two variables. This would not be possible with call-by-value. Here is the output:

If you want to pass a parameter by reference, but do not want to change it in the function, then it is a good idea to prefix the parameter with the keyword const in the receiving function. This makes the code clearer and protects you from your own mistakes.
“Call-by-Pointer”
Alternatively, you can work in the function with a pointer to the variable to be edited. This should then be called “call-by-pointer”. However, since the term is unusual, I have put quotation marks around it.
When you call the function, you prefix the parameter with the address operator. In the receiving function, the indirection operator is used:
void setup() {
  Serial.begin(9600);
  int iVar = 42;
  Serial.print("iVar in Setup: "); Serial.println(iVar);
  passAsPointer(&iVar);
  Serial.print("iVar in Setup: "); Serial.println(iVar);
}

void loop() {/* empty */}

void passAsPointer(int *var){
  *var *= 2;
  Serial.print("Variable in passAsPointer(): "); Serial.println(*var);
}
Here, too, we work with the original variable within the function. Therefore, the variable is changed permanently:

I would generally prefer the call-by-reference method. However, when passing arrays, we are automatically using the “call-by-pointer” method.
Passing objects
If you pass objects as pointers and use object methods in the function, then you must use the dereference operator within the function or replace the point operator with the arrow operator. Here is an example:
void setup() {
  Serial.begin(9600);
  String string = "Hello world";
  Serial.print("string in setup: "); Serial.println(string);
  upperCase(&string);
  Serial.print("string in setup: "); Serial.println(string);
}

void loop() {/* empty */}

void upperCase(String *localString){
  Serial.print("Upper case: ");
  localString->toUpperCase(); // alternative: *localString.toUpperCase;
  Serial.println(*localString);
}
And here is the output:

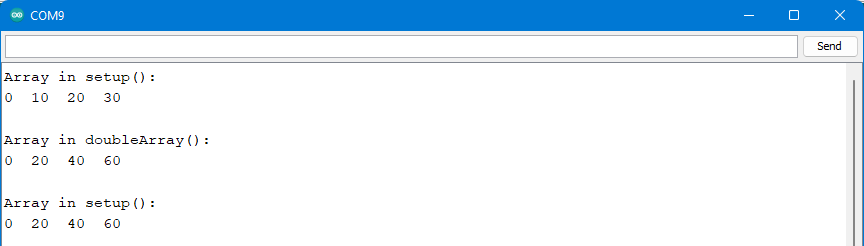
Passing arrays
You pass an array to a function using the name of the array as a parameter. With this, you do not pass the whole array, but only the pointer to the array. A copy of the pointer is then created in the function. As we saw earlier, the information about the size of the array, i.e. the number of elements, is lost in the process. You can conveniently calculate the size of the array via sizeof(anyArray)/sizeof(datatype) and pass it as an additional parameter.
void setup() {
  Serial.begin(9600);
  int intArray[4] = {0};
  for(int i=0; i<4; i++){
    intArray[i] = i * 10;
  }

  Serial.println("Array in setup():");
  for(int i=0; i<4; i++){
    Serial.print(intArray[i]);
    Serial.print("  ");
  }
  Serial.println();
  Serial.println();

  doubleArray(intArray, sizeof(intArray)/sizeof(int));

  Serial.println("Array in setup():");
  for(int i=0; i<4; i++){
    Serial.print(intArray[i]);
    Serial.print("  ");
  }
  Serial.println();
  Serial.println();
}

void loop() {/* empty */}

void doubleArray(int *arr, size_t count){
  Serial.println("Array in doubleArray():");
  for(unsigned int i=0; i<count; i++){
    arr[i] *= 2;
    Serial.print(arr[i]); Serial.print("  ");
  }
  Serial.println();
  Serial.println();
}
Since the function works with the original, the change made by the function is permanent.
Closing words
I think that with this post I have covered the most important aspects on the subject of pointers and references. But more important is what you think. So if there are any open questions or things are unclear or misunderstood, feel free to let me know. Otherwise, I hope I haven’t completely confused you with this post.
Acknowledgement
I owe the post image to pencil parker on Pixabay.