About this post
In this article, I explain how to handle SD cards and SD card modules. Among other aspects, I will discuss the differences in using Arduino, ESP8266 and ESP32 boards.
These are the topics I will cover:
- Why do you need SD cards?
- SD card formats, classes and modules
- Preparations
- Writing and reading
- Create / delete / display files and directories
- Further functions of the classes SD and File
- Testing the writing speed
- SD cards as data logger
- Using multiple SD card modules
Why do you need SD cards?
There are many ways to store data using microcontrollers:
- Smaller amounts of data ranging from a few hundred bytes to a few kilobytes can be stored on the internal EEPROM. That is what I have described here.
- For somewhat larger amounts of data up to ~1 megabyte you can use external EEPROMs. These are characterized by low space and power requirements. I described external, I2C-controlled EEPROMs here. An article about the faster, SPI-based representatives can be found here.
- If you use an ESP32 or ESP8266 based board, you can store several megabytes of data using LittleFS (formerly SPIFFS = SPI Flash File Storage).
- Finally, there are various options for storing data in the cloud or sending it via a network to a PC, for example.
Why do you need SD cards then? There can be several reasons:
- The SD cards are characterized by high storage capacities in the range of gigabytes.
- The data is conveniently transportable. This allows you to read and evaluate the stored data with a card reader on your PC, while your devices (MCU, sensors, etc.) remain on site.
- Unlike online storage methods, you are not dependent on network availability.
SD card formats, classes and modules
SD cards (“Secure Digital memory cards”) differ among others in:
- their dimensions,
- their maximum storage capacity and
- their minimum write speed.
Strictly speaking, the term “SD card” means the large models with dimensions of 24 mm x 32 mm x 2.1 mm and a maximum storage capacity of 2 gigabytes. The somewhat clunky SD card has been replaced by the small microSD card in the 11 mm × 15 mm × 1.0 mm format in most applications. Regarding the size, there are still the rarely used miniSD cards in between.
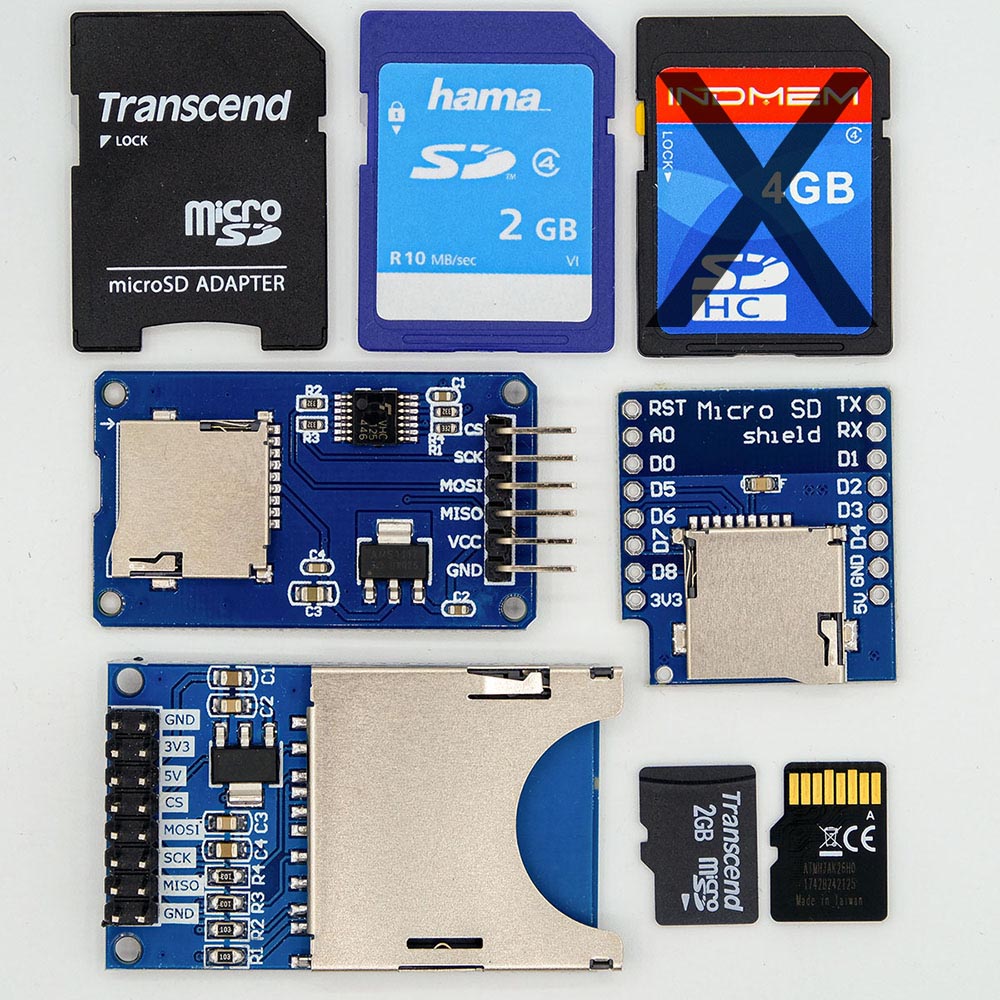
Regarding the maximum storage capacities, a distinction is made between SD, SDHC, SDXC and SDUC cards. Especially for the SD and the microSD/microSDHC cards there are cheap modules for Arduino and other boards, for example these:

With a maximum of 32 gigabytes, SDHC cards have a much higher storage capacity than SD cards.
The minimum writing speed can be derived from the class of the SD card. This is the small number (2 to 10) in the unclosed circle. The number specifies the speed in megabytes per second.
Power consumption
I determined a power consumption of 1.8 milliamps in idle mode for the microSDHC card module. For battery-powered projects, this is quite high. You could consider switching the module on and off as needed via a transistor, or better via a MOSFET. During writing, the power consumption is just under 40 milliamperes.
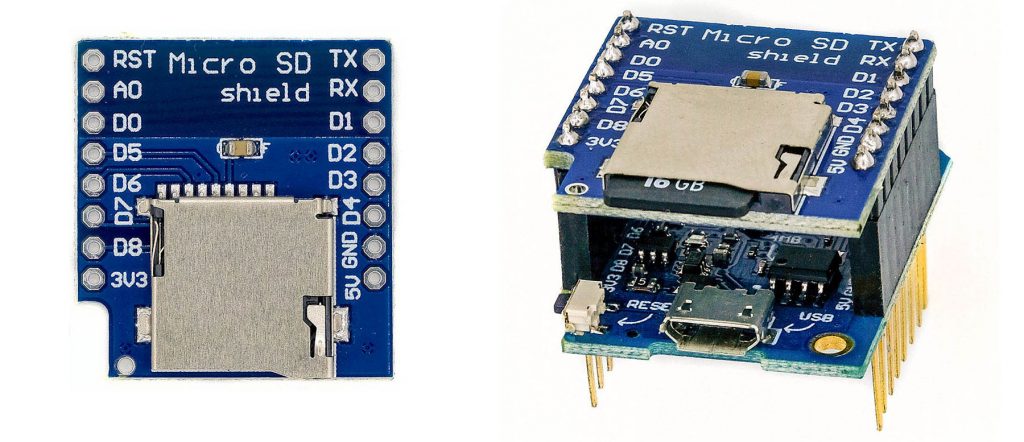
microSD Shield for the Wemos D1 mini
A particularly practical solution is available for the Wemos D1 Mini Board, namely a microSD card shield:
Preparations
Formatting SD cards
If you buy an SD card, it will be pre-formatted. The format can harmonize with the memory card modules, but it does not have to. But even if you want to recycle an old SD card, e.g. from a camera, this is not possible without further ado, since manufacturer-specific formats are sometimes used there.
For the use in the SD card modules, you need the FAT16 or FAT32 format. You can do the formatting on your PC or laptop. If you don’t have an SD card slot, then you should get a USB SD card reader for about 10 Euros.
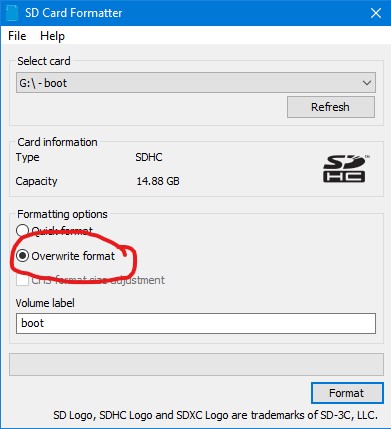
As software, I recommend the free program SD Card Formatter, which you can get here. You have to “unzip” the installation file, and then you can install the program.
SD Card Formatter, with its few settings, is about the simplest program I have ever used. The SD card is automatically detected by the program. Select the option “Overwrite format” and click on “Format”. The process takes a few minutes. And that’s it.
The SD library
The SD library is part of the basic Arduino IDE and therefore does not need to be installed via the library manager. Strictly speaking, there is not “the one” SD library, but different versions for different boards. Especially the version for the ESP32 has a few peculiarities, which I will discuss later.
Depending on the board you have set, you will find different example sketches. Unfortunately, the “Examples for any Board” are not hidden when using ESP32 based boards, although they do not work with them. Go to the ESP32 examples → SD(esp32) instead.

Connecting the microcontroller
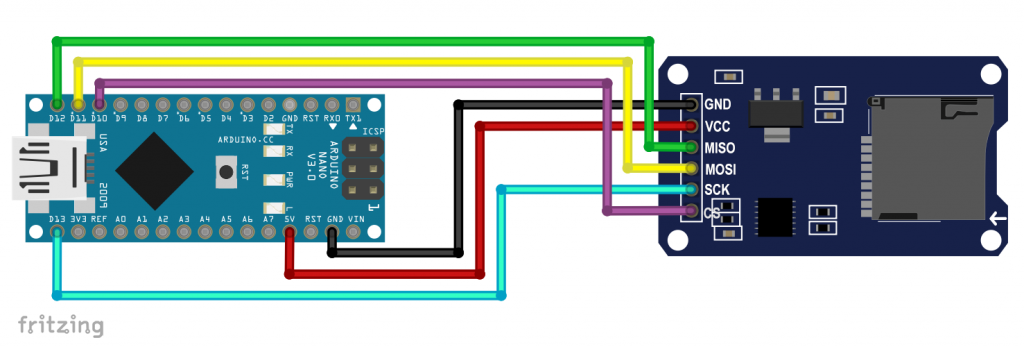
The permissible supply voltage for SD cards is usually 2.7 – 3.6 volts. Some SD cards can also tolerate 1.8 volts. Most SD card modules have voltage regulators and can therefore be operated with 5 volts. The microSD card module I use (absurdly) does not have a 3 volt pin, so it must be powered by 5 volts.
The communication with the microcontroller takes place via SPI. So, MISO is connected to MISO, MOSI to MOSI, SCK to SCK and CS to CS. You can set the CS pin yourself on most boards.
For the Arduino Nano the wiring looks like this:
Check your setup
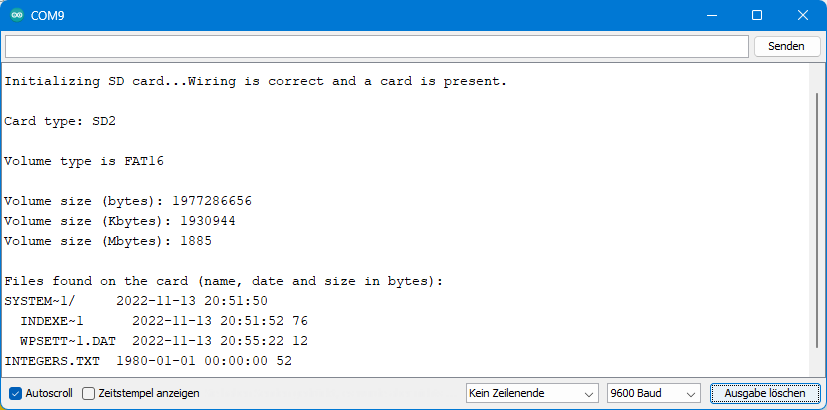
If you are using an Arduino board, then you can check the circuit and the SD card with the CardInfo sketch from the examples. Do not forget to adjust the CS pin if necessary.
The sketch tells you the SD card type, format, storage capacity and the directories and files present:
CardInfo does not work on ESP32 or ESP8266 boards. As a first test for an ESP32 based board, I recommend instead the example sketch SD_Test.ino and for an ESP8266 board the sketch listfiles.ino.
Writing and reading
Now let’s have a look at a few functions of the SD library and start with simple read and write operations.
Writing
The following example sketch writes an integer array to the SD card. Again, (but for the last time in this post) the hint: You may have to adjust the CS pin.
#include <SD.h>
const int chipSelect = 10; // choose an appropriate pin for your board
void setup(){
String myFile = "integers.txt"; // for ESP32: "/integers.txt";
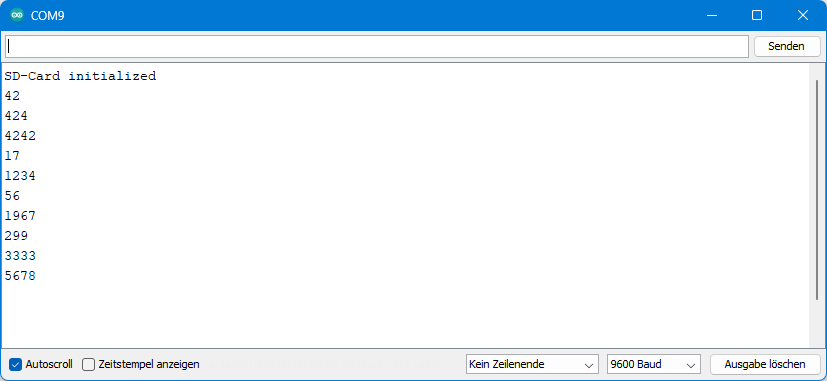
int intArray[10] = {42, 424, 4242, 17, 1234, 56, 1967, 299, 3333, 5678};
Serial.begin(9600);
// while(!Serial){} // needed for some boards
// delay(1000); // helps in case of incomplete output on serial monitor
if(!SD.begin(chipSelect)){
Serial.println("SD-Card not connected!");
while(1);
}
else{
Serial.println("SD-Card initialized");
}
SD.remove(myFile);
File dataFile = SD.open(myFile, FILE_WRITE);
if(dataFile){
for(int i = 0; i < 10; i++){
dataFile.println(intArray[i]);
}
dataFile.close();
Serial.println("Data written");
}
else{
Serial.println("Could not open file");
}
}
void loop(){}
Explanations for sd_card_write.ino
The SD library is included with #include <SD.h>. The initialization is done with SD.begin(chipSelectPin). If this process works, then SD.begin() returns the value true, otherwise false. You do not need to create an SD object unless you want to use two or more SD cards (see last chapter).
The file we create and fill is called “integers.txt”. We store the name in the string variable “myFile”. Only 8 characters are allowed for the file name, plus 3 characters for the file extension – welcome to the last millennium!
The instruction SD.remove(myFile); deletes the file myFile (or “integers.txt”) if it should exist. Without this measure, the data to be saved would be appended to the end of the file again with each program run (except with the ESP32).
Line 20 appears inconspicuous, but there is much behind it:
File dataFile = SD.open(myFile, FILE_WRITE);
For understanding (or confusion?):
- SD is an object of SDClass. This is not obvious since you did not have to create SD yourself.
- File is a property of SDClass.
SD.open(myFile)opens the path to “myFile”. The function returns an object of the File class, i.e. a file object, which is given the name dataFile. The FILE_WRITE parameter specifies that the file is opened for writing.- So “myFile” contains only the filename or the path to the file. In contrast, “dataFile” is the actual file object.
- Consequently,
dataFile.name()returns the content of the variable “myFile”, in this case “integers.txt”. You can try that out.
- Consequently,
The instructions for writing are print(), println() or alternatively write(). The similarities to Serial functions are not accidental because File and Serial are relatives, namely “children” of the Stream class.
Finally, you complete the writing process with close().
Peculiarities of the ESP32
For the ESP32 you need to consider:
- The names of files and directories must be preceded by a slash (“/”).
- If “FILE_WRITE” is applied to an existing file, then its contents will be overwritten. You can append content using the FILE_APPEND parameter. The SD library for Arduino boards does not know the parameter “FILE_APPEND” and appends the content automatically.
SD.begin()can be called without CS Pin. In this case the default GPIO5 is used.
Read
The following sketch reads the just saved data from the SD card:
#include <SD.h>
const int chipSelect = 10; // choose an appropriate pin for your board

void setup(){
  char myFile[] = "integers.txt"; // for ESP32: "/integers.txt";
  Serial.begin(9600);
//  while(!Serial){} // needed for some Boards
//  delay(1000); // helps in case of incomplete output on serial monitor

  if(!SD.begin(chipSelect)){
    Serial.println("SD-Card not connected!");
    while(1);
  }
  else{
    Serial.println("SD-Card initialized");
  }

  File dataFile = SD.open(myFile);

  if(dataFile){
    while(dataFile.available()){
      String line = dataFile.readStringUntil('\n');
      Serial.println(line);
    }
//    Alternative: read as Integer
//    while(dataFile.available()){
//      int readInt = dataFile.parseInt();
//      Serial.println(readInt);
//    }
    dataFile.close();
  }
  else{
    Serial.println("Could not open file");
  }
}

void loop(){}
Explanations for sd_card_read.ino
Much of this is similar to the writing sketch discussed earlier. I will only go into the main differences.
- This time I defined “myFile” as a character array. The reason is merely to show that it can be done.
- By calling
SD.open(myFile)without “FILE_WRITE”, the file can only be read. - There are two options for reading the data:
readStringUntil('\n')reads all characters up to the next line break as a string.- To read out the data as an integer, the practical function
parseInt()can be used. For floating-point numbers,parseFloat()would be available.
Finally, the file is closed again with close().
The output should not surprise:
Creating / deleting / displaying files and directories
You have just seen how to create and delete files. Now let’s look at how you do the same with directories and how you display entire directory structures, including the files preserved in them. First here is the sketch which also works on an ESP8266 but not on an ESP32:
/* Based on:
  listfiles.ino, created Nov 2010 by David A. Mellis;
  modified 9 Apr 2012 by Tom Igoe
  modified 2 Feb 2014 by Scott Fitzgerald
*/
#include <SD.h>
const int chipSelectPin = 10;

void setup() {
  Serial.begin(9600);
  while (!Serial) {}

  Serial.print("Initializing SD card...");

  if (!SD.begin(chipSelectPin)) {
    Serial.println("initialization failed!");
    while (1);
  }
  Serial.println("initialization done.");

  Serial.println("Adding files:");
  SD.mkdir("New_Fold"); // make new folder
  File dataFile = SD.open("file_1.txt", FILE_WRITE);
  dataFile.println("Some Content");
  dataFile.close();

  dataFile = SD.open("new_fold/file_2.txt", FILE_WRITE);
  dataFile.println("Some other Content");
  dataFile.close();

  File root = SD.open("/");
  printDirectory(root, 0);

  Serial.println();
  Serial.println("After removing files:");
  SD.remove("file_1.txt");
  SD.remove("new_fold/file_2.txt");
  SD.rmdir("new_fold");

  root = SD.open("/");
  printDirectory(root, 0);

  Serial.println("done!");
}

void loop() {}

void printDirectory(File &dir, int numTabs) {
  while (true) {

    File entry =  dir.openNextFile();
    if (! entry) {
      // no more files
      break;
    }
    for (uint8_t i = 0; i < numTabs; i++) {
      Serial.print('\t');
    }
    Serial.print(entry.name());
    if (entry.isDirectory()) {
      Serial.println("/");
      printDirectory(entry, numTabs + 1);
    } else {
      // files have sizes, directories do not
      Serial.print("\t\t");
      Serial.println(entry.size(), DEC);
    }
    entry.close();
  }
}
Explanations for add_remove_list_files_and_folders.ino
The setup()
SD.mkdir("New_Fold")creates a directory with the name “New_Fold”.- We create the file “file_1.txt” only to have something more to display.
SD.open("New_Fold/file_2.txt", FILE_WRITE);creates the file “file_2.txt” in the folder “New_Fold”.- The assignment
File root = SD.open("/");is perhaps a little surprising, since a file object called “root” is created, which represents the main directory. Users of Linux or Unix should be less surprised because for these systems a directory is just a special file. - The files and directories are displayed using the
printDirectory()function. We’ll get to that in a moment. - We remove the added files and directories with
SD.remove()andSD.rmdir()respectively. - After that, the content of the SD card is output once again.
The printDirectory() function
The function printDirectory() is passed a file object (on the first call this is root) and the number of tabs. The number of tabs is used for formatting and represents the current directory depth.
File entry = dir.openNextFile(); opens the next file found on the SD card and creates the file object “entry” from it. Three scenarios are possible:
- There is no other file or directory (
!entry). The loop is canceled. - Another entry is available and it is a directory (
entry.isDirectory()). In that case,printDirectory()is executed again, and the current directory depth is increased by 1. This is a nice example of a recursive call. - Another entry is present and it is a file. In this case the file size is queried and output with
entry.size(). After that, the while loop continues.
Here is the output:
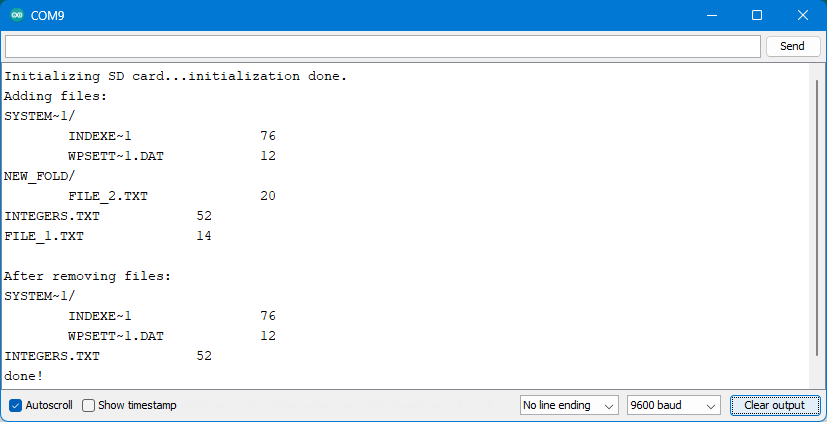
A few things stand out:
- SYSTEM~1 is the SystemVolumeInformation directory. It is created automatically by Windows. Since its name has more than eight letters, it is abbreviated.
- You can delete the directory without hesitation because it is not needed for FAT16/FAT32. However, you must first delete the two files in this directory.
SD.rmdir()works only with empty directories. - If you then read the SD card again with a reader on the PC, the directory and its contents will be recreated.
- You can delete the directory without hesitation because it is not needed for FAT16/FAT32. However, you must first delete the two files in this directory.
- The SD library converts all file and directory names to uppercase.
add_remove_list_files_and_folders for the ESP32
The corresponding sketch for the ESP32 does basically the same. Here, however, the directory depth (“noOfFolderLevels”) must be specified. A value greater than the actual directory depth (which you may not know) does no harm.
The sketch is based on parts of the example sketch SD_Test.ino. The original sketch is a little more complex than it needs to be because the SD object is also passed to the functions there. But this is not necessary.
In addition, the sketch provides general information about the SD card, namely type and size.
#include "SD.h"

void setup(){
  int noOfFolderLevels = 3;
  Serial.begin(115200);
  delay(1000);
  if(!SD.begin()){
    Serial.println("Card Mount Failed");
    return;
  }
  uint8_t cardType = SD.cardType();

  if(cardType == CARD_NONE){
    Serial.println("No SD card attached");
    return;
  }

  Serial.print("SD Card Type: ");
  if(cardType == CARD_MMC){
    Serial.println("MMC");
  } else if(cardType == CARD_SD){
      Serial.println("SDSC");
  } else if(cardType == CARD_SDHC){
      Serial.println("SDHC");
  } else {
      Serial.println("UNKNOWN");
  }
  uint64_t cardSize = SD.cardSize() / (1024 * 1024);
  Serial.printf("SD Card Size: %lluMB\n", cardSize);

  Serial.println("Adding files:");
  SD.mkdir("/new_fold"); // make new folder
  File dataFile = SD.open("/file_1.txt", FILE_WRITE);
  dataFile.println("Some Content");
  dataFile.close();

  dataFile = SD.open("/new_fold/file_2.txt", FILE_WRITE);
  dataFile.println("Some other Content");
  dataFile.close();

  listDir("/", noOfFolderLevels);

  Serial.println();
  Serial.println("After removing files:");
  SD.remove("/file_1.txt");
  SD.remove("/new_fold/file_2.txt");
  SD.rmdir("/new_fold");

  listDir("/", noOfFolderLevels);
}

void loop(){}

void listDir(const char * dirname, uint8_t levels){
  Serial.printf("Listing directory: ");
  Serial.println(dirname);

  File root = SD.open(dirname);
  if(!root){
    Serial.println("Failed to open directory");
    return;
  }
  if(!root.isDirectory()){
    Serial.println("Not a directory");
    return;
  }

  File file = root.openNextFile();
  while(file){
    if(file.isDirectory()){
      Serial.print("  DIR : ");
      Serial.println(file.name());
      if(levels){
        listDir(file.name(), levels -1);
      }
    } else {
        Serial.print("  FILE: ");
        Serial.print(file.name());
        Serial.print("  SIZE: ");
        Serial.println(file.size());
    }
    file = root.openNextFile();
  }
}
And this is what the output looks like:

Further functions of the classes SD and File
Many functions classes SD and File we have already discussed. A complete listing can be found here on the Arduino pages.

Testing the writing speed
To check the writing speed, I wrote the following sketch. It writes 1000 integer values to a file. Two variants are being tested. First, the file is opened, and the values are written “in one go” to numbersa.txt. In a second pass, the file is opened again for each write operation (to numbersb.txt).
#include <SD.h>
const int chipSelect = 10;

void setup(){
  String myFile = "numbersa.txt";
  Serial.begin(9600);
  SD.begin(chipSelect);
  SD.remove(myFile);
  unsigned long startTime = millis();

  // Continuous writing:
  File dataFile = SD.open(myFile, FILE_WRITE);
  for (int i=0; i<1000; i++){
    dataFile.println(i);
  }
  dataFile.close();

  unsigned long writingTime = millis() - startTime;
  Serial.println("Writing 1000 integers took: ");
  Serial.print(writingTime);
  Serial.println(" [ms],");
  Serial.println("when keeping file open");
  Serial.println();

  // Discontinuous writing: n x (open, write, close)
  myFile = "numbersb.txt";
  SD.remove(myFile);
  startTime = millis();
  for (int i=0; i<1000; i++){
    dataFile = SD.open(myFile, FILE_WRITE); // FILE_APPEND for ESP32
    dataFile.println(i);
    dataFile.close();
  }

  writingTime = millis() - startTime;
  Serial.println("Writing 1000 integers took: ");
  Serial.print(writingTime);
  Serial.println(" [ms],");
  Serial.println("when reopening the file for every entry");
  Serial.println();
  delay(1000);
}

void loop(){}
Here is the result using an Arduino Nano:
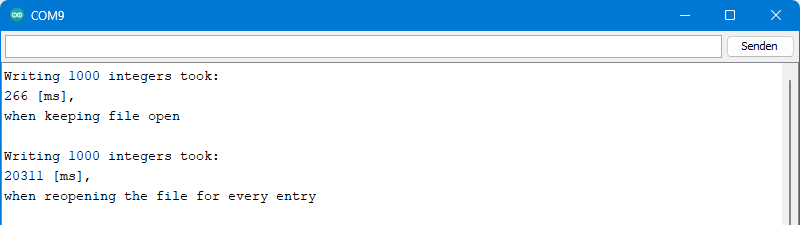
The result speaks for itself: Opening and closing the file takes a few milliseconds each, while the actual writing of a single integer value takes place in the microsecond range. So, if speed is important, you should leave the file open.
The file numbersa.txt is 4.77 kilobytes in size. We needed 0.266 seconds for this, which results in a write speed of 17.9 KB/s. But wasn’t the minimum writing speed of SD cards in the range of a few MB/s? This is true, but the bottleneck here is data processing and transmission.
The write process on a Wemos D1 Mini board was considerably faster. It only took 57 (!) milliseconds. For an ESP32 development board, I determined 75 milliseconds.
Moreover, the speed depends on the SD card. I determined the above values with a 16 GB microSDHC card. The time required to write the 1000 integer values, on the other hand, was 60 to 100 milliseconds higher when using a 2 GB microSD card (without “HC”).
Acceleration for Arduino AVR Boards
If you want to write larger amounts of data, it is more effective to store them temporarily in a buffer and then transfer the buffer in one go. At least this is true when using an AVR-based Arduino board. Using this sketch (based on the nonBlockingWrite example sketch), I was able to reduce the write time for 1000 integers from 266 milliseconds to 141 milliseconds.
#include <SD.h>

const char filename[] = "demo.txt";
File txtFile;
unsigned long lastMillis = 0;

void setup() {
    Serial.begin(115200);
    while (!Serial);

    // reserve memory for a String used as a buffer
    String buffer;
    buffer.reserve(288);  // reserve memory for the buffer (slightly bigger than the chunk size)

    if (!SD.begin(10)) {
        Serial.println("Card failed, or not present");
        // don't do anything more:
    while (1);
    }
    // If you want to start from an empty file,
    // uncomment the next line:
    SD.remove(filename);

    txtFile = SD.open(filename, FILE_WRITE);
    if (!txtFile) {
        Serial.print("error opening ");
        Serial.println(filename);
        while (1);
    }

    int counter = 0;
    unsigned long startingTime = millis();

    while(counter < 1000){
        fastWrite(buffer, counter);
        counter++;
    }
    txtFile.write(buffer.c_str()); // write what is left in the buffer
    unsigned long writingTime = millis() - startingTime;
    txtFile.close();
    Serial.print("Writing Time [ms]: ");
    Serial.println(writingTime);
}

void loop() {}

void fastWrite(String &buf, int counter){
    const unsigned int chunkSize = 256;
    char charBuf[10]; // buffer for t
    dtostrf(counter, 1, 0, charBuf); // convert counter char array
    buf += charBuf;
    buf += "\r\n";  // add carriage return and line feed
    if ((buf.length() >= chunkSize)) {
        txtFile.write(buf.c_str(), chunkSize); // write chunk
        buf.remove(0, chunkSize); // remove from buffer what's already written
    }
}
The sketch is quite substantial. But to keep the article from getting too long, I’ll just explain it in broad terms:
bufferis the buffer memory for the numbers to be written. Its capacity must be slightly higher than the size of the chunks to be written.dtostrf()converts the number to be written into a character array which is written to the end of the buffer memory.- If the buffer is larger than the chunk size, the buffer is written to the SD card and reduced accordingly. After that, the buffer is filled again.
- At the end, the rest of the buffer is written to the SD card.
For the Wemos D1 Mini Board, I could not achieve an increase in writing speed with it. It does not work on the ESP32, but further explanation would lead too far.
SD cards as data loggers
One of the main applications for SD cards with microcontrollers is as data loggers. In the examples, you will find a simple sketch. I go one step further and control the recording of the values temporally via an alarm of a DS3231 RTC module. This has the advantage that you can record the date and time of your measurement. Furthermore, you can send your microcontroller to sleep meanwhile and wake it up by the DS3231. Here is the basic circuit:
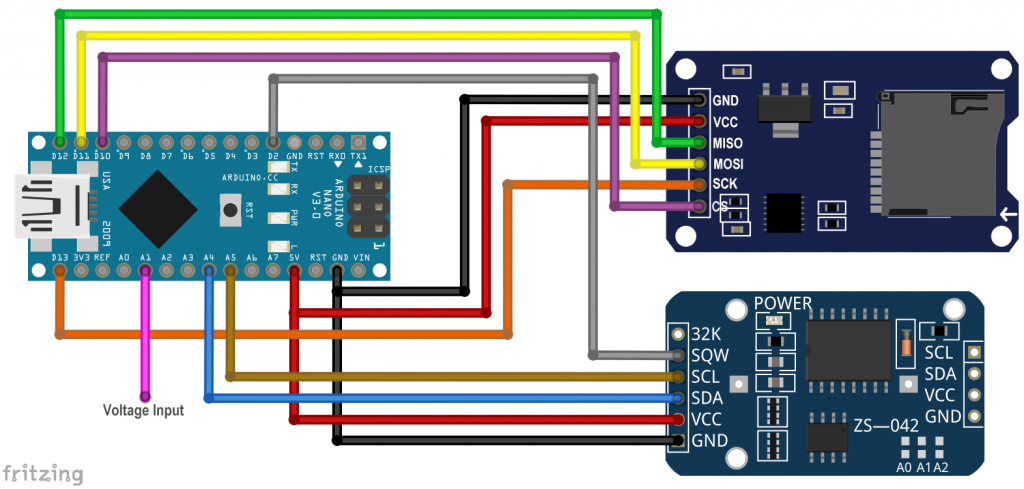
To measure just anything, I connected a potentiometer to the analog input A1. You can replace that with something more exciting. This is the sketch:
#include <RTClib.h>
#include <Wire.h>
#include <SD.h>
#include <avr/sleep.h> // comment if you don't use an AVR based Board
const int chipSelectPin = 10;
const int clockInterruptPin = 2;
const int analogPin = A1;
String myFile = "data_log.csv";

RTC_DS3231 rtc;

void setup() {
  Serial.begin(9600);
  pinMode(analogPin, INPUT);

  SD.begin(chipSelectPin);
  SD.remove(myFile);
  File dataFile = SD.open(myFile, FILE_WRITE);
  dataFile.println("Time;analogRead"); // you my need a "," instead of ";"
  dataFile.close();

  rtc.begin();
  rtc.adjust(DateTime(F(__DATE__), F(__TIME__))); // set time to system at when compiling
  rtc.disable32K(); //disable 32K pin
  rtc.clearAlarm(1); // in case there's still an alarm
  rtc.clearAlarm(2);
  rtc.writeSqwPinMode(DS3231_OFF); // we use the SQW pin for interrupts
  rtc.disableAlarm(2); // we don't need alarm 2
  rtc.setAlarm1(rtc.now() + TimeSpan(10), DS3231_A1_Second);  // alarm in 10 seconds

  pinMode(clockInterruptPin, INPUT_PULLUP);
  attachInterrupt(digitalPinToInterrupt(clockInterruptPin), onAlarm, FALLING);
}

void loop() {
  if(rtc.alarmFired(1)) {
    unsigned int measuredValue = analogRead(analogPin);
    char date[18] = "DD.MM.YY hh:mm:ss";
    rtc.now().toString(date);
    rtc.clearAlarm(1);

    Serial.println(date);
    Serial.print("Analog Read: ");
    Serial.println(measuredValue);
    File dataFile = SD.open(myFile, FILE_WRITE); // FILE_APPEND for ESP32
    dataFile.print(date);
    dataFile.print(";");
    dataFile.println(measuredValue);
    dataFile.close();
    rtc.setAlarm1(rtc.now() + TimeSpan(10),DS3231_A1_Second);
    delay(100); // give some time for Serial.print() / Data.print() to complete

    set_sleep_mode(SLEEP_MODE_PWR_DOWN); // choose power down mode, comment if you don't use an AVR based Board
    sleep_mode(); // sleep now! // comment if you don't use an AVR based Board
  }
}

void onAlarm() {
    Serial.print("Alarm at: ");
}
Explanations for data_logger.ino
In order not to make the article too long, I will not go into the details of the DS3231 control. Please have a look at this article. In broad terms, here’s what the sketch does:
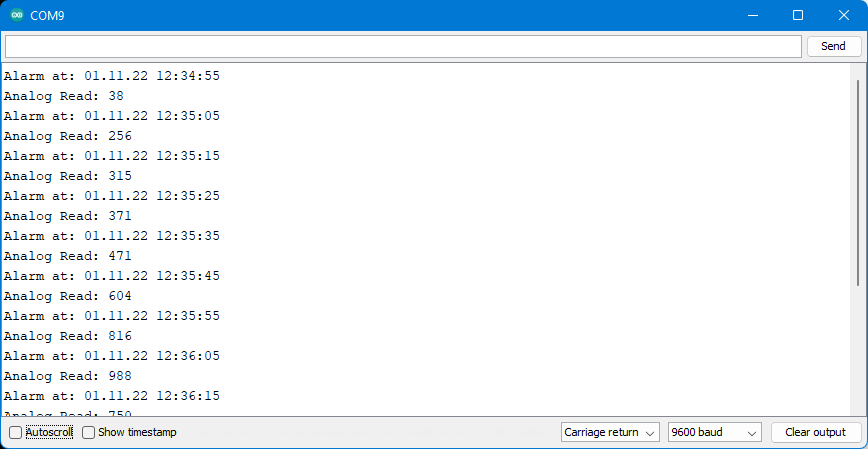
- Every 10 seconds, the DS3231 triggers an alarm.
- The alarm wakes up the Arduino, which then takes a measurement.
- The measured value is written to the SD card in the data_log.csv file, together with the date and time. The format is: “DD.MM.YY hh:mm:ss;measured value”.
- The first line in data_log.csv is “Time;analogRead” and serves as a header.
- Measured value and time are also output on the serial monitor, which is only for control purposes.
- The Arduino is sent to sleep and everything starts over again.
This is what the output looked like on the serial monitor:
Display / evaluate the data in Excel
The nice thing about “.csv” files is that you can evaluate them in Excel, as long as they are properly formatted. Properly formatted means:
- One set of values per line.
- The values are separated by a separator, in Germany a semicolon.
- Excel can read “.csv” files if they contain a maximum of 1,048,576 (=220) lines.
The separator is not defined in Excel, but in the operating system. In Windows 11 you can change this under: Settings → Time and Language → Language and Region → Administrative Language Settings → Tab: Formats → Other Settings → List Separator. Well hidden!
So you take your “.csv” file and import it into Excel:

Don’t worry, the seconds have not disappeared. If you click in the individual lines, they will be displayed.
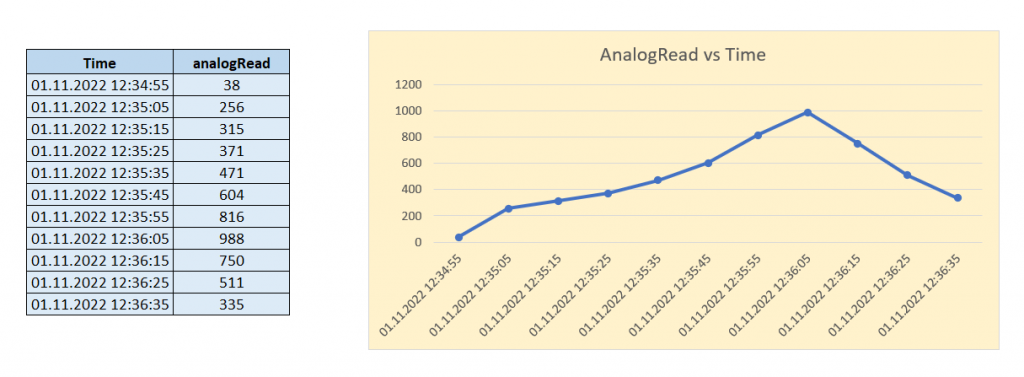
And now you can make statistical evaluations or use the many options for graphical representation, for example like this:
Using multiple SD card modules
You want to use multiple SD card modules? No problem. You just have to create a separate SDClass object for each SD card or SD card module and assign a CS pin. The SD cards share the MISO, MOSI and SCK lines. This is what it would look like for two modules:
#include <SD.h>
const int csPin_1 = 9;
const int csPin_2 = 10;

SDClass mySD_1;
SDClass mySD_2;

void setup(){
  Serial.begin(9600);
  if(!mySD_1.begin(csPin_1)){
    Serial.println("SD-Card 1 not connected!");
    while(1);
  }
  else{
    Serial.println("SD-Card 1 initialized");
  }

  if(!mySD_2.begin(csPin_2)){
    Serial.println("SD-Card 2 not connected!");
    while(1);
  }
  else{
    Serial.println("SD-Card 2 initialized");
  }
}

void loop(){}
On an ESP32, you could alternatively use two separate SPI interfaces.
Hello Mr Wolfgang, I hope everything is fine. I’ve been trying to obtain readings from an analog pressure sensor to observe pressure changes in a water tank and save these pressure values on an SD card, it turns out that on arduinos I can take the readings and save the data, but on the ESP32 I can’t, I’ve been struggling with ESP for almost a year to save this data and I haven’t been successful in any way, even following the forums and tutorials, could you give me some light? I use an esp32 wroom 32D and my last attempt was as follows:
#include
#include
#include
File myFile;
int meteoCount = 1;
void setup() {
Serial.begin(9600);
SD.begin(5);
myFile = SD.open(“/ph2o.txt”, FILE_WRITE);
myFile.println(“ph2o psi”);
myFile.close();
}
void loop() {
float in = analogRead(14);
float tensao = in * (4.5 / 4096.0);
float ph2o = (10.8961573941795*tensao)-5.26502400898493;
myFile = SD.open(“/ph2o.txt”, FILE_WRITE);
myFile.print(ph2o, 2);
myFile.println(“”);
myFile.close();
meteoCount++;
delay (1000);
}
Dear Andre, one year is a log time trying! I hope I can help. If you use FILE_WRITE on the ESP32, the content of the file will be overwritten. So, if you want to add values to an existing file, you need to use FILE_APPEND instead. This only applies to the ESP32. Does this solve your problem?
Regards, Wolfgang
Dear Mr. Wolfang, a year is really a good amount of time, but this year I managed to learn a lot about the world of MCUs and carry out fun projects with the Arduino. Trying to migrate to ESP32 is an attempt to evolve these projects and so far it hadn’t worked, I found where it was failing with your help and it was something very simple (I didn’t define APPEND in the setup, just in the loop), once again I I would like to thank you very much for your help, experience and willingness. I wish you happiness at the end of the year and beginning of 2024.
Hi Wolfgang,
(regarding ESP32)
Where does the 2GB size limit for SDcards come from?
I have also seen “4GB” limits specified (nothing official though).
Why is there a difference in usable size between SD and mircoSD? I always thought the only difference was the formfactor?
My issue is, I want to use SD (not microSD) for my project because they are larger and more robust, don’t get lost or damaged so easily (better suited i.e. for little kids). But although I don’t think I will ever need more than 2GB of storage, 2GB cards are rare and expensive compared to more common ones. So I’d like to understand the actual technical limitation.
kind regards,
Ethan
Hi Ethan,
you are right, the formfactor and the storge capacity are two different things. An “SD-card” is the big-sized card and a maximum storage capacity of 2 GB. An “SDHC-card” card would be the big-sized card with a maximum of 32 GB. You can use these if your SD card module is able to read them (I had some problems, but this may not apply for all modules). An “SDHCmicro-card” would be the small-sized card with up to 32GB. There is a good summary on Wikipedia.
Cheers, Wolfgang
I’m aware of what sizes, speeds etc. there are, but not of the hardware limitations regarding ESP32. Do the modules have any active electronics inside? afaik the SDcard can be accessed directly @3.3v via SPI, without anything in between. See also: https://www.mischianti.org/2021/03/28/how-to-use-sd-card-with-esp32-2/ – so if there is any usable size limitation, it can only be ESP32-software-based. I’m also aware that the SD.h only supports (max) FAT32. But that only limits single file sizes, afaik, not the whole filesystem size.
My SD-card module only seems to have some resistors and capacitors and a voltage regulator for 5V supply. If this is all needed – I simply don’t know. According to the article for which you sent the link it’s not needed. My SDHC module additionally hosts a VHC 125 bus buffer: https://www.onsemi.com/download/data-sheet/pdf/mc74vhc125-d.pdf. If this is needed in general or just needed to achieve a certain data rate or similar I don’t know.
The documentation of the SD card library just says it is limited to SD and SDHC cards. And that limits the max. size to 2GB (SD) or 32 GB (SDHC). I don’t know the reason why e.g. XC Cards are not supported.
You may also have a look at the alternative library SDFat which also supports exFAT:
https://github.com/greiman/SdFat