About this post
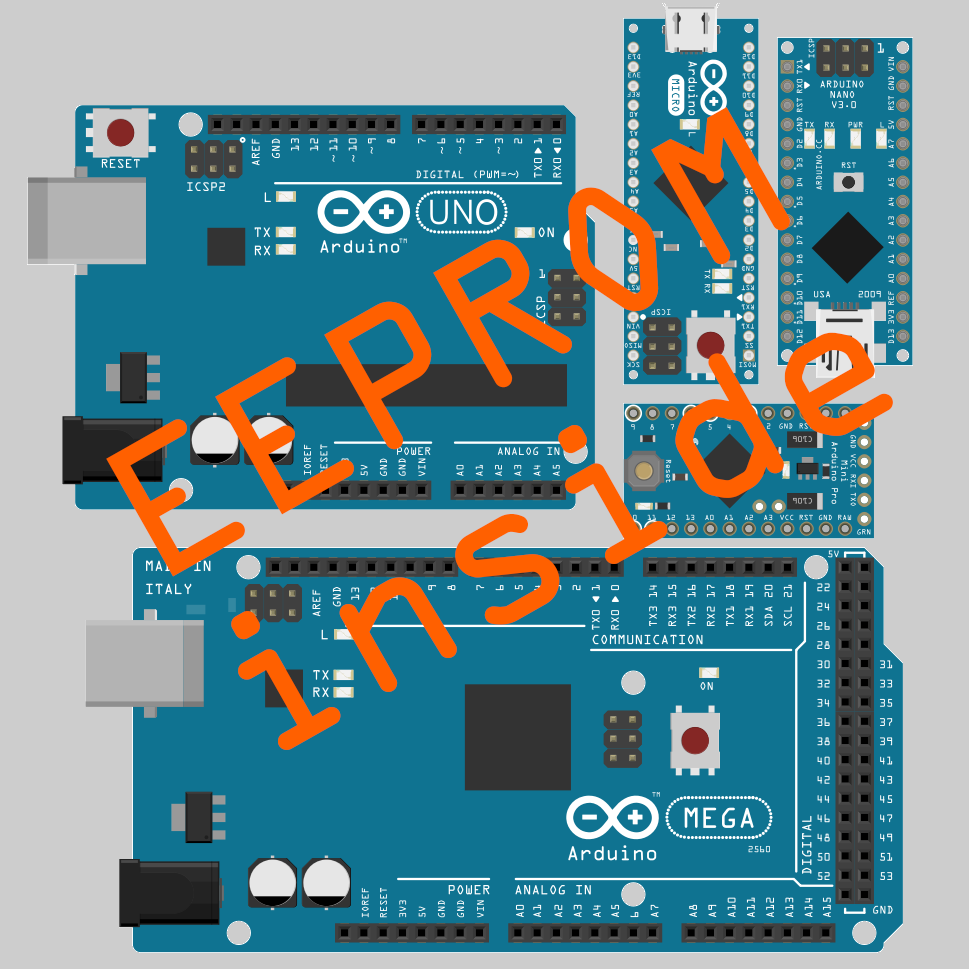
Development boards based on AVR microcontrollers, such as the Arduino UNO, MEGA2560, Nano, Pro Mini and some others, have a small EEPROM (Electrically Erasable Programmable Read-Only Memory). The EEPROM is ideal for storing small amounts of data that the microcontroller should not forget even after power off.
The ESP32 and ESP8266 boards also have read-only memories that can be controlled with the EEPROM library.
Those who read my article about the HX711-based scale may remember that the calibration values could be stored in the EEPROM there. This is much more convenient than manually adding them into the program code.
In this post I will show which functions you use to write to and read from the EEPROM. This is simple for data types with a defined size, such as bytes, integers or floats. A bit more demanding is the handling of strings or character arrays. That’s why I’m going into this topic particularly intensively.
The article is structured as follows:
- What is an EEPROM?
- The functions of the EEPROM library
- Write and read speed
- Storing character arrays and strings on the EEPROM
- Application example: Telephone directory with ready-made SMS
Introduction – what is an EEPROM?
Brief development history of the EEPROM
The development history of the EEPROM is in its name. Evolution proceeded as follows:
- ROM – Read Only Memory: this type of memory is immutable. The memory content is determined during production.
- PROM – Programmable Read Only Memory: this memory can be programmed once.
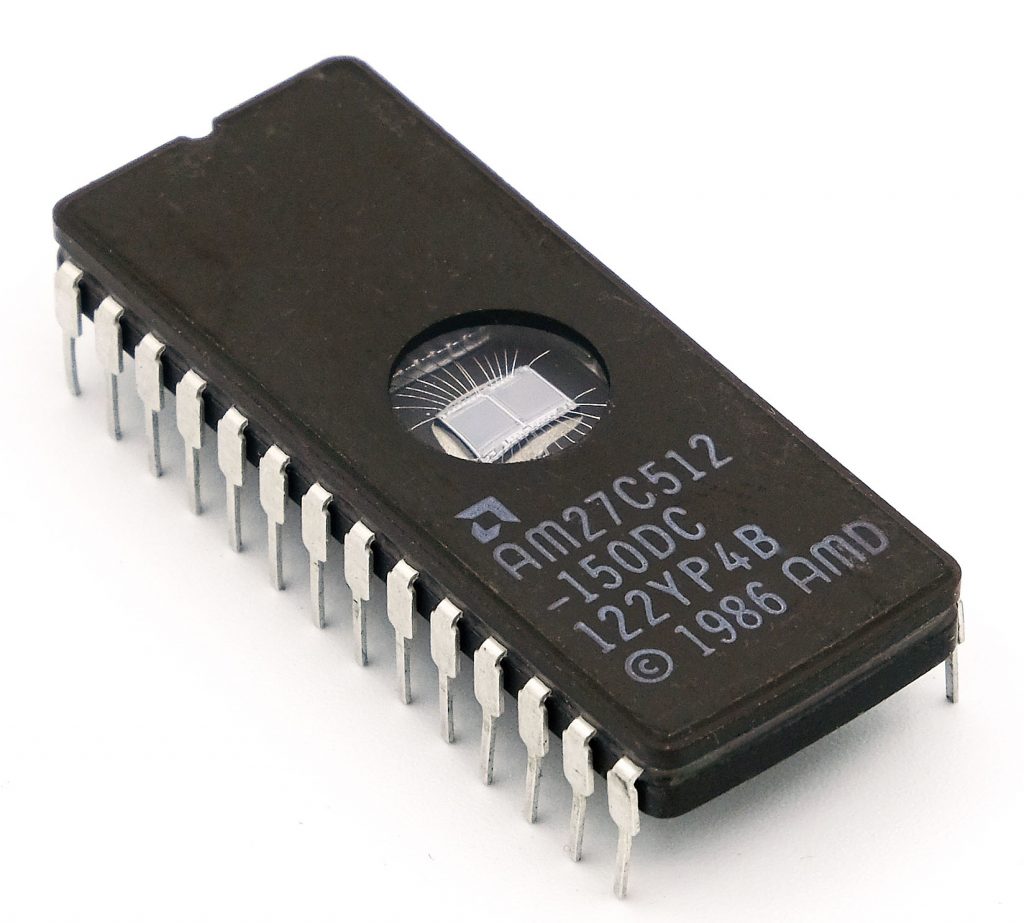
- EPROM – Erasable Programmable Read Only Memory: with this further development, the ROM could also be erased again, for example with UV light.
- EEPROM – Electrically Erasable Programmable Read Only Memory: this most modern variant is electrically erasable, so also by software.
Flash memory, as used in SD cards, is also based on EEPROM technology. A major difference is that the EEPROM can be written and deleted byte by byte, while this is done on the flash memory sector by sector. This is one of the reasons why the flash memory is much faster.
Features of EEPROMs
EEPROMs are used when small amounts of data are to be stored permanently and are not subject to frequent changes. Their disadvantage is the limited number of write operations. Manufacturers guarantee between 10,000 and 1,000,000 write cycles. In addition, the writing process is extremely slow – we’ll get to that.
The internal EEPROM of the Arduino
The EEPROM memory is part of the underlying microcontroller. The Arduino Mega 2560 is based on the ATmega2560, which has an EEPROM of 4 KB. The boards based on the ATmega328P, such as the Arduino UNO, have a 1 KB EEPROM. For Arduino boards that are available with different microcontrollers, such as the Arduino Pro Mini (Atmega328P or Atmega168) you have to check which one is used. The service life is 100,000 write cycles.
The functions of the EEPROM library
put(), get() and length()
We start with a simple task. Three integer values are to be written first into the EEPROM, then read out and finally output to the serial monitor.
First, we need to integrate the EEPROM library, which is an integral part of the Arduino IDE when using AVR boards. It is not necessary for us to create an EEPROM object. However, when using an ESP32 or ESP8266 based board, it is necessary to initialize the EEPROM with EEPROM.begin(size in byte);. I only write this in the first example sketch. In the other sketches, you have to add the line yourself.
The function EEPROM.put(addr, var) writes the variable var to the EEPROM. It starts at the address addr. In the example sketch, this is address 0. Since an integer comprises two bytes, memory addresses 0 and 1 are occupied. We set the next integer value at address 2 and thus occupy memory locations 2 and 3. This means that you have to keep track of the addresses when writing.
If you are unsure about the size of the variable, you can use the sizeof(var) function to determine it.
The put()function does not care which address you apply. You could also start at 357. The function does not check whether a memory address already contains data or not. For example, if you were to store the second integer at addresses 1 and 2, there would be no warnings. The first integer value would be partially overwritten.
The function EEPROM.get(addr, var) reads the EEPROM at the address addr. It stores the content in the variable var. The variable type determines how many memory addresses will be read.
The function EEPROM.length() returns the total size of the EEPROM memory.
This is the sketch:
#include <EEPROM.h>
void setup(){
  Serial.begin(9600);
//  EEPROM.begin(1024); // uncomment if you use an ESP32 or ESP8266
//  delay(1000);
  int int0 = 42, int1 = 9999, int2 = -13756;
  int readInt = 0;
  Serial.print("Size of EEPROM: ");
  Serial.println(EEPROM.length());

  unsigned int address = 0;
  unsigned int increment = (sizeof(int));
  Serial.print("increment: ");
  Serial.println(increment);

  // Write:
  EEPROM.put(address, int0);
  address += increment;
  EEPROM.put(address, int1);
  address += increment;
  EEPROM.put(address, int2);

  // Read:
  address = 0;
  EEPROM.get(address, readInt);
  Serial.print("1. Integer: ");
  Serial.println(readInt);

  address += increment;
  EEPROM.get(address, readInt);
  Serial.print("2. Integer: ");
  Serial.println(readInt);

  address += increment;
  EEPROM.get(address, readInt);
  Serial.print("3. Integer: ");
  Serial.println(readInt);

  // uncomment the following for ESP32 / ESP8266
  /*
  if (EEPROM.commit()) { // validate the changes
    Serial.println("EEPROM successfully committed");
  } else {
    Serial.println("ERROR! EEPROM commit failed");
  }
  */

}

void loop(){}
And here is the output:

write(), read(), update() and EEPROM[]
Alternatively, you can write to the EEPROM using EEPROM.write(addr, var). However, byte must be variable of the type var. To save an integer value with this function, you would first have to split it into its two bytes (4 bytes when using an ESP32 or ESP8266) and write them individually to the EEPROM.
The function EEPROM.update(addr, var) does the same as EEPROM.write(addr, var), but writes var only if the value is different from the current value at that memory address. On the one hand, this brings speed advantages, on the other hand, it increases the life span of the EEPROM. However, this is only noticeable if only a small proportion of what you write on the EEPROM is actually new. Otherwise, the chance is 1 : 256 that the correct value is already in memory. With text to be saved, it looks a little better.
The counterpart to EEPROM.write() is EEPROM.read(addr). This function reads a single byte at the address addr.
With EEPROM[addr] you address the EEPROM as an array. EEPROM[addr] = var writes a value, var = EEPROM[addr] reads a value. And again, var is mandatory of the byte data type.
Here is a small sketch:
#include <EEPROM.h>

void setup(){
  Serial.begin(9600);
  byte readVal = 0;

  // write:
  EEPROM.write(0,255);
  EEPROM.update(523,42);
  EEPROM[37] = 111;

  // read and print:
  readVal = EEPROM[0];
  Serial.print("Address 0:   ");
  Serial.println(readVal);

  readVal = EEPROM.read(523);
  Serial.print("Address 523: ");
  Serial.println(readVal);

  EEPROM.get(37, readVal);
  Serial.print("Address 37:  ");
  Serial.println(readVal);
}

void loop(){}
Here’s what the output looks like:

In the following, I will mainly use the functions put() and get(), also for writing individual bytes.
Write and read speed
Writing data to EEPROMs is a very slow process. I “measured” this with the following sketch.
#include <EEPROM.h>

void setup(){
  Serial.begin(9600);

  unsigned long duration = 0;
  unsigned long start = millis();

  for(int address=0; address<1024; address++){
    EEPROM.write(address,42);
  }
  duration = millis() - start;

  Serial.print("duration [ms]: ");
  Serial.println(duration);
}

void loop(){}
It took all of 3.5 seconds to fill the entire EEPROM with data:

So you need about 3.4 milliseconds to write a single byte. To illustrate this: If you wanted to store a 4 GB movie at this speed, it would take about 157 days!
The reading process is almost 2000 times faster. With the following sketch, you can test this:
#include <EEPROM.h>

void setup(){
  Serial.begin(9600);

  byte b = 0;
  unsigned long a = 0;
  unsigned long duration1 = 0;
  unsigned long duration2 = 0;
  unsigned long duration = 0;
  unsigned long start = micros();

  for(int address=0; address<1024; address++){
    EEPROM.get(address,b);
    a += b; // dummy use of b
  }
  duration1 = micros() - start;

  a = 0;
  start = micros();
  for(int address=0; address<1024; address++){
    a += b;
  }
  duration2 = micros() - start;

  duration = duration1 - duration2;

  Serial.print("duration1 [µs]: ");
  Serial.println(duration1);
  Serial.print("duration2 [µs]: ");
  Serial.println(duration2);
  Serial.print("duration [µs]: ");
  Serial.println(duration);
  Serial.print("dummy: ");
  Serial.println(a);
}
void loop(){}
The sketch looks quite complex for what it is supposed to do. However, simply reading the contents of memory without using the data causes the compiler to simply “optimize away” the process.
Since the loop and the calculation also take some time, I measured the time needed for these operations again separately and then subtracted it.

The reading of the entire EEPROM takes 1924 μs, i.e. about 1.88 μs per byte.
Deepening
The following sketch writes the numbers 65 to 74 as bytes to the addresses 0 to 9. For verification, the numbers are read out and output to the serial monitor.
#include <EEPROM.h>

void setup(){
  Serial.begin(9600);
  byte byteArray[10];
  byte startValue = 65;

  for(int i=0; i<10; i++){
    EEPROM.put(i, startValue + i);
  }

  for(int i=0; i<10; i++){
    EEPROM.get(i, byteArray[i]);
  }
  for(int i=0; i<10; i++){
    Serial.print("byteArray[");
    Serial.print(i);
    Serial.print("]: ");
    Serial.println(byteArray[i]);
  }
}

void loop(){}
The data on the EEPROM does not indicate which data types it is or at which address a value begins and where it ends. The following sketch interprets the data in different ways as bytes, characters, integer, float and long.
#include <EEPROM.h>

void setup(){
  Serial.begin(9600);
  byte byteArray[10];
  char charArray[10];
  unsigned int uintArray[5];
  float floatVal = 0.0;
  long longVal = 0;
  int intArray[5];

  for(int i=0; i<10; i++){
    EEPROM.get(i, byteArray[i]);
  }
  for(int i=0; i<10; i++){
    Serial.print("byteArray[");
    Serial.print(i);
    Serial.print("]: ");
    Serial.print(byteArray[i]);
    Serial.print(", 0x");
    Serial.println(byteArray[i], HEX);
  }
  for(int i=0; i<10; i++){
    EEPROM.get(i, charArray[i]);
  }
  for(int i=0; i<10; i++){
    Serial.print("charArray[");
    Serial.print(i);
    Serial.print("]: ");
    Serial.println(charArray[i]);
  }
  for(int i=0; i<5; i++){
    EEPROM.get(2*i, uintArray[i]);
  }
  for(int i=0; i<5; i++){
    Serial.print("uintArray[");
    Serial.print(i);
    Serial.print("]: ");
    Serial.print(uintArray[i]);
    Serial.print(", 0x");
    Serial.println(uintArray[i], HEX);
  }
  for(int i=0; i<5; i++){
    EEPROM.get(2*i, intArray[i]);
  }
  EEPROM.get(0, floatVal);
  Serial.print("Float Value:  ");
  Serial.println(floatVal);
  EEPROM.get(4, longVal);
  Serial.print("Long Value:   ");
  Serial.println(longVal);
}
void loop(){}
And this is what the output looks like:
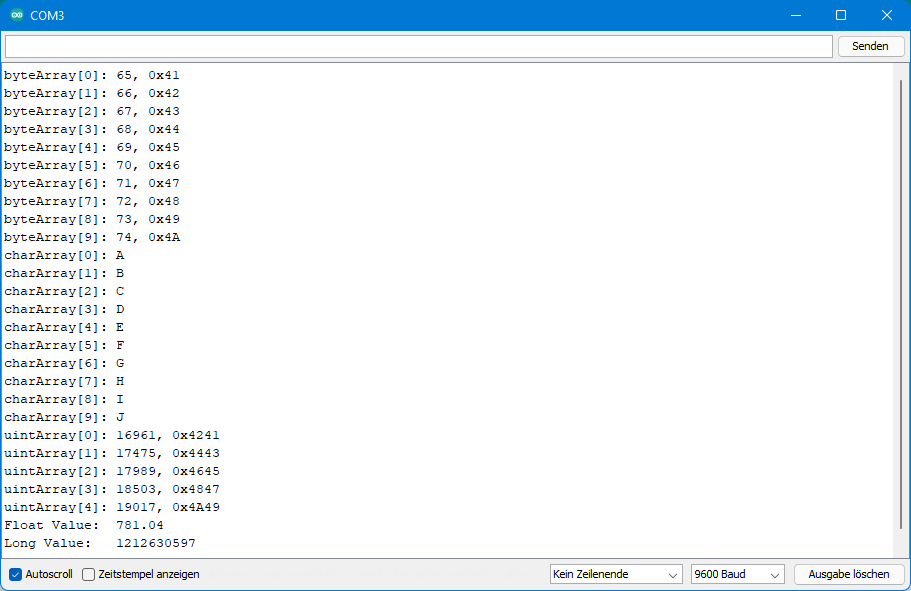
This last sketch is only to clarify once more that you must know exactly where your data is located on the EEPROM and which data type it is. Without that, it’s just “data salad”.
Writing character arrays and strings to the EEPROM
There are options for “text” variables. Either you use character arrays (array of chars) or string objects. Character arrays require less program memory and RAM, on the other hand there are very convenient functions to deal with strings.
The difference between strings and the variable types used so far is their variable length. So, you not only have to know at which address they start on the EEPROM, but also where they end. But how? The answer is: Strings are terminated with the null character '\0'. The null character (ASCII code 0) is not to be confused with the zero (ASCII code 48). When declaring a character array, due to null termination, one more element must be added to the number of readable characters, for example:
char myCharArray[5] = "four";
Character Arrays
General information about character arrays
In the last section, we had saved the characters “ABCDEFGHIJ” on the EEPROM. The string occupies addresses 0 through 9. The following sketch adds the null character to the address 10. After this operation, the string can be read in one go, even if the length is not known. To illustrate this, I intentionally reserved more characters than necessary for the array myCharArray in the following sketch.
#include <EEPROM.h>

void setup(){
  Serial.begin(9600);
  EEPROM.put(10,'WPML_BUFFER_MASK_7');

  char myCharArray[20];
  EEPROM.get(0,myCharArray);

  Serial.print("myCharArray: ");
  Serial.println(myCharArray);
  Serial.print("Length: ");
  Serial.println(sizeof(myCharArray));

  String myString = String(myCharArray);
  Serial.print("myString:    ");
  Serial.println(myString);
  Serial.print("Length: ");
  Serial.println(myString.length());
}

void loop(){}
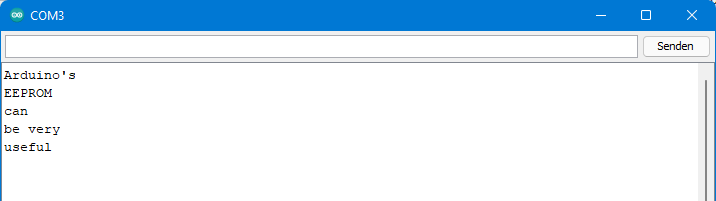
Here’s what the output looks like:
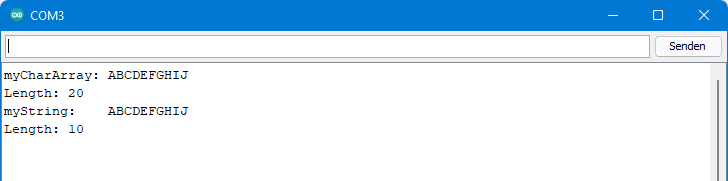
Although myCharArray can have up to 20 characters, it is displayed correctly via the println() function. When converting to a String object, the characters after the null character are ignored.
Writing multiple character arrays to the EEPROM
Now I want to show you how to write several character arrays to the EEPROM. In the following sketch, the character arrays are first declared and then passed one after the other to a function that writes the arrays character by character to the EEPROM. It is necessary to always calculate the current address.
#include <EEPROM.h>

void setup(){
  int address = 0;
  char myCharArray0[] = "Arduino's";
  char myCharArray1[] = "EEPROM";
  char myCharArray2[] = "can";
  char myCharArray3[] = "be very";
  char myCharArray4[] = "useful";

  Serial.begin(9600);

  address = writeToEEPROM(address, myCharArray0);
  address = writeToEEPROM(address, myCharArray1);
  address = writeToEEPROM(address, myCharArray2);
  address = writeToEEPROM(address, myCharArray3);
  address = writeToEEPROM(address, myCharArray4);
}

void loop(){}

int writeToEEPROM(int addr, char *cArr){
  int i=0;

  do{
    EEPROM.put(addr + i, cArr[i]);
    i++;
  }while(cArr[i-1] != 'WPML_BUFFER_MASK_8');

  addr += i;
  return addr;
}
Since strings can take up a lot of memory, functions to which they are passed do not work with copies, but with the originals. The name of a character array is the pointer to its first element. With this, writeToEEPROM(address, myCharArray0); passes the array myCharArray0 as a pointer. Accordingly, it must be received in the function writeToEEPROM() as a pointer, which is indicated by the “*” operator.
Reading multiple character arrays from the EEPROM
The readout works similarly:
#include <EEPROM.h>

void setup(){
  char myCharArray[30]; // max 29 characters expected
  Serial.begin(9600);

  for(int i=0; i<5; i++){
    readNextCharArray(myCharArray);
    Serial.println(myCharArray);
  }
}

void loop(){}

void readNextCharArray(char* cArr){
  static int address = 0;
  int i = 0;
  cArr[i] = ' ';

  do{
    EEPROM.get(address + i, cArr[i]);
    i++;
  }while(cArr[i-1] != 'WPML_BUFFER_MASK_9');

  address += i;
}
With char myCharArray[30] I declare a character array at a length of up to 29 characters plus the null character. The array is passed as a pointer to readNextCharArray() and ist there filled with life, so to speak. I have solved the bookkeeping for the address differently here for a change. It is calculated as “static int” in the writing function.
Why writing and reading character by character?
Above I had read the “ABCDEFGHIJ” array “in one go” and not character by character. Why not in the last examples? Unfortunately, this does not work so easily after passing to the function. Here’s a test:
#include <EEPROM.h>

void setup(){
  char myCharArray[30]; // max 29 characters expected
  Serial.begin(9600);

  EEPROM.get(0,myCharArray);

  Serial.print("Char Array (setup): ");
  Serial.println(myCharArray);
  readCharArray(myCharArray);
}

void loop(){}

void readCharArray(char* cArr){
  char myLocalCharArray[30];
  Serial.print("Char Array (passed to readCharArray): ");
  Serial.println(cArr);
  EEPROM.get(0,cArr);
  Serial.print("Char Array (read from EEPROM in readCharArray): ");
  Serial.println(cArr);
  EEPROM.get(0,myLocalCharArray);
  Serial.print("Char Array (read from EEPROM in readCharArray as local array of chars): ");
  Serial.println(myLocalCharArray);
}
The Serial.println() command works after the transfer, but reading does EEPROM.get(0, cArr) not work properly:

An alternative
Instead of the null character, you could also write the length of the character array to be stored at the beginning character array. Then you know how many characters you need to read before the next character array begins. This replaces the null character on the EEPROM. The space needed is therefore the same.
Strings
Writing multiple strings to the EEPROM
Even when passings string objects to functions, you should work with the originals in functions and not create local copies. To do this, the String object is simply preceded by the address operator “&” in the function declaration. Otherwise, the procedure is similar:
#include <EEPROM.h>

void setup(){
  int address = 0;
  String myString0 = "Arduino's";
  String myString1 = "EEPROM";
  String myString2 = "can";
  String myString3 = "be very";
  String myString4 = "useful";
  Serial.begin(9600);

  address = writeToEEPROM(address, myString0);
  address = writeToEEPROM(address, myString1);
  address = writeToEEPROM(address, myString2);
  address = writeToEEPROM(address, myString3);
  address = writeToEEPROM(address, myString4);
}

void loop(){}

int writeToEEPROM(int address, String &stringToWrite){
  for(unsigned int i=0; i<stringToWrite.length(); i++){
    EEPROM.put(address, stringToWrite[i]);
    address++;
  }
  EEPROM.put(address, '\0');
  address++;
  return address;
}
As you can see, we do not save the String object as such, but again as a character array.
Reading multiple strings from the EEPROM
Since the strings were stored as character arrays on the EEPROM, you could simply read them with the Sketch eeprom_read_multiple_char_arrays.ino. But I would like to show here how to work with strings instead.
#include <EEPROM.h>

void setup(){
  int address = 0;
  String myString = "";
  Serial.begin(9600);

  for(int i=0; i<5; i++){
    readNextString(myString);
    Serial.println(myString);
  }
}

void loop(){}

void readNextString(String &stringToRead){
  static int address = 0;
  stringToRead = "";
  char c = ' ';

  while(c != '\0'){
    EEPROM.get(address,c);
    address++;
    stringToRead += c;
  }
}
Of course, the output is the same as when reading by using character arrays:
Application example: Telephone directory with ready-made SMS
A few weeks ago, a reader asked me how the EEPROM and SIM800L modules could be used to send ready-made SMS at the push of a button. By the way, that was also the trigger for writing this article.
This task is no longer a big challenge. First, the phone numbers and the ready-made SMS are stored on the EEPROM as follows.
#include <EEPROM.h>

void setup(){
  int address = 0;
  String Herbert = "+491731234567,Hi Herbert, let's have a beer this evening, do you have time?";
  String John = "+492323223323,Hi John, can you call me tomorrow?";
  String Grandma = "+497776665554444,Hi Grandma, don't forget to take your medicine!";
  String Tina = "+49876543210,Hi Tina, I will arrive in 30 minutes";
  String Pizza = "+492345654321,Hi Pizza-Service, No. 18 with extra garlic, please";

  Serial.begin(9600);

  address = writeToEEPROM(address, Herbert);
  address = writeToEEPROM(address, John);
  address = writeToEEPROM(address, Grandma);
  address = writeToEEPROM(address, Tina);
  address = writeToEEPROM(address, Pizza);
}

void loop(){}

int writeToEEPROM(int address, String &stringToWrite){
  for(unsigned int i=0; i<stringToWrite.length(); i++){
    EEPROM.put(address, stringToWrite[i]);
    address++;
  }
  EEPROM.put(address, '\0');
  address++;
  return address;
}
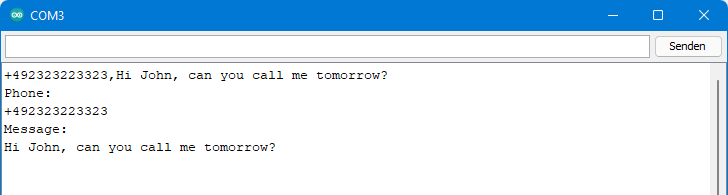
This post is about the EEPROM and not the SIM800L module. That’s why I’m just focusing on how the entries are read from the EEPROM. The recipients of the SMS are defined as an enum called “smsRecipient”. The order must correspond to the order of the entries on the EEPROM. If you now want to send a text message to John, you will get to the phone number and the message as follows:
#include <EEPROM.h>

enum smsRecipient {Herbert, John, Grandma, Tina, Pizza};

void setup(){
  String smsString = "";
  smsRecipient sendTo = John;
  Serial.begin(9600);

  readSmsString(smsString, sendTo);
  Serial.println(smsString);
  String phone = smsString.substring(0, smsString.indexOf(","));
  String message = smsString.substring(smsString.indexOf(",")+1, smsString.length());
  Serial.println("Phone:");
  Serial.println(phone);
  Serial.println("Message:");
  Serial.println(message);
}

void loop(){}

void readSmsString(String &stringToRead, smsRecipient sendTo){
  unsigned int address = 0;
  stringToRead = "";
  char c = ' ';
  unsigned int counter = 0;

  while(counter < sendTo){
    address++;
    EEPROM.get(address,c);
    if(c == '\0'){
      counter++;
    }
  }
  c = ' ';
  while(c != '\0'){
    address++;
    EEPROM.get(address,c);
    stringToRead += c;
  }
}
Herbert is 0, John is 1. So, you have to search for the first null character on the EEPROM. Everything between the first and second null character is stored in a string. The first comma of the string separates the phone number from the message. The two parts can be split into individual strings via the convenient substring() and indexOf() functions. In this example, I first output the entire string, then the number and finally the message on the serial monitor:
Not much is missing to complete the sketch: a few buttons are queried in a loop whether they have been pressed. The buttons are assigned to SMS recipients, for example: “If key 1 is pressed, then smsRecipient = John”. How to send SMS messages with the SIM800L module, I have described in my post about the SIM800L module.
Outlook
If you have to store larger amounts of data, you don’t get very far with the internal EEPROM, at least this is true for the AVR-based boards. Therefore, I will show in a second part how to control external IC2 based EEPROMs. In a third part, I will deal with SPI based EEPROMs.
hello please help me, how to put and get
String kandang[8] = {“1″,”13″,”15″,”16″,”17″,”3″,”19″,”20”};
please give me example..
Hi,
just take the sketch eeprom_write_multiple_strings.ino and change the setup to:
Serial.begin(9600);
int address = 0;
String kandang[8] = {“1″,”13″,”15″,”16″,”17″,”3″,”19″,”20”};
for(int i=0; i<<8; i++){
address = writeToEEPROM(address, kandang[i]);
}
For reading you take the sketch eeprom_read_multiple_strings.ino and change the setup to:
String readKandang[8] = {"","","","","","","",""};
Serial.begin(9600);
for(int i=0; i<8; i++){
readNextString(readKandang[i]);
Serial.println(readKandang[i]);
}
That means you store and read the strings as a character array.
You use the code
for(int i=0; i<5; i++){
EEPROM.get(2*i, uintArray[i]);
I cannot figure out how "2*i" works, can explain or give a long version of what it does.
Your tutorial has cleared up a lot of questions I have about eeproms.
Thank you
Hi,
this is part of the sketch which I use to show that you need to know what kind of data is located at which address. The part you are referring to is reading the data on the EEPROM as unsigned integers. An integer consists of two bytes. So, the first integer will be at address 0 and 1, the second at 2 and 3, the third at 4 and 5 and so on. If you go through the loop, you will get:
EEPROM.get(0, uintArray[0]);
EEPROM.get(2, uintArray[1]);
EEPROM.get(4, uintArray[2]);
etc.
So the first value that is read is starting at address 0. uintArray[0] is the element 0 of an array of unsigned integers. The get function is intelligent and therefore it knows that the integer consists of two bytes and will read the addresses 0 and 1 and make an unsigned integer from the two bytes.
The next integer uintArray[1] will be read beginning at address 2, uintArray[2] at address 4 and so on.
I hope it’s clearer now?!
Hi Ewald, I use the eeprom of an Arduino Mega 2560 in my project for an off-grid solar installation (june 12, 2021 post in INA226).
The scheme I use is quite simple and works very well but it should be used with care because it only writes the bytes that have changed from the entire structure (update) and always reads the entire structure.
It uses an union that is a special data type that enables to store different data types in a single definition:
byte byteArray[900];
is a vector of the same size as the structure
struct
{
.
.
.
};
is a structure that contains all the variables that will be written in and read from the eeprom
This example is what I use in my project. It uses 900 bytes of eeprom from address 0.
union
{
byte byteArray[900]; // Vector attached to the structure for writing and reading the eeprom
struct // Structure of variables for processing
{
unsigned long valido; // Code that confirms valid eeprom
float etracer1; // Energia recebida no Tracer 1
float etracer2; // Energy received on Tracer 1
float einversor; // Energy supplied by the inverter
int grupo_rf[13][13]; // grupo_rf[grupo][x] -> reflectors that make up the group
// grupo_rf[grupo][0] -> number of reflectors in the group
int grupo_am[13][2]; // grupo_am[grupo][0] -> active(0-inactive,1-active),
// grupo_am[grupo][1] -> mode(1-automatic(photocell),
// 2-command,3-scheduled (on and off time))
float grupo_if[13][2]; // grupo_if[grupo][0] -> time schedule – on
// grupo_if[grupo][1] -> time schedule – off
};
}uniao;
Every reference to the variables of the struct and the vector must be preceded by the name of the union as a prefix (in my case I used the name uniao).
int grava_estrutura_eeprom(void) // Function to write the eeprom
{
unsigned int nn;
byte *p = uniao.byteArray;
for (nn=0;nn<sizeof(uniao.byteArray);nn++)
{
EEPROM.update(nn,*p++);
//EEPROM.write(nn,*p++);
}
return nn;
}
int le_estrutura_eeprom(void) // Function to read the eeprom
{
unsigned int nn;
byte *p = uniao.byteArray;
for (nn=0;nn<sizeof(uniao.byteArray);nn++)
{
*p++ = EEPROM.read(nn);
}
return nn;
}