About this post
In this article, we will dive into the depths of SRAM (Static Random Access Memory). In doing so, I will explain the difference between stack and heap and show how variables are created and managed in these memory areas. In this context, we will also address the question of why one should be careful when using strings in Arduino sketches. Finally, I’ll give you some tips on how to use the SRAM resource sparingly.
All this is not new, and there are already quite a few good articles about it on the web. I think what sets this post apart from many others is the level of detail and the approach. Above all, I want to show very concretely on address level what is going on in the SRAM when different variables are created. I will also show you how to determine the addresses of variables in the heap. “Forensic Arduinoistics,” so to speak.
The article assumes basic knowledge about pointers, references and the address operator. If you have difficulties with this, please read my last post.
What topics I will cover:
- Flash, SRAM and EEPROM
- The SRAM at a glance
- How variables are stored in SRAM
- Stack Management
- String handling in SRAM
- Character Arrays
- Force variables into the heap
- Saving SRAM with PROGMEM and F()
1. Flash, SRAM and EEPROM
1.1. Overview
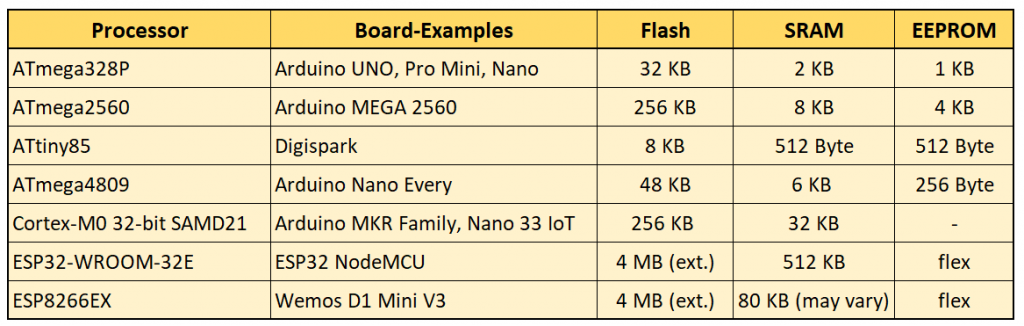
The design of the memory of a microcontroller depends on the model. In this article, I mainly refer to the ATmega328P, which is used for example in the Arduino UNO, Nano and Pro Mini.
As you can see in the diagram on the right, the ATmega328P has three different memoriy areas, namely the relatively large flash, the SRAM and the EEPROM.
Even though the memory design of other microcontrollers differ quite a bit (see table below), the SRAM is comparatively smaller in all of them compared to the flash and is thus a resource worth protecting.
The flash is also called program memory. When you upload your sketches, they are first compiled, then translated into machine-readable code, and finally written to flash. The bootloader is also located there. The flash is non-volatile, i.e. the memory content is retained even when the MCU is disconnected from the supply voltage. Moreover, it does not change during program execution, so there are no runtime problems with it.
The EEPROM is also non-volatile. I have described it in detail in this post. It is particularly well suited for data that may change during the runtime, but on the other hand should be permanently preserved. This could be, for example, calibration factors for sensors or data from the last program run.
The SRAM is your working memory. It is reserved for the variables of your programs. One of the challenges in dealing with the SRAM is that its occupancy rate can only be planned to a limited extent.
1.2. Memory usage details during sketch upload
When you upload your sketches to your microcontroller via the Arduino IDE, you will get an info like the following:

In this example, the program uses 9716 bytes of the available flash, or: 31% of 30720 bytes. Actually, 32 KB of flash are available, the difference is due to the bootloader. 2048 bytes of SRAM are available. Of these, the sketch uses 751 bytes (36%) for global variables. This value is known at compile time and does not change during runtime. Local variables, on the other hand, “come and go.” How many of them are “alive” at any given time and how much space they require cannot necessarily be predicted.
1.3. Static and dynamic – confusing terms
RAM is the generic term for SRAM (Static RAM) and DRAM (Dynamic RAM). SRAM and DRAM differ in their physical structure. SRAM is considerably more expensive, but also faster and more power-efficient. Mostly, SRAM is used in microcontrollers. More information about the differences between SRAM and DRAM can be found here, for example.
In the ESP32 documentation, the term DRAM is used for Data RAM to distinguish it from IRAM, the Instruction RAM (see here). So, it is not a physical difference, but a functional one.
Sometimes the SRAM is also called dynamic memory – for example in the Arduino IDE, as we have just seen. Still others mean only the heap when they talk about dynamic memory.
And to complete the confusion, the global variables and the static local variables are called “Static Data”, which are stored in a specific area of the SRAM.
I will therefore try to avoid the terms “static” and “dynamic” as far as possible.
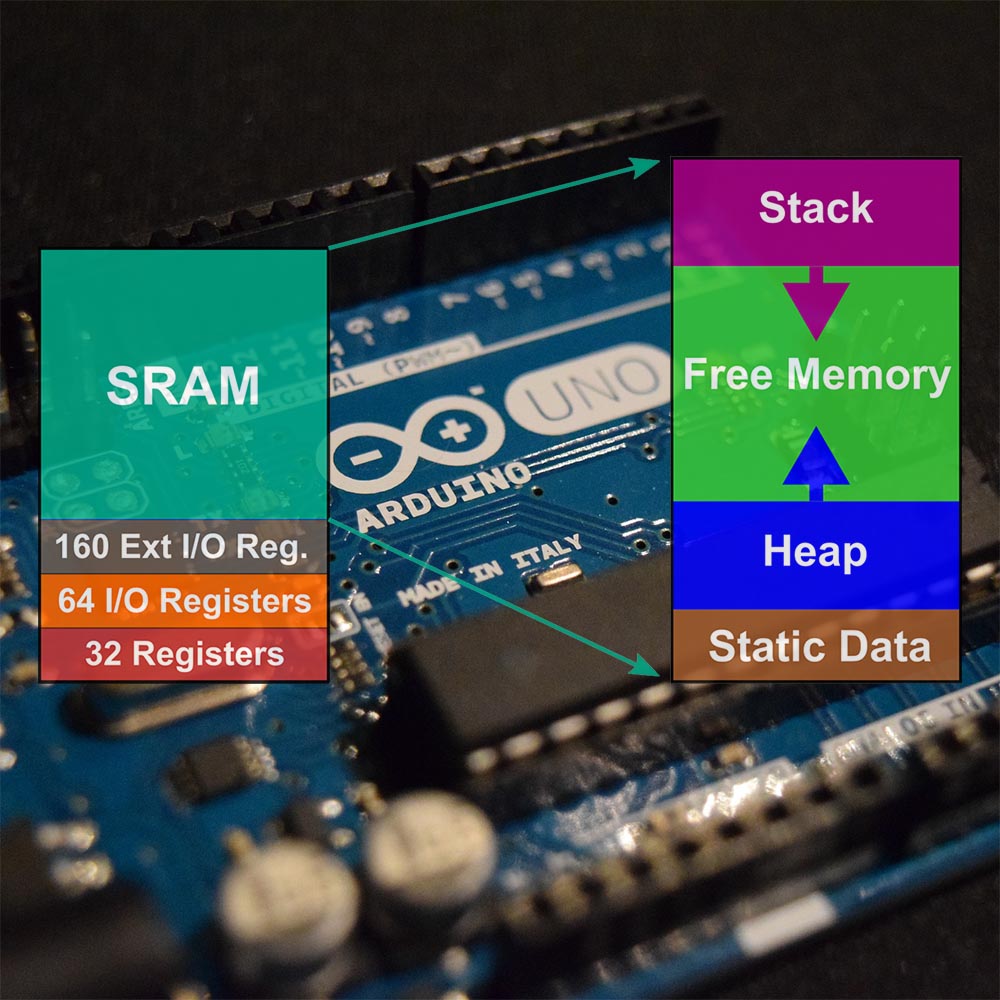
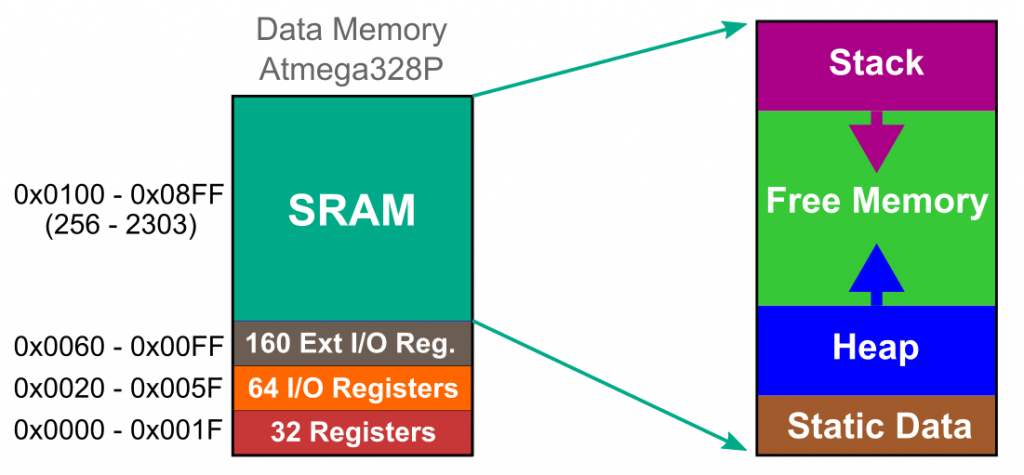
2. The SRAM at a glance
In my previous remarks I did not mention the memory area for the registers because it is not available for free use. It is located below the SRAM and is the reason why the memory addresses do not start at zero, but in the case of the ATmega328P at 256:
3. How variables are stored in the SRAM
3.1. Example sketch
In the first example sketch, we create a motley assortment of variables, and we show where they can be found in the SRAM.
int a = 42;
int b = 43;
int c = 44;

void setup() {
    Serial.begin(9600);
    delay(2000); // needed for some boards
    int d = 45;
    int e = 46;
    int f = 47;
    char g[] = "I am a char array";
    char h[] = "I am a char array, too";
    char i[] = "No surprise what I am";
    String j = "I am a string";
    String k = "I am a string, too";
    String l = "Guess what I am";

    Serial.println(F("Addresses in SRAM:"));

    Serial.print(F("a (int, global): "));
    printVariableDetails(a);

    Serial.print(F("b (int, global): "));
    printVariableDetails(b);

    Serial.print(F("c (int, global): "));
    printVariableDetails(c);

    Serial.print(F("d (int, local): "));
    printVariableDetails(d);

    Serial.print(F("e (int, local): "));
    printVariableDetails(e);

    Serial.print(F("f (int, local): "));
    printVariableDetails(f);

    Serial.print(F("g (char array): "));
    Serial.print((int)&g);
    Serial.print(F(" - "));
    Serial.println((int)&g + sizeof(g) - 1);

    Serial.print(F("h (char array): "));
    Serial.print((int)&h);
    Serial.print(F(" - "));
    Serial.println((int)&h + sizeof(h) - 1);

    Serial.print(F("i (char array): "));
    Serial.print((int)&i);
    Serial.print(F(" - "));
    Serial.println((int)&i + sizeof(i) - 1);

    Serial.print(F("j (String): "));
    printVariableDetails(j);

    Serial.print(F("k (String): "));
    printVariableDetails(k);

    Serial.print(F("l (String): "));
    printVariableDetails(l);
}

void loop() {}

template<typename T>
void printVariableDetails(T &i){
    Serial.print((int)&i);
    Serial.print(F(" - "));
    Serial.println((int)&i + sizeof(i) - 1);
}

/* For those who are not familiar with templates:
 * If you have functions to which you want to pass different data types or which shall
 * return different variable types, you can use templates to avoid defining several functions
 * for each data type like:
 * void printVariableDetails(int &i){.....}
 * and:
 * void printVariableDetails(String &i){.....}
 */
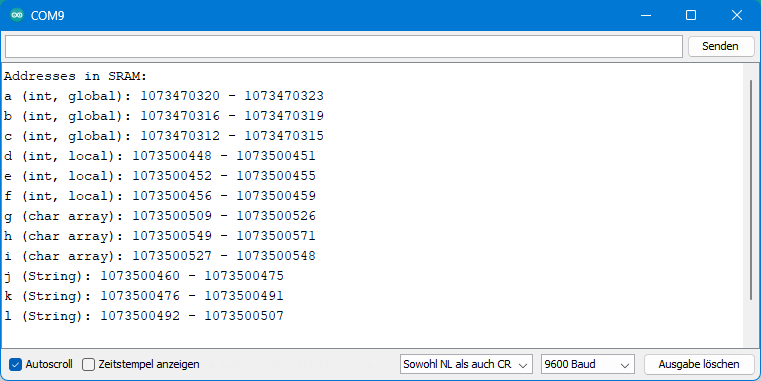
Here is the output on an Arduino Nano:

3.2. Review of example_1.ino
What we can conclude from this:
- Using the example of the integer variables a, b and c, we can see that global variables are stored at the bottom of the stack (“Static Data” area). On an ATmega328P based board, integer variables occupy two bytes each.
- The integer values are representative of simple variable types in this sketch. In the same way, we could have taken variables of type long, float, double, and so on.
- The order of the variable addresses does not necessarily correspond to the order in which the variables are defined.
- In the setup we define three more integer variables, namely d, e and f. However, they are on the stack, i.e. at the top of the SRAM because they are local variables.
- The character arrays g, h and i are also located in the stack. Their space requirement corresponds to the number of their characters plus an extra byte for the null character (ASCII character 0 = ‘\0’, also call null terminator).
- Finally, we defined the strings j, k and l. More precisely, we have created objects of the string class. They require 6 bytes each in the stack, regardless of their length. At least this is true for the AVR based Arduinos.
The last point may be surprising, especially since I had already anticipated that strings occupy memory space in the heap. The solution is: A string object consists of two parts. The actual string is located in the heap. In the stack, however, only a kind of reference to the string object is created, which consists of three components (the string variable, so to speak):
char *buffer;	        // the actual char array
unsigned int capacity;  // the array length minus one (for the '\0')
unsigned int len;       // the String length (not counting the '\0')
The first two bytes of the string variable represent the pointer to the string (“buffer”) located in the heap. This is followed by an integer value which is the amount of memory reserved for the string (“capacity”). This is followed by an integer value containing the actual length of the string (“len”). Take it that way for now, I’ll come back to it in a minute.
By the way, you can find the definition of the class String in the depths of the Arduino library files in WString.h: …\AppData\Local\Arduino15\packages\arduino\hardware\avr\version\cores\arduino\WString.h (with version = version number).
3.3. example_1.ino on other MCUs
The sketch example_1 is also executable on other boards without any changes. I tested it on a Nano Every, Mega2560, ESP32, Nano 33 IoT and a Wemos D1 Mini (ESP8266).
Here is the output on an ESP32:
4. Stack management
4.1. Example sketch
With the next sketch, I want to show that the memory for variables in the stack that are no longer needed is automatically freed. In other words, you don’t have to worry about stack management!
void setup() {
    Serial.begin(9600);
    delay(2000); // needed for some boards

    int a = 1111;
    Serial.print(F("a: "));
    Serial.print((int)&a);
    Serial.println(F(" (setup)"));
    Serial.println();

    function_1();
    Serial.println();

    int c = 3333;
    Serial.print(F("c: "));
    Serial.print((int)&c);
    Serial.println(F(" (setup)"));
    Serial.println();

    function_2();
    Serial.println();
    function_3();
}

void loop() {}

void function_1(){
    int b = 2222;
    Serial.print(F("b: "));
    Serial.print((int)&b);
    Serial.println(F(" (function_1)"));
}

void function_2(){
    int d = 4444;
    Serial.print(F("d: "));
    Serial.print((int)&d);
    Serial.println(F(" (function_2)"));
    function_2a();
}

void function_2a(void){
    int e = 5555;
    Serial.print(F("e: "));
    Serial.print((int)&e);
    Serial.println(F(" (function_2a)"));
    function_2b();
}

void function_2b(void){
    int f = 6666;
    Serial.print(F("f: "));
    Serial.print((int)&f);
    Serial.println(F(" (function_2b)"));
}

void function_3(void){
   int g = 7777;
    Serial.print(F("g: "));
    Serial.print((int)&g);
    Serial.println(F(" (function_3)"));
    function_3a();

}

void function_3a(void){
    int h = 8888;
    Serial.print(F("h: "));
    Serial.print((int)&h);
    Serial.println(F(" (function_3a)"));
}
Here is the output for an Arduino Nano (ATmega328P):
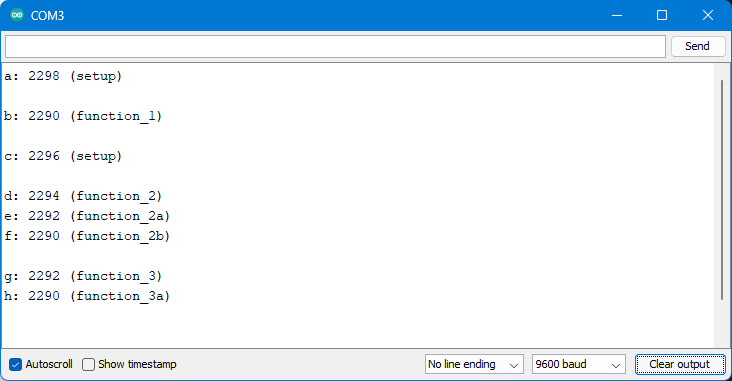
4.2. Review of example_2.ino
The variables a and c “survive” as long as the setup is executed. All other variables exist only within their functions and “die” after returning to the setup. The memory space is reused. Since function 2 calls function 2a, which in turn calls function 2b, the variables d, e, and f coexist. The same applies to g and h.
“Homework”: prefix one of the integer definitions with “static”. So, for example: static int d = 4444; and see what happens.
5. String handling in SRAM
In the next few example sketches, we will take a closer look at the handling of strings in stack and heap. A few tools are used for this purpose:
- To read the value of a variable at a specific memory address, we use pointers:
value = *(datatype*)address = *(datatype*)&variable. See my last post on this. - We determine the total SRAM still available with
getTotalAvailableMemory(). The largest contiguous free memory block is returned bygetLargestAvailableBlock().- The two functions are part of MemoryInfo.Avr.cpp. To make them available, you need to include MemoryInfo.Avr.cpp as an extra tab in the sketches.
- MemoryInfo.Avr.cpp is written by Benoît Blanchon. I found the code here on GitHub.
5.1. String analysis in stack and heap
5.1.1. Example sketch
First, we define only a single string:
void setup() {
    Serial.begin(9600);
    delay(2000); // needed for some boards
    printMemoryDetails();

    String str = "Arduino is great";

    Serial.print(str);
    Serial.println(F(" - details:"));
    Serial.print(F("Stack address:\t"));
    Serial.println((int)&str);

    Serial.print(F("Heap address: \t"));
    int *strPtr; // pointer to heap
    strPtr = (int*)(int)&str;
    Serial.println(*strPtr);

    Serial.print(F("Capacity:\t"));
    Serial.println(*(uint16_t*)((int)&str + 2));

    Serial.print(F("Length: \t"));
    Serial.println(*(uint16_t*)((int)&str + 4));

    Serial.println(F("Read from Heap:"));
    for(unsigned int i=*strPtr; i<(*strPtr + str.length()); i++){
        Serial.print(*(char*)(i));
        Serial.print(" ");
    }
    Serial.println("\n");

    printMemoryDetails();
}

void loop() {
    Serial.println(F("In loop: "));
    printMemoryDetails();
    while(1); // stop here
}

void printMemoryDetails(){
    Serial.print(F("Free memory: "));
    Serial.print(getTotalAvailableMemory());
    Serial.print(F(" / Biggest free block: "));
    Serial.println(getLargestAvailableBlock());
    Serial.println();
}
// C++ for Arduino
// What is heap fragmentation?
// https://cpp4arduino.com/

// This source file captures the platform dependent code.
// This version was tested with the AVR Core version 1.6.22

// This code is freely inspired from https://github.com/McNeight/MemoryFree

// This heap allocator defines this structure to keep track of free blocks.
struct block_t {
  size_t sz;
  struct block_t *nx;
};

// NOTE. The following extern variables are defined in malloc.c in avr-stdlib

// A pointer to the first block
extern struct block_t *__flp;

// A pointer to the end of the heap, initialized at first malloc()
extern char *__brkval;

// A pointer to the beginning of the heap
extern char *__malloc_heap_start;

static size_t getBlockSize(struct block_t *block) {
  return block->sz + 2;
}

static size_t getUnusedBytes() {
  char foo;
  if (__brkval) {
    return size_t(&foo - __brkval);
  } else {
    return size_t(&foo - __malloc_heap_start);
  }
}

size_t getTotalAvailableMemory() {
  size_t sum = getUnusedBytes();
  for (struct block_t *block = __flp; block; block = block->nx) {
    sum += getBlockSize(block);
  }
  return sum;
}

size_t getLargestAvailableBlock() {
  size_t largest = getUnusedBytes();
  for (struct block_t *block = __flp; block; block = block->nx) {
    size_t size = getBlockSize(block);
    if (size > largest) {
      largest = size;
    }
  }
  return largest;
}
This is the output when using an ATmega328P based board:
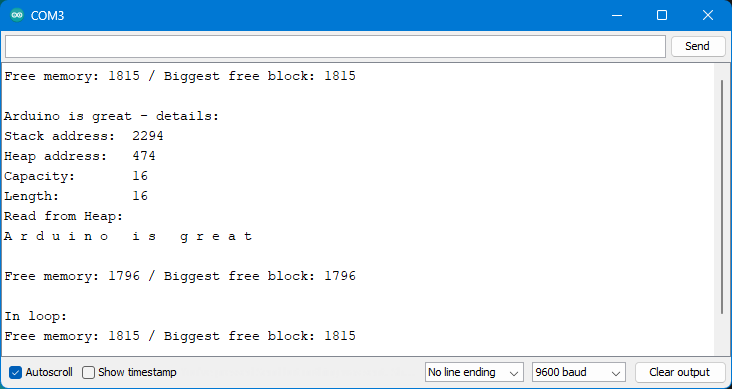
5.1.2. Review of example_3.ino
The available memory at the beginning of the program is 1815 bytes. Then we define the string “str” (= “Arduino is great”). It consists of 16 characters and its address in the stack is 2294.
“strPtr” is the pointer to the address of the string in the heap. With strPtr = (int*)(int)&str; we read the pointer from “str” (address 2294-2295). We use the same technique to determine the capacity and length. Both values are 16.
Then we read the actual string (the content) of the string object directly from the heap. Not that you should do that as a matter of principle! It only serves to prove that the string is actually in the heap.
The free memory is reduced by 19 bytes by the string. But why does the string occupy 19 bytes in the heap and not 16? One byte is needed for the null terminator ‘\0’. And basically, variables in the heap are separated by two more bytes. Honestly speaking, their purpose is not clear to me (I would be grateful for hints!).
And where are the 6 bytes for the variable “str” from the stack in this calculation? They are not included in the calculation – the free memory is calculated based on the maximum stack expansion.
After the setup is completed, the memory space occupied by the string in the heap is released. Thus, 1815 bytes are available again in loop().
5.1.3. Adaptation for ESP32 and ESP8266
The sketch example_3 works only on AVR boards. Here is an adapted version for the ESP32 and ESP8266:
void setup() {
    Serial.begin(9600);
    delay(2000); // needed for some boards
    printMemoryDetails();

    String str = "Arduino is great";

    Serial.print(str);
    Serial.println(F(" - details:"));
    Serial.print(F("Stack address:\t"));
    Serial.println((int)&str);

    Serial.print(F("Heap address: \t"));
    int *strPtr;
    strPtr = (int*)(int)&str;
    Serial.println(*strPtr);

    Serial.print(F("Capacity:\t"));
    Serial.println(*(uint16_t*)((int)&str + 4));

    Serial.print(F("Length:   \t"));
    Serial.println(*(uint16_t*)((int)&str + 8));

    Serial.println(F("Read from Heap:"));
    for(unsigned int i=*strPtr; i<(*strPtr + str.length()); i++){
        Serial.print(*(char*)(i));
        Serial.print(" ");
    }
    Serial.println("\n");

    printMemoryDetails();
}

void loop() {
   Serial.println(F("In loop: "));
    printMemoryDetails();
    while(1){   // stop here
        delay(1000); // prevents WDT reset on ESP8266
    }
}

void printMemoryDetails(){
    Serial.print(F("Free memory: "));
    // for ESP32:
    Serial.println(esp_get_free_heap_size());
    // for ESP8266:
    //Serial.println(ESP.getFreeHeap());
    Serial.println();
}
The sketch generates the following output when using an ESP32:
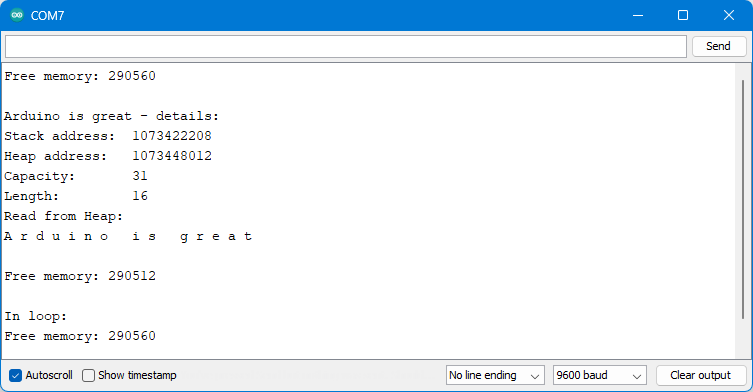
Strings are handled differently on the ESP32. If you play a little with the length of the string, you will see:
- If the string consists of up to 15 characters, a capacity of 15 characters (= 15 bytes) is reserved for it. As with the AVR microcontrollers, three bytes are added so that the space required for the character string in the heap is 18 bytes. In addition, you find 12 bytes occupied for the “string variable” in the stack.
- If the length is between 15 and 31 characters, then 31 characters are reserved, between 32 and 47 it is 47 – and so it goes on in steps of 16.
- Strings with a length of less than 10 are not saved on the heap at all. Try it by shortening the string to “Arduino”. The sketch then outputs a capacity of 28265 and a length of 111. That’s nonsense, of course. What we read here is 28265 = 0x6E69 ⇒ 110 (0x6E) / 105 (0x69) ⇒ ASCII characters ‘n’ / ‘i’ and 111 ⇒ ‘o’, i.e. the characters from “Arduino”.
- This is called Small String Optimization (SSO).
The ESP8266 does not save strings that consist of less than 11 characters; otherwise it behaves similarly.
For the next examples, I won’t make any adjustments for non-AVR boards, as this post is already way too long. Based on the previous explanations, you should be able to do this yourself if needed.
5.2. Heap fragmentation
5.2.1. Example sketch
Many people warn against the use of strings in the field of microcontrollers. One of the main arguments is potential heap fragmentation (remember the bookshelf mentioned at the beginning?).
With the following sketch, we create a hole in the heap:
void setup() {
    Serial.begin(9600);
    delay(2000); // needed for some boards
    Serial.print(F("Free memory: "));
    Serial.print(getTotalAvailableMemory());
    Serial.print(F(" / Biggest free block: "));
    Serial.println(getLargestAvailableBlock());
    Serial.println();

    String s = "Arduino is great";
    //s.reserve(26);
    printStringDetails(s);

    String t = "ESP32 is fast";
    //t.reserve(23);
    printStringDetails(t);

    String u = "Wemos is fabulous";
    //u.reserve(27);
    printStringDetails(u);


    Serial.println();
    for(int i = 1; i<=10; i++){
        s += "!";
    }
    printStringDetails(s);

    for(int i = 1; i<=10; i++){
        t += "!";
    }
    printStringDetails(t);

    for(int i = 1; i<=10; i++){
        u += "!";
    }
    printStringDetails(u);
}

void loop() {}

void printStringDetails(String &str){
    Serial.print(str);
    Serial.println(F(" - details:"));
    Serial.print(F("Stack address: "));
    Serial.print((int)&str);
    Serial.print(F(" / Heap address: "));

    int *strPtr; //Pointer to heap address
    uint16_t capacity = *(uint16_t*)((int)&str + 2); // for some boards + 4
    uint16_t len = *(uint16_t*)((int)&str + 4); // for some boards + 6
    strPtr = (int*)(int)&str;

    Serial.print(*strPtr);
    Serial.print(F(" - "));
    Serial.println(*strPtr + capacity + 2);
    Serial.print(F("Capacity: "));
    Serial.print(capacity);
    Serial.print(F(" / Length: "));
    Serial.println(len);

//    Read from Heap if you want
//    for(unsigned int i=*strPtr; i<(*strPtr + str.length()); i++){
//        Serial.print(*(char*)(i));
//        Serial.print(" ");
//    }
//    Serial.println();

    // comment the following lines if you use a non-AVR based board
    Serial.print(F("Free memory: "));
    Serial.print(getTotalAvailableMemory());
    Serial.print(F(" / Biggest free block: "));
    Serial.println(getLargestAvailableBlock());
    Serial.println("");
}
// C++ for Arduino
// What is heap fragmentation?
// https://cpp4arduino.com/

// This source file captures the platform dependent code.
// This version was tested with the AVR Core version 1.6.22

// This code is freely inspired from https://github.com/McNeight/MemoryFree

// This heap allocator defines this structure to keep track of free blocks.
struct block_t {
  size_t sz;
  struct block_t *nx;
};

// NOTE. The following extern variables are defined in malloc.c in avr-stdlib

// A pointer to the first block
extern struct block_t *__flp;

// A pointer to the end of the heap, initialized at first malloc()
extern char *__brkval;

// A pointer to the beginning of the heap
extern char *__malloc_heap_start;

static size_t getBlockSize(struct block_t *block) {
  return block->sz + 2;
}

static size_t getUnusedBytes() {
  char foo;
  if (__brkval) {
    return size_t(&foo - __brkval);
  } else {
    return size_t(&foo - __malloc_heap_start);
  }
}

size_t getTotalAvailableMemory() {
  size_t sum = getUnusedBytes();
  for (struct block_t *block = __flp; block; block = block->nx) {
    sum += getBlockSize(block);
  }
  return sum;
}

size_t getLargestAvailableBlock() {
  size_t largest = getUnusedBytes();
  for (struct block_t *block = __flp; block; block = block->nx) {
    size_t size = getBlockSize(block);
    if (size > largest) {
      largest = size;
    }
  }
  return largest;
}
On an Arduino Nano I got the following output:
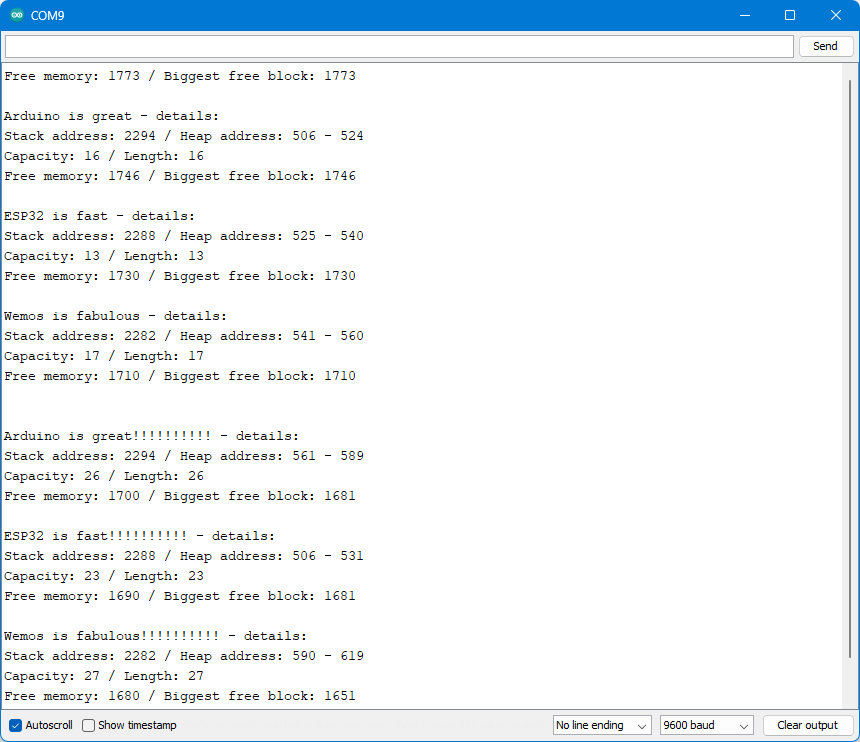
5.2.2. Review of example_4
We create three strings:
- s: “Arduino is great” – 16 characters, requires 19 bytes in the heap.
- t: “ESP32 is fast” -13 characters, requires 16 bytes in the heap.
- u: “Wemos is fabulous” – 17 characters, requires 20 bytes in the heap.

All three strings are stored one after the other in the heap (order: s→t→u). Then we extend string “s” by 10 exclamation marks. As a result, it takes up an additional 10 bytes and no longer fits in its original memory location. Therefore, it moves to the next free memory space in the heap. The heap now has a hole of 19 bytes, and the order is t→u→s.
Now, we extend string “t” by 10 exclamation marks. Its start address moves to the former start address of “S”. Despite the extension, however, there is still a gap of 9 bytes (532 – 540).
Finally, “u” also gets its 10 extra characters. There is a 29 byte gap between 532 and 560. “u”, however, needs 30 bytes and therefore moves up (sequence t→s→u) and the gap becomes larger again.
In this example, the gap is not a big problem because the heap is “clean” again when you exit the setup. More problematic is the handling of strings in loop(). If you work with strings of different lengths, the holes can add up if things go wrong. A great article taking this to the extreme can be found here.
5.2.3. Prevent heap fragmentation with reserve()
The fragmentation just shown can be easily prevented. You just have to think about how long your string could be at maximum and reserve the space with Stringname.reserve(maximum_length). Try it by uncommenting lines 11, 15 and 19 in example_4.
Even if you reserve a bit more memory than necessary (e.g. because you don’t know the actual maximum length), you may lose less memory than by fragmentation. Moreover, you have things under control. And you save time, since moving the strings in the heap requires a significant amount of computation.
5.3. Concatenating strings
5.3.1 Example sketch
But there is at least one more pitfall when using strings, and that concerns their concatenation.
In the following sketch, we concatenate (add) three strings:
void setup() {
    Serial.begin(9600);
    delay(2000);

    String s = "Arduino is great";
    printStringDetails(s);
    String t = "ESP32 is fast";
    printStringDetails(t);
    String u = "Wemos is fabulous";
    printStringDetails(u);

    String v = "";
    v = s + t + u;
//    v += s;  // alternative: v.concat(s);
//    v += t;  // alternative: v.concat(t);
//    v += u;  // alternative: v.concat(u);
    printStringDetails(v);
}

void loop() {}

void printStringDetails(String &str){
    Serial.print(str);
    Serial.println(F(" - details:"));
    Serial.print(F("Stack address: "));
    Serial.print((int)&str);
    Serial.print(F(" / Heap address: "));

    int *strPtr; //Pointer to heap address
    uint16_t capacity = *(uint16_t*)((int)&str + 2);
    uint16_t len = *(uint16_t*)((int)&str + 4);
    strPtr = (int*)(int)&str;

    Serial.print(*strPtr);
    Serial.print(F(" - "));
    Serial.println(*strPtr + capacity + 2);
    Serial.print(F("Capacity: "));
    Serial.print(capacity);
    Serial.print(F(" / Length: "));
    Serial.println(len);

//    for(uint16_t i=*strPtr; i<(*strPtr + str.length()); i++){
//        Serial.print(*(char*)(i));
//        Serial.print(" ");
//    }
//    Serial.println();
    Serial.print(F("Free memory: "));
    Serial.print(getTotalAvailableMemory());
    Serial.print(F(" / Biggest free block: "));
    Serial.println(getLargestAvailableBlock());
    Serial.println("");
}
// C++ for Arduino
// What is heap fragmentation?
// https://cpp4arduino.com/

// This source file captures the platform dependent code.
// This version was tested with the AVR Core version 1.6.22

// This code is freely inspired from https://github.com/McNeight/MemoryFree

// This heap allocator defines this structure to keep track of free blocks.
struct block_t {
  size_t sz;
  struct block_t *nx;
};

// NOTE. The following extern variables are defined in malloc.c in avr-stdlib

// A pointer to the first block
extern struct block_t *__flp;

// A pointer to the end of the heap, initialized at first malloc()
extern char *__brkval;

// A pointer to the beginning of the heap
extern char *__malloc_heap_start;

static size_t getBlockSize(struct block_t *block) {
  return block->sz + 2;
}

static size_t getUnusedBytes() {
  char foo;
  if (__brkval) {
    return size_t(&foo - __brkval);
  } else {
    return size_t(&foo - __malloc_heap_start);
  }
}

size_t getTotalAvailableMemory() {
  size_t sum = getUnusedBytes();
  for (struct block_t *block = __flp; block; block = block->nx) {
    sum += getBlockSize(block);
  }
  return sum;
}

size_t getLargestAvailableBlock() {
  size_t largest = getUnusedBytes();
  for (struct block_t *block = __flp; block; block = block->nx) {
    size_t size = getBlockSize(block);
    if (size > largest) {
      largest = size;
    }
  }
  return largest;
}
Output on an Arduino Nano:

5.3.2. Review of example_5
The sketch tears a big hole of 53 bytes in the heap. The reason for this is the intermediate result that is stored in the heap. s and t and u are added first, and then the result is assigned to v.
The good news is that you can prevent the hole by making a tiny change in the code. Comment line 13 and uncomments lines 14 to 16. The result is “hole-free”. “Free memory” and “Biggest free block” are 1659 bytes. Just try it out.
5.4. So, should I use strings or not?
For many programmers, strings are a witches’ brew in the microcontroller area, an absloute no-go! No question: Character arrays are more resource-efficient and faster. However, when using them, you can also make a lot of mistakes. In addition, the code is harder to read, at least for beginners. In addition, many hobbyists today turn to fast microcontrollers equipped with plenty of SRAM, such as the ESP32 or ESP8266.
If you want to be confirmed that you should not use strings, you can read this article: The evils of Arduino Strings. If you wish to hear a more nuanced verdict, check out the wonderful article Taming Arduino Strings.
My opinion is: if speed is not critical, and you are not short of SRAM, then go ahead and use strings. I certainly do! But be aware of the dangers and take some precautions:
- Avoids creating strings in loop().
- Use reserve() if the length of your strings can change.
- Concatenate strings using “+=” or concat().
- To save SRAM, pass strings as references (see last post).
You can find more tips here in the already mentioned article “Taming Arduino Strings” or in this nice article.
6. Character arrays
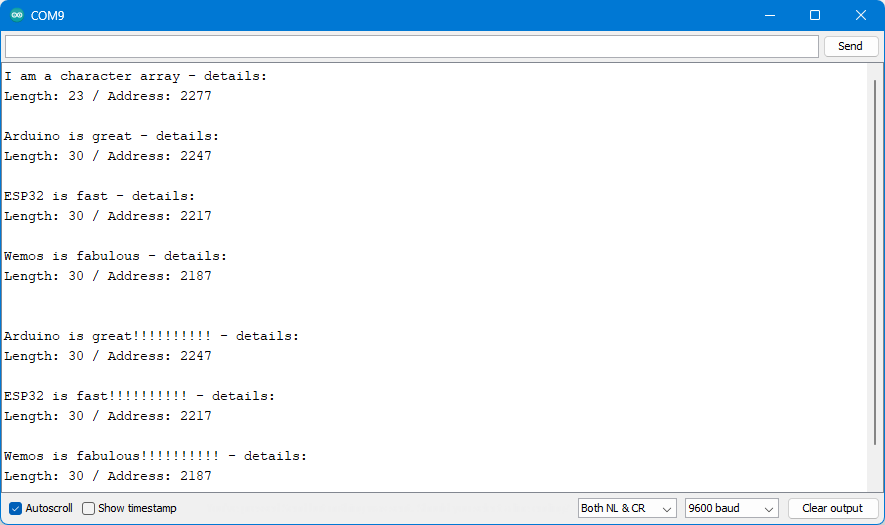
For the sake of completeness, a few words about character arrays. If you don’t specify the length, they will occupy as many bytes in the stack as they have characters, plus one for the null terminator, as already mentioned. If you do not want to change the character array during runtime, then you should declare it as a constant. This protects you from your own mistakes and makes the code clearer. If the length of the character array varies, then reserve as much space as you expect as a maximum.
Here is the example of this:
void setup() {
    Serial.begin(9600);
    const char a[] = "I am a character array";
    char b[30] = "Arduino is great";
    char c[30] = "ESP32 is fast";
    char d[30] = "Wemos is fabulous";

    printCharArrayDetails(a, sizeof(a));
    printCharArrayDetails(b, sizeof(b));
    printCharArrayDetails(c, sizeof(c));
    printCharArrayDetails(d, sizeof(d));
    Serial.println();

    strcat(b, "!!!!!!!!!!");
    strcat(c, "!!!!!!!!!!");
    strcat(d, "!!!!!!!!!!");

    printCharArrayDetails(b, sizeof(b));
    printCharArrayDetails(c, sizeof(c));
    printCharArrayDetails(d, sizeof(d));
}

void loop() {}

void printCharArrayDetails(char* cArr, int len){
    for(int i=0; i<len; i++){
        Serial.print(cArr[i]);
    }
    Serial.println(F(" - details:"));
    Serial.print(F("Length: "));
    Serial.print(len);
    Serial.print(F(" / Address: "));
    Serial.print((int)cArr);
    Serial.println("\n\r");
}
And here is the output when using an Arduino Nano:
7. Force variables into the heap
As you have seen, most local variables are automatically stored in the stack, unless they are strings. But you can also force variables into the heap. There are two methods for this:
- Declaration with the keyword
new. - Allocation of memory space per
malloc().
The following sketch illustrates their use:
void setup() {
    Serial.begin(9600);
    delay(2000);

    int *a = new int[5];  // reserve memory for 5 integers
    for(int i=0; i<5; i++){
        a[i] = 2*i;
    }
    int heapAddrA = *(int*)(int)&a; // just to show you find a in heap

    char *b = new char[2]; // reserve memory for a char array
    b[0] = 'b';
    int heapAddrB = *(int*)(int)&b;

    Serial.print(F("Stack address a: "));
    Serial.println((int)&a);
    Serial.print(F("Stack address b: "));
    Serial.println((int)&b);

    Serial.print(F("Heap address a:  "));
    Serial.println(heapAddrA);
    Serial.print(F("Heap address b:  "));
    Serial.println(heapAddrB);

    int *c = (int*)malloc(5 * sizeof(int)); // reserve memory for 5 integers
    for(int i=0; i<5; i++){
        c[i] = i * 2000;
    }

    int heapAddrC = *(int*)(int)&c;

    Serial.print(F("Stack address c: "));
    Serial.println((int)&c);

    Serial.print(F("Heap address c:  "));
    Serial.println(heapAddrC);
    Serial.println();

    Serial.print(F("Available memory before deletion: \t"));
    Serial.println(getTotalAvailableMemory());
    delete a;  // new -> delete
    delete b;
    free(c);    // malloc -> free
    Serial.print(F("New available memory after deletion: \t"));
    Serial.println(getTotalAvailableMemory());
}

void loop() {}
// C++ for Arduino
// What is heap fragmentation?
// https://cpp4arduino.com/

// This source file captures the platform dependent code.
// This version was tested with the AVR Core version 1.6.22

// This code is freely inspired from https://github.com/McNeight/MemoryFree

// This heap allocator defines this structure to keep track of free blocks.
struct block_t {
  size_t sz;
  struct block_t *nx;
};

// NOTE. The following extern variables are defined in malloc.c in avr-stdlib

// A pointer to the first block
extern struct block_t *__flp;

// A pointer to the end of the heap, initialized at first malloc()
extern char *__brkval;

// A pointer to the beginning of the heap
extern char *__malloc_heap_start;

static size_t getBlockSize(struct block_t *block) {
  return block->sz + 2;
}

static size_t getUnusedBytes() {
  char foo;
  if (__brkval) {
    return size_t(&foo - __brkval);
  } else {
    return size_t(&foo - __malloc_heap_start);
  }
}

size_t getTotalAvailableMemory() {
  size_t sum = getUnusedBytes();
  for (struct block_t *block = __flp; block; block = block->nx) {
    sum += getBlockSize(block);
  }
  return sum;
}

size_t getLargestAvailableBlock() {
  size_t largest = getUnusedBytes();
  for (struct block_t *block = __flp; block; block = block->nx) {
    size_t size = getBlockSize(block);
    if (size > largest) {
      largest = size;
    }
  }
  return largest;
}
Here is the output:

You can see that the objects created with new and malloc() each occupy two bytes in the stack. However, this is only the pointer to the actual data in the heap.
But why should I do that? There are applications where you need to create variables or objects during runtime, but you don’t know before their size and how many you will need. Then new and malloc() are ideal for reserving the required storage space. The advantage is that you can release the storage space with delete or free(). At first glance, new and malloc() do the same thing, but there are a few important differences. Interested parties may look here.
The use of new and malloc() is not free of risks. If you forget to free the memory again, you could run out of memory. Or you forget that you have already freed the space and still try to access it with your pointer. The problem is: the pointer still works! For example, inserts Serial.println(c[3]) after free(c). You are still reading the value that was there before. However, only as long as the memory space has not yet been overwritten. After that, you read just “something” there and wonder why your program behaves strangely. Such bugs are difficult to find.
8. Saving SRAM with PROGMEM and F()
8.1. PROGMEM
Constants that consume too much SRAM can be conveniently banished from the SRAM. They are then read from the flash. This is particularly useful for long arrays and strings. When defining the constants, you just need to add the keyword PROGMEM, i.e.: const datatype arrayName[] PROGMEM = { data };.
Reading the data requires only a little getting used to. Instead of element_i = arrayName[i]; you write element_i = pgm_read_type_near (arrayName + i) with type = byte, word, oder dword.
Here is an example sketch to illustrate the function:
const byte byteArray[] PROGMEM = {11, 22, 33, 44, 55, 66};
const int intArray[] PROGMEM = {1111, 2222, 3333, 4444};
const unsigned long longArray[] PROGMEM = {1111111, 2222222, 3333333, 4444444, 5555555};
const char charArray[] PROGMEM = {"Hello, PROGMEM helps you saving SRAM!"};

void setup() {
    Serial.begin(9600);
    delay(2000); // needed for some boards

    for(unsigned int i=0; i<sizeof(byteArray)/sizeof(byte); i++){
        byte element = pgm_read_byte_near(byteArray + i);
        Serial.print(element); Serial.print(" ");
    }
    Serial.println("\n");

    for(unsigned int i=0; i<sizeof(intArray)/sizeof(int); i++){
        int element = pgm_read_word_near(intArray + i);
        Serial.print(element); Serial.print(" ");
    }
    Serial.println("\n");

    for(unsigned int i=0; i<sizeof(longArray)/sizeof(long); i++){
        long element = pgm_read_dword_near(longArray + i);
        Serial.print(element); Serial.print(" ");
    }
    Serial.println("\n");

    for(unsigned int i=0; i<strlen_P(charArray); i++){  // alternative: i<sizeof(charArray)/sizeof(char);
        char element = pgm_read_byte_near(charArray + i);
        Serial.print(element);
    }
    Serial.println("\n");
}

void loop() {}
I wrote a second version of example_8 without PROGMEM (but not shown here) and then uploaded both versions for comparison. The difference in the allocation of the SRAM by global variables is 72 bytes:
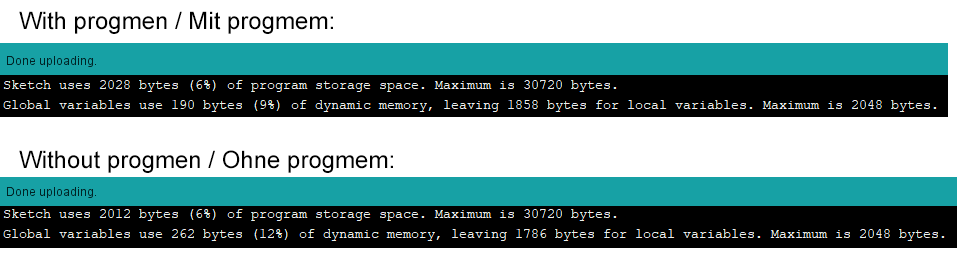
This is precisely the 72 bytes needed by the constants in example_8 on an ATmega328P based board. If you are recounting, please keep in mind the zero terminator.
8.2. The F() macro
You may have noticed that I consistently use the F macro in this post, i.e. Serial.print(F("blabla"));. Without F() “blabla” would be written into the static data area of the SRAM at program start and read from there when needed. With F() the microcontroller reads “blabla” directly from the flash. This is a simple way to save SRAM. I do not have an example sketch for this. Just take out an F() once in the above sketches and compare the space consumed by global variables
Acknowledgement
I owe the background of my post image to Daan Lenaerts on Pixabay.