
About this post
In this article, I come back to real-time clocks (RTC) and introduce the DS1302 and the DS1307. I will use the library Rtc by Makuna to control the RTCs. It is similar to the RTClib I used in my post about the DS3231. I had to take a different library here because the RTClib does not cover the DS1302.
What topics I will cover:
- Technical characteristics
- Preparations
- Accuracy / deviations of the DS1302 and DS1307
- Basic RTC functions of the DS1302 / DS1307
- Setting the time
- Calculations with RtcDateTime objects
- Using the RAM of the DS1302 / DS1307
- The DS1302 as trickle charger
Technical characteristics
The DS1302 and DS1307 are real-time clocks. This means that unlike simple timers, they store the time and date in the year/month/day/hour/minute/second format. The leap years up to the 2100 are programmed in.
Compared to the DS3231, the DS1302 and DS107 have fewer functions. For example, neither of them has an alarm function. In return, the power consumption is even lower than that of the DS3231. In “timekeeping mode”, i.e. in battery-only operation, it is below 0.5 microamps – hence a CR2032 coin cell (theoretically) lasts for decades.
- Operating voltage:
- DS1302: 2.0 – 5.5 volts
- DS1307: 2.0 -3.5 volts VBAT / 4.5 – 5.5 volts VCC
- Current in “timekeeping mode”: < 0.5 microamps
- Communication:
- DS1302: special 3-wire protocol
- DS1307: I2C (address: 0x68, not adjustable)
- Temperature compensation: none
- Crystal: external, 32768 Hz, 45 kilohms
- DS1302: 6 pF
- DS1307: 12.5 pF
- RAM:
- DS1302: 31 byte
- DS1307: 56 byte
- Trickle Charger: DS1302 only
The data sheet for the DS1302 can be found here, the data sheet for the DS1307 is available here.
Pinout
Both ICs have eight pins. Besides GND, there is a pin for the battery voltage (VCC1 or VBAT) and one for the “normal” supply voltage (VVCC2 or VCC). X1 and X2 are the pins for the oscillator.
The DS1302 communicates via a special 3-wire interface using the three pins SCLK, I/O (DAT) and CE (RST). The DS1307 communicates via I2C and therefore only requires SDA and SCL. On the DS1307 you can tap a 1 Hz, 4 KHz, 8 KHz or 32 kHz signal at the SQW/OUT.

DS1302 and DS1307 modules
Modules of the DS1302 and DS1307 are available in many different versions. I used these common ones:
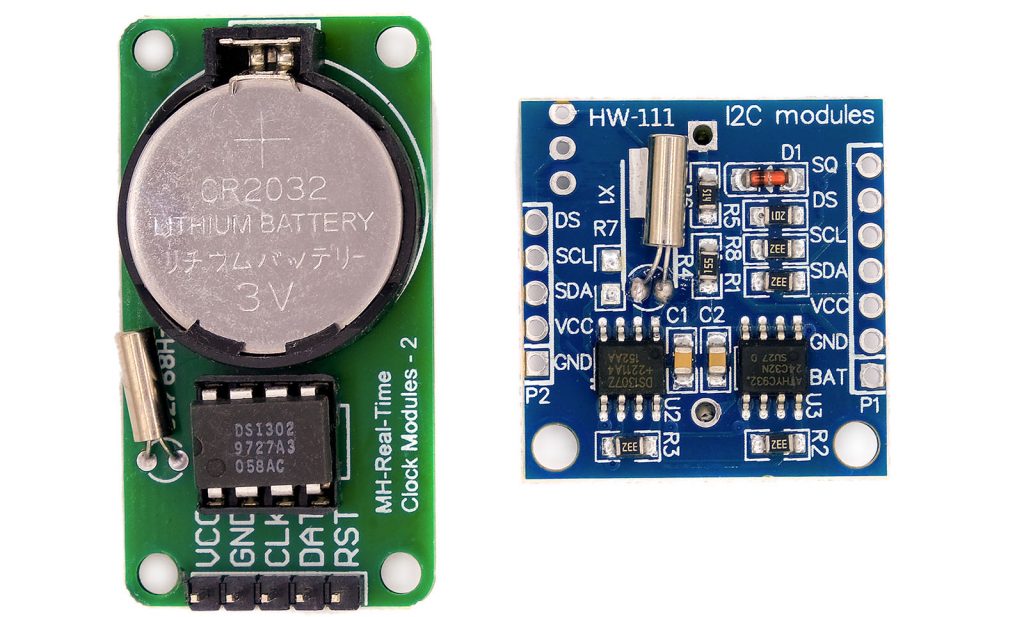
The advantage of modules is that you don’t have to worry about the oscillator, and there is usually a holder for CR2032 batteries or LIR2032 rechargeable batteries.
DIY module
In my tests I included a homemade DS1302 module. For this, I added a battery holder, pin headers and an oscillator (on the backside) to the DS1302 IC:

I found out that the 6 pF / 32768 Hz oscillators needed for this purpose are not so easy to get. I’d rather not tell you what I paid for them …
Special features of the DS1307 module (HW-111)
The DS1307 module (HW-111) used here also has a 32-kilobit EEPROM (=4 KB) in which you can store data. This is ideal for use as a data logger. In addition, there are pull-up resistors for the I2C lines and capacitors for voltage stabilization. Less useful is the charging circuit for batteries – I’ll come to that shortly.
Charging circuit of the DS1307 module (HW-111)
The HW-111 module, based on the DS1307, has a charging circuit for LIR2032 batteries. The positive pole of the battery holder is connected to VCC via a diode and a 200 ohm resistor. The charging circuit cannot be turned off, and that is not good at all for CR2032 batteries. Even for LIR2032 batteries, the circuit is not really suitable. My recommendation: remove the diode (the conspicuous red component). I have already gone into this topic in detail in my article about the DS3231.
Preparations
Installing the “Rtc by Makuna” library
If you are using a DS1302, then I recommend the library “Rtc by Makuna”, which you can install via the Library Manager of the Arduino IDE or you can download it directly from GitHub here. If you use a DS1307, you can also use the library RTClib from Adafruit, but then you would have to adapt the examples from this article. Both libraries are similar in operation, but just not the same.
Connecting the microcontroller
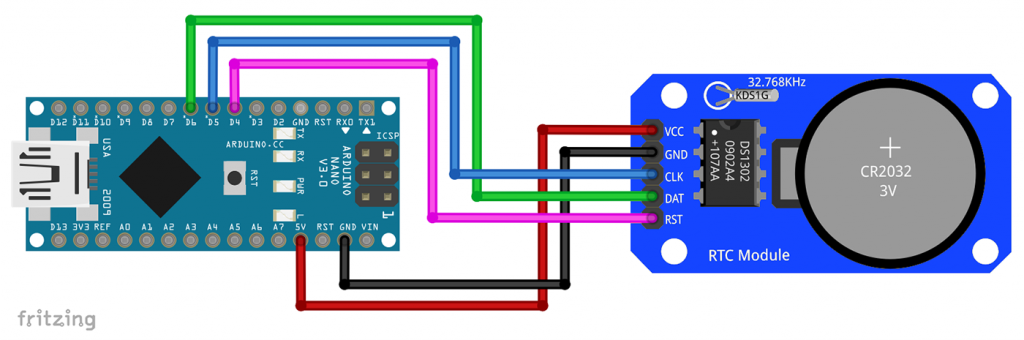
DS1302
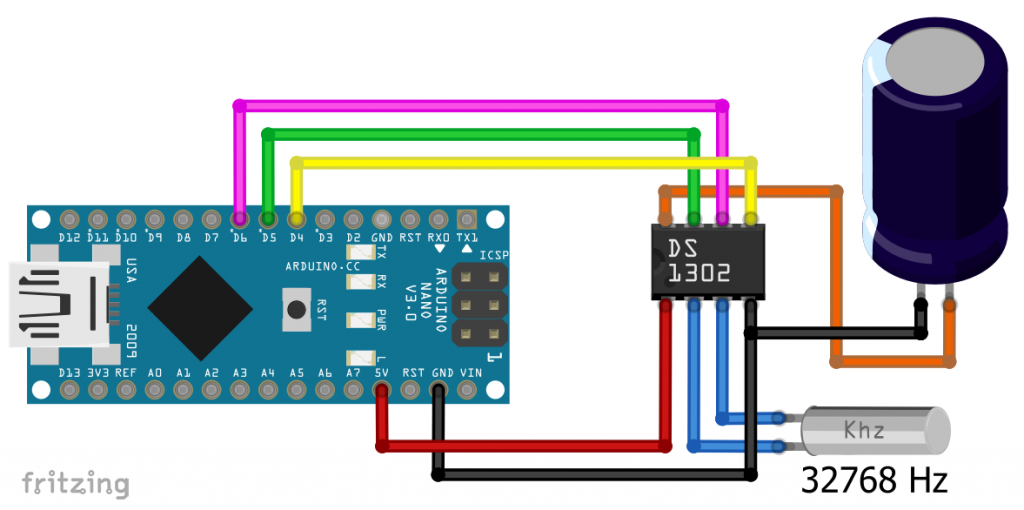
The easiest way to power your DS1302 is to use the 5 volts output of your Arduino. You can freely select the pins for the communication via 3-wire:
DS1307
The connection of the DS1307 does not really need any explanation. GND is connected to GND, VCC to 5V and SDA/SCL to the I2C pins of your microcontroller:
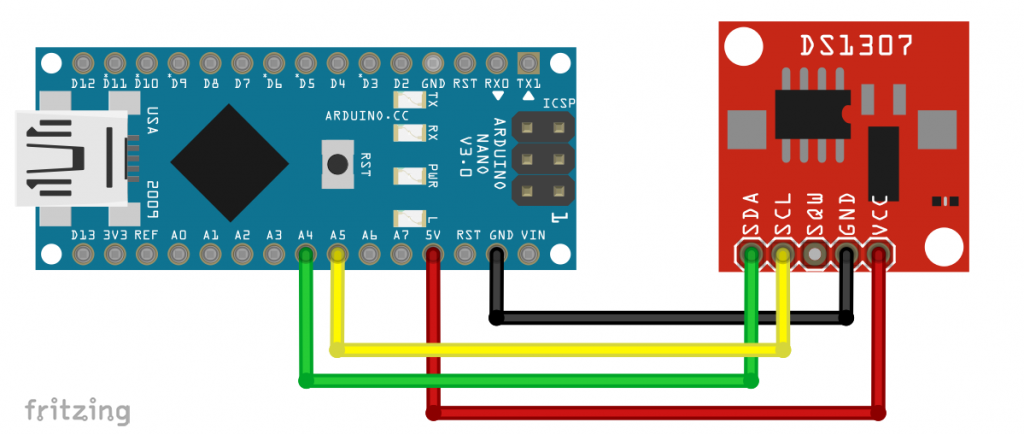
You can leave the SQW pin unconnected.
Accuracy / deviation of DS1302 and DS1307
The RTCs considered here are considerably less accurate than the DS3231. On the one hand, the external oscillators have a higher tolerance, on the other hand they lack the temperature compensation of the DS3231.
I have several purchased DS1302 and DS1307 modules and two homemade DS1302 ICs (DS1302_self_x) competing against each other. I set the modules exactly according to an atomic clock and then measured the deviation daily for a week. Here is the result:

The results are very disappointing for both the ready-made and the homemade DS1302 modules. The deviations are up to one minute within 7 days. Only one of the modules shows a deviation of less than 10 seconds in one week.
The three tested DS1307 modules showed better results. All deviations are below 10 seconds per week.
For comparison: DS3231 modules have a deviation of a few seconds (< 10) per month in my experience.
So, if you plan to buy a RTC module, you should rather choose a DS3231. However, if you already have DS1302 or DS1307 modules, then be prepared for corresponding deviations. Of course, I cannot claim that my results are representative. For that I would have to test many more modules from different sources. But the trend is already clear.
While the variances vary by module, they appear to be reasonably constant for each module. This offers the option of programming automatic readjustment. However, I conducted my experiments at fairly constant temperatures. With larger fluctuations in this regard, the result may look different again. How to adjust the time via Google, I have described below.
Basic functions of the DS1302 and the DS1307
The following sketches demonstrate how to use the basic functions of the DS1302 and the DS1307 when using the lib Rtc by Makuna. Both sketches do basically the same thing. You first create an RTC object and initialize it. Then you set the time using the computer system time at the time of compilation. A few more checks are carried out in the process. Finally, the time is regularly read and output in loop().
The sketches are based on the library examples DS1302_simple and DS1307_simple, which I modified slightly.
Basic sketch DS1302
Here is the sketch:
#include <ThreeWire.h>
#include <RtcDS1302.h>

ThreeWire myWire(6,5,4); // DAT (I/O), CLK (SCLK), RST (CE)
RtcDS1302<ThreeWire> rtc(myWire);

void setup () {
    Serial.begin(9600);
    Serial.print("compiled: ");
    Serial.print(__DATE__);
    Serial.print(" ");
    Serial.println(__TIME__);

    rtc.Begin();

    RtcDateTime compiled = RtcDateTime(__DATE__, __TIME__);
    printDateTime(compiled);
    Serial.println();

    if (!rtc.IsDateTimeValid()) {
        // Common Causes:
        //    1) first time you ran and the device wasn't running yet
        //    2) the battery on the device is low or even missing

        Serial.println("RTC lost confidence in the DateTime!");
        rtc.SetDateTime(compiled);
    }

    if (rtc.GetIsWriteProtected()){
        Serial.println("RTC was write protected, enabling writing now");
        rtc.SetIsWriteProtected(false);
    }

    if (!rtc.GetIsRunning()){
        Serial.println("RTC was not actively running, starting now");
        rtc.SetIsRunning(true);
    }
    RtcDateTime now = rtc.GetDateTime();
    if (now < compiled) {
        Serial.println("RTC is older than compile time!  (Updating DateTime)");
        rtc.SetDateTime(compiled);
    }
    else if (now > compiled) {
        Serial.println("RTC is newer than compile time. (this is expected)");
    }
    else if (now == compiled) {
        Serial.println("RTC is the same as compile time! (not expected but all is fine)");
    }
}

void loop () {
    RtcDateTime now = rtc.GetDateTime();

    printDateTime(now);
    Serial.println();

    if (!now.IsValid()) {
        // Common Causes:
        //    1) the battery on the device is low or even missing and the power line was disconnected
        Serial.println("RTC lost confidence in the DateTime!");
    }

    delay(10000); // ten seconds
}

#define countof(a) (sizeof(a) / sizeof(a[0]))

void printDateTime(const RtcDateTime& dt){
    char datestring[25];
    char daysOfTheWeek[7][4] = {"Sun","Mon", "Tue", "Wed", "Thu", "Fri", "Sat"};

    snprintf_P(datestring,
        countof(datestring),
        PSTR("%3s, %02u.%02u.%04u %02u:%02u:%02u"),
        daysOfTheWeek[dt.DayOfWeek()],
        dt.Day(),
        dt.Month(),
        dt.Year(),
        dt.Hour(),
        dt.Minute(),
        dt.Second() );
    Serial.print(datestring);
}
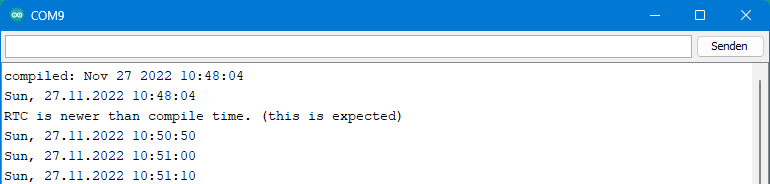
And here is the output:
Explanations for ds1302_basic
I won’t go through every single line, as much is self-explanatory.
- First, you need to include the necessary library files.
- With
ThreeWire myWire(6,5,4);you create a 3-wire object and define the corresponding pins. For this, you can choose any I/O pin of your microcontroller. RtcDS1302<ThreeWire> rtc(myWire);creates an RTC object to which the 3-wire object is passed.RtcDateTime compiled = RtcDateTime(__DATE__, __TIME__);creates an RtcDateTime object that contains the time of compilation. RtcDateTime objects store date and time internally as year, month, day, hour, minute, second. You can access this data via the functions Year(), Month(), Day(), Hour(), Minute() and Second(). Year() returns the year as uint16_t. All other functions return uint8_t values.IsDateTimeValid()checks if the date stored on the RTC makes sense (e.g.: are minutes <= 60?). The function is identical toGetDateTime().IsValid().SetDateTime()sets the time by passing an RtcDateTime object to the function.- The DS1302 has a write protection option. With
GetIsWriteProtected()andSetIsWriteProtected(true/false)you query the status or set it. - Before you can use the DS1302, it must first be started. You do that with
SetIsRunning(true). If you passfalse, it will turn off.Mit GetIsRunning()will return the status. GetDateTime()queries the current time of the DS1302 and returns it as an RtcDateTime object.- You can use RtcDateTime objects to perform arithmetic and comparison operations such as
now > compiled. - The
snprintf_P()function is used to format the date. This is not a function of the RTC library. I’ll get to that in a minute.
Basic sketch DS1307
The basic sketch for the DS1307 is similar:
#include <Wire.h> // must be included here so that Arduino library object file references work
#include <RtcDS1307.h>
RtcDS1307<TwoWire> rtc(Wire);


void setup ()
{
    Serial.begin(9600);

    Serial.print("compiled: ");
    Serial.print(__DATE__);
    Serial.println(__TIME__);

    rtc.Begin();

    RtcDateTime compiled = RtcDateTime(__DATE__, __TIME__);
    printDateTime(compiled);
    Serial.println();

    if (!rtc.IsDateTimeValid()){
        if (rtc.LastError() != 0){
            Serial.print("RTC communications error = ");
            Serial.println(rtc.LastError());
        }
        else{
            Serial.println("RTC lost confidence in the DateTime!");
            rtc.SetDateTime(compiled);
        }
    }

    if (!rtc.GetIsRunning()) {
        Serial.println("RTC was not actively running, starting now");
        rtc.SetIsRunning(true);
    }

    RtcDateTime now = rtc.GetDateTime();
    if (now < compiled) {
        Serial.println("RTC is older than compile time!  (Updating DateTime)");
        rtc.SetDateTime(compiled);
    }
    else if (now > compiled) {
        Serial.println("RTC is newer than compile time. (this is expected)");
    }
    else if (now == compiled) {
        Serial.println("RTC is the same as compile time! (not expected but all is fine)");
    }

    rtc.SetSquareWavePin(DS1307SquareWaveOut_Low);
}

void loop ()
{
    if (!rtc.IsDateTimeValid()) {
        if (rtc.LastError() != 0){
            // we have a communications error
            // see https://www.arduino.cc/en/Reference/WireEndTransmission for
            // what the number means
            Serial.print("RTC communications error = ");
            Serial.println(rtc.LastError());
        }
        else{
            // Common Causes:
            //    1) the battery on the device is low or even missing and the power line was disconnected
            Serial.println("RTC lost confidence in the DateTime!");
        }
    }

    RtcDateTime now = rtc.GetDateTime();

    printDateTime(now);
    Serial.println();

    delay(1000); // ten seconds
}

#define countof(a) (sizeof(a) / sizeof(a[0]))

void printDateTime(const RtcDateTime& dt){
    char datestring[25];
    char daysOfTheWeek[7][4] = {"Sun","Mon", "Tue", "Wed", "Thu", "Fri", "Sat"};

    snprintf_P(datestring,
            countof(datestring),
            PSTR("%3s, %02u.%02u.%04u %02u:%02u:%02u"),
            daysOfTheWeek[dt.DayOfWeek()],
            dt.Day(),
            dt.Month(),
            dt.Year(),
            dt.Hour(),
            dt.Minute(),
            dt.Second() );
    Serial.print(datestring);
}
Explanations for ds1307_basis
There are many similarities with the control of the DS1302. But in order that you don’t have to scroll back and forth too much, I’ll go over all the functions once again:
- First, include the necessary library files.
- The DS1307 uses I2C. Therefore, when you create your RTC object, you pass the Wire object:
RtcDS1307<TwoWire> rtc(Wire);. RtcDateTime compiled = RtcDateTime(__DATE__, __TIME__);creates an RtcDateTime object that contains the time of compilation. RtcDateTime objects store date and time internally as year, month, day, hour, minute, second. You can access this data using the functions Year(), Month(), Day(), Hour(), Minute() and Second(). Year() returns the year as uint16_t. All other functions return uint8_t values.IsDateTimeValid()checks if the date on the RTC makes sense (e.g.: are minutes <= 60?). The function is identical withGetDateTime().IsValid().SetDateTime()sets the time by passing an RtcDateTime object to the function.- Before you can use the DS1307, it must first be started. You do that with
SetIsRunning(true). If you passfalse, it switches off. UseGetIsRunning()to query the status. SetSquareWavePin()sets the output of the SQW pin. As parameter you pass DS1307SquareWaveOut_x, with x = High, Low, 1Hz, 4kHz, 8kHz or 32kHz.GetDateTime()queries the current time of the DS1307 and returns it as RtcDateTime object.- You can use RtcDateTime objects to perform arithmetic and comparison operations such as
now > compiled. - If
LastError()returns anything other than 0, there is an error in the I2C connection. The error code is the return value fromWire.endTransmission(), which is passed toLastError(). For details on the error codes, look here. - The
snprintf_P()function is used to format the date. This is not a function of the RTC library. I’ll get to that in a minute.
Formatting time and date
I could write a whole post about formatting outputs. The printf() and sprintf() functions are probably familiar to many of you. In addition, there are a number of related functions. A very compact summary can be found here. The snprintf_P() function is used less frequently. It is based on the function snprintf(), which is explained e.g. here.
This is how snprintf_P() is applied:
snprintf_P(s, sizeof(s), PSTR("String mit Variablen"), Variable_1, Variable_2, usw.)
Where “s” is the character array in which the result is stored. The size is calculated via sizeof(s). This is followed by the output string (“Format String”) with the text and the placeholders, and then finally the variables that replace the placeholders in the output. The PSTR() macro makes the difference to snprintf(). It causes that the enclosed string is not read from the SRAM, but from flash. This is similar to the better known F() macro. In short: snprintf_P() saves valuable SRAM compared to snprintf().
The fact that you cannot use F() here is due to the data type. To explain this in detail would take us too far.
I have not yet explained the function DayOfWeek(). It returns calculated the day of the week as a number (0 = Sunday, 1 = Monday, 2 = Tuesday, etc.).
Setting the time
Setting the time via serial monitor
If you use the compile time to set the RTC time, you are already a few seconds behind the real time from the start. This could be compensated by adding a few seconds to compile: compile += 10; or similar. A better method is to set the time via the serial monitor. You can also repeat this at any time during operation.
Setting the DS1302
The following sketch first sets the time of the DS1302 roughly according to when it was compiled. The time based on this is output every second. Then you adjust the time exactly by entering the current time in the serial monitor in the format “hour:minute:second” and send it.
#include <ThreeWire.h>
#include <RtcDS1302.h>

ThreeWire myWire(6,5,4); // DAT (I/O), CLK (SCLK), RST (CE)
RtcDS1302<ThreeWire> rtc(myWire);

void setup () {
    Serial.begin(9600);

    rtc.Begin();
    if(!rtc.GetIsRunning()) {
        Serial.println("RTC was not actively running, starting now");
        rtc.SetIsRunning(true);
    }
    RtcDateTime compiled = RtcDateTime(__DATE__, __TIME__);
    Serial.println("Compile Time:");
    printDateTime(compiled);
    Serial.println();
    rtc.SetDateTime(compiled);

    Serial.println("Enter the new time as hh:mm:ss");
}

void loop () {
    RtcDateTime now = rtc.GetDateTime();
    static int currentSecond = 61; // currentSecond to be different from first nextSecond
    int nextSecond = now.Second();

    if(nextSecond != currentSecond){
        printDateTime(now);
        Serial.println();
        currentSecond = nextSecond;
    }

    if(Serial.available()){
        uint8_t newHour = Serial.parseInt();
        uint8_t newMinute = Serial.parseInt();
        uint8_t newSecond = Serial.parseInt();
        rtc.SetDateTime(RtcDateTime(now.Year(),now.Month(),now.Day(),newHour, newMinute, newSecond));
        while(Serial.available()){
            Serial.read();
        }
    }
}

#define countof(a) (sizeof(a) / sizeof(a[0]))

void printDateTime(const RtcDateTime& dt){
    char datestring[25];
    char daysOfTheWeek[7][4] = {"Sun","Mon", "Tue", "Wed", "Thu", "Fri", "Sat"};

    snprintf_P(datestring,
        countof(datestring),
        PSTR("%3s, %02u.%02u.%04u %02u:%02u:%02u"),
        daysOfTheWeek[dt.DayOfWeek()],
        dt.Day(),
        dt.Month(),
        dt.Year(),
        dt.Hour(),
        dt.Minute(),
        dt.Second() );
    Serial.print(datestring);
}
In order to ensure that the transferred time is also taken over immediately, no delay() shall be used in loop(). To output the time every second anyway, the sketch permanently queries the time, “remembers” the second and only outputs the time if the queried second differs from the remembered second.
Setting the DS1307
And here again the same for the DS1307:
#include <Wire.h>
#include <RtcDS1307.h>

RtcDS1307<TwoWire> rtc(Wire);

void setup () {
    Serial.begin(9600);

    rtc.Begin();
    if(!rtc.GetIsRunning()) {
        Serial.println("RTC was not actively running, starting now");
        rtc.SetIsRunning(true);
    }
    RtcDateTime compiled = RtcDateTime(__DATE__, __TIME__);
    Serial.println("Compile Time:");
    printDateTime(compiled);
    Serial.println();
    rtc.SetDateTime(compiled);

    Serial.println("Enter the new time as hh:mm:ss");
}

void loop () {
    RtcDateTime now = rtc.GetDateTime();
    static int currentSecond = 61; // currentSecond to be different from first nextSecond
    int nextSecond = now.Second();

    if(nextSecond != currentSecond){
        printDateTime(now);
        Serial.println();
        currentSecond = nextSecond;
    }

    if(Serial.available()){
        uint8_t newHour = Serial.parseInt();
        uint8_t newMinute = Serial.parseInt();
        uint8_t newSecond = Serial.parseInt();
        rtc.SetDateTime(RtcDateTime(now.Year(),now.Month(),now.Day(),newHour, newMinute, newSecond));
        while(Serial.available()){
            Serial.read();
        }
    }
}

#define countof(a) (sizeof(a) / sizeof(a[0]))

void printDateTime(const RtcDateTime& dt){
    char datestring[25];
    char daysOfTheWeek[7][4] = {"Sun","Mon", "Tue", "Wed", "Thu", "Fri", "Sat"};

    snprintf_P(datestring,
        countof(datestring),
        PSTR("%3s, %02u.%02u.%04u %02u:%02u:%02u"),
        daysOfTheWeek[dt.DayOfWeek()],
        dt.Day(),
        dt.Month(),
        dt.Year(),
        dt.Hour(),
        dt.Minute(),
        dt.Second() );
    Serial.print(datestring);
}
Output of the setting sketches
This is what the output looked like:
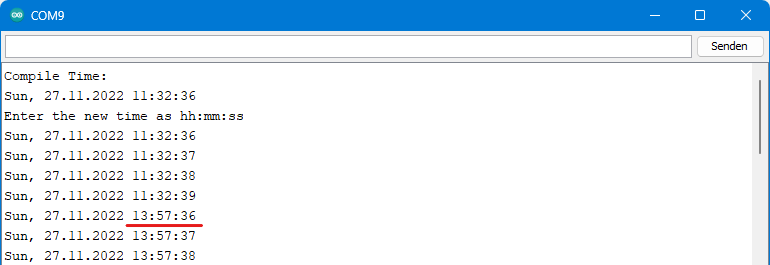
To make the effect more visible, I had set the time forward a few hours.
Setting the time via Google
If your microcontroller has internet access, you can easily adjust the RTC automatically. To do this, you send Google a GET request and get a bunch of data back. Among this data, there is one line containing the current date and time:
Date: Sun, 15 Jan 2023 10:30:45 GMT
To use this information to set your RTC, you need to overcome a few hurdles:
- Integration of your microcontroller into the home network.
- Creating and sending the GET request.
- Filtering out the “date line” from the response.
- Filtering out the hours, minutes and seconds from the “date line”.
I have written a corresponding sketch for an ESP32 board and the DS1302:
#include <WebServer.h>
#include <ThreeWire.h>
#include <RtcDS1302.h>

ThreeWire myWire(18, 17, 16); // DAT (I/O), CLK (SCLK), RST (CE)
RtcDS1302<ThreeWire> rtc(myWire);

const char* ssid     = "Your Wifi Name";
const char* password = "Your Wifi Password";
const char* host = "www.google.de";
const unsigned long rtcAdjustPeriod = 12000;

void setup() {
    Serial.begin(115200);
    delay(1000);
    initRTC();
    initWifi();
}

void loop() {
    static unsigned long lastTimeAdjust = 0;
    RtcDateTime now = rtc.GetDateTime();
    printDateTime(now);
    Serial.println();
    if( ((millis()-lastTimeAdjust)>rtcAdjustPeriod) || (millis()<lastTimeAdjust) ){  // millis() will overflow after ~50 days!
        uint8_t googleTime[3] = {0}; // hour, minute, second as array
        getGoogleTime(googleTime);
        RtcDateTime adjusted = RtcDateTime(now.Year(),now.Month(),now.Day(),googleTime[0],googleTime[1],googleTime[2]);
        adjusted += 3600; // German time = GMT + 1 hour
        rtc.SetDateTime(adjusted);
        lastTimeAdjust = millis();
    }
    delay(5000);
}

void initRTC(){
    rtc.Begin();
    if(!rtc.GetIsRunning()) {
        Serial.println("RTC was not actively running, starting now");
        rtc.SetIsRunning(true);
    }
    RtcDateTime compiled = RtcDateTime(__DATE__, __TIME__);
    Serial.println("Compile Time:");
    printDateTime(compiled);
    Serial.println();
    rtc.SetDateTime(compiled);
}

void initWifi(){
    Serial.print("Connecting to ");
    Serial.println(ssid);

    WiFi.begin(ssid, password);
    while (WiFi.status() != WL_CONNECTED) {
        delay(500);
        Serial.print(".");
    }

  Serial.println("");
  Serial.println("WiFi connected");
  Serial.println("IP address: ");
  Serial.println(WiFi.localIP());
  Serial.println();
}

void getGoogleTime(uint8_t *nowTime){
    String timeString = "";
    timeString.reserve(40);
    Serial.print("connecting to ");
    Serial.println(host);

    WiFiClient client;
    const int httpPort = 80;
    if (!client.connect(host, httpPort)) {
        Serial.println("connection failed");
        return;
    }

    // build the get request
    String getRequest = "GET: / HTTP/1.1\r\n Host: ";
    getRequest += host;
    getRequest += "\r\n Connection: close\r\n\r\n";

    // Send the get request to google
    client.print(getRequest);
    // start waiting for the response
    unsigned long lasttime = millis();
    while (!client.available() && millis() - lasttime < 1000) {
        delay(1);
    }   // wait max 1s for data

    //evaluate response
    while(client.available()) {
        timeString = client.readStringUntil('\r');
        if (timeString.indexOf("Date:")>=1) { // scan for the line containing the date/time
            int lastColon = timeString.lastIndexOf(":"); // to find out position of hh:mm:ss
            String subTimeString = timeString.substring(lastColon-6,lastColon-3);
            nowTime[0] = (uint8_t)atoi(subTimeString.c_str()); // extract the hours
            subTimeString = timeString.substring(lastColon-2,lastColon);
            nowTime[1] = (uint8_t)atoi(subTimeString.c_str()); // extract the minutes
            subTimeString = timeString.substring(lastColon+1,lastColon+3);
            nowTime[2] = (uint8_t)atoi(subTimeString.c_str()); // extract the seconds
            return;  // return because we have found what we needed
        }
    }
}

#define countof(a) (sizeof(a) / sizeof(a[0]))

void printDateTime(const RtcDateTime& dt){
    char datestring[25];
    char daysOfTheWeek[7][4] = {"Sun","Mon", "Tue", "Wed", "Thu", "Fri", "Sat"};

    snprintf_P(datestring,
        countof(datestring),
        PSTR("%3s, %02u.%02u.%04u %02u:%02u:%02u"),
        daysOfTheWeek[dt.DayOfWeek()],
        dt.Day(),
        dt.Month(),
        dt.Year(),
        dt.Hour(),
        dt.Minute(),
        dt.Second() );
    Serial.print(datestring);
}
And this is what the output for it looks like:
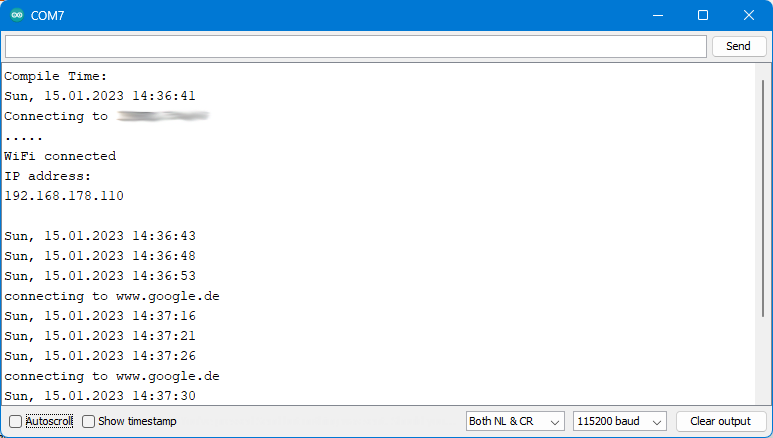
A few explanations about the sketch
The sketch DS1302_set_time_google.ino is quite content rich. For everything concerning WiFi and GET requests, I refer to my article Using WiFi with the ESP8266 and ESP32. But at least I want to mention: Of course you have to replace “Your Wifi Name” and “Your Wifi Password” with the credentials of your WiFi net.
As for the rest, just a few comments:
rtcAdjustPeriodis the period in which the time is reset. I chose only 12 seconds to test the sketch. In real applications, a period of a few hours or a day would be appropriate.- For long-term running applications where you use
millis(), you have to keep in mind that this counter will overflow after 232 microseconds (= ~50 days). This meansmillis()starts again from zero. This explainsmillis()<lastTimeAdjustin line 25. - The query of the Google time is done through
getGoogleTime(). The data that Google sends is read line by line and searched for the sequence “Date:”. - If the correct line is found, the hours, minutes and seconds are extracted from it and stored in an array (nowTime or googleTime). The last colon serves as a reference point for determining the position of the hours, minutes and seconds within the line.
- Excessive use of strings and string functions is not good, as I explained in my last post. However, this is not so relevant for the fast, SRAM-rich ESP32. Also, the strings are used in a function and not in
loop().
Adjusting the time with a DCF77
Another possibility would be to readjust the time with a DCF77 radio clock receiver. I have reported about the DCF77 here. However, the question arises why you would then need an additional RTC at all. In such a case I would work only with DCF77 or use it with a software RTC, which is based on millis(). Adafruit’s RTClib contains such a software RTC. Have a look at the example sketch softrtc.ino.
Calculations with RtcDateTime objects
In some sketches, we have already applied comparison operators to RtcDateTime objects (e.g. now > compiled). But you can also perform arithmetic operations with them. That, and how you get the Unix time from the RtcDateTime objects, I show in this sketch:
#include <ThreeWire.h>
#include <RtcDS1302.h>
ThreeWire myWire(6,5,4); // DAT (I/O), CLK (SCLK), RST (CE)
RtcDS1302<ThreeWire> rtc(myWire);
void setup () {
Serial.begin(9600);
rtc.Begin();
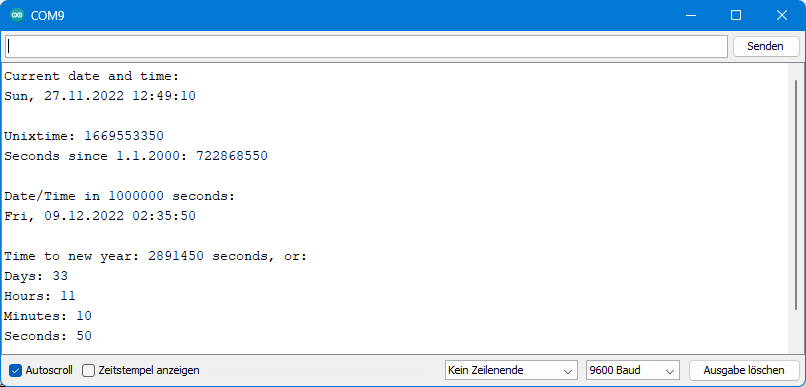
RtcDateTime now = rtc.GetDateTime();
Serial.println("Current date and time: ");
printDateTime(now);
Serial.println("\n\r");
Serial.print("Unixtime: ");
Serial.println(now.Unix32Time());
Serial.print("Seconds since 1.1.2000: ");
Serial.println(now.TotalSeconds());
Serial.println();
Serial.println("Date/Time in 1000000 seconds: ");
now += 1000000;
printDateTime(now);
Serial.println("\n\r");
Serial.print("Time to new year: ");
now = rtc.GetDateTime();
RtcDateTime newYear = RtcDateTime(now.Year()+1, 0, 0, 0, 0, 0);
uint32_t timeToNewYear = newYear.TotalSeconds() - now.TotalSeconds();
Serial.print(timeToNewYear);
Serial.println(" seconds, or:");
uint8_t secondsToNewYear = timeToNewYear%60;
timeToNewYear /= 60;
uint8_t minutesToNewYear = timeToNewYear%60;
timeToNewYear /= 60;
uint8_t hoursToNewYear = timeToNewYear%24;
uint16_t daysToNewYear = timeToNewYear/24;
Serial.print("Days: "); Serial.println(daysToNewYear);
Serial.print("Hours: "); Serial.println(hoursToNewYear);
Serial.print("Minutes: "); Serial.println(minutesToNewYear);
Serial.print("Seconds: "); Serial.println(secondsToNewYear);
}
void loop () {}
#define countof(a) (sizeof(a) / sizeof(a[0]))
void printDateTime(const RtcDateTime& dt){
char datestring[25];
char daysOfTheWeek[7][4] = {"Sun","Mon", "Tue", "Wed", "Thu", "Fri", "Sat"};
snprintf_P(datestring,
countof(datestring),
PSTR("%3s, %02u.%02u.%04u %02u:%02u:%02u"),
daysOfTheWeek[dt.DayOfWeek()],
dt.Day(),
dt.Month(),
dt.Year(),
dt.Hour(),
dt.Minute(),
dt.Second() );
Serial.print(datestring);
}
I think the sketch is fairly self-explanatory, so I’ll spare the explanations. Also, it should not be difficult for you to rewrite the sketch to the DS1307 if needed.
Here is the output:
Using the RAM of the DS1302 and DS1307
The DS1302 has a RAM of 31 bytes, the RAM of the DS1307 is 56 bytes. The possibilities that arise from such an almost ridiculously small memory are, of course, quite limited. It’s more like an electronic post-it, but it vanishes into thin air when the power is interrupted. But I still wanted to show how to use it.
DS1302 – Example for RAM usage
In my example for the DS1302, I show how you store and read a formatted date in the RAM. You could modify the sketch and use it to save the point in time when you last updated the time, or something similar.
#include <ThreeWire.h>
#include <RtcDS1302.h>

ThreeWire myWire(6,5,4); // IO, SCLK, CE
RtcDS1302<ThreeWire> rtc(myWire);

#define countof(a) (sizeof(a) / sizeof(a[0]))
RtcDateTime now;

void setup () {
    Serial.begin(9600);
    rtc.Begin();
    char data[] = "No entry yet";
    uint8_t count = sizeof(data);
    uint8_t written = rtc.SetMemory((const uint8_t*)data, count); // this includes a null terminator for the string
    if (written != count) {
        Serial.print("something didn't match, count = ");
        Serial.print(count, DEC);
        Serial.print(", written = ");
        Serial.print(written, DEC);
        Serial.println();
    }
    Serial.println("Enter \"w\" to write current time to the RAM");
    Serial.println("Enter \"r\" to read stored time from the RAM");
}

void loop () {
    char datestring[20];
    if((millis()%5000) == 0){
        now = rtc.GetDateTime();
        makeDateTimeString(now, datestring, sizeof(datestring));
        Serial.println(datestring);
    }
    if(Serial.available()){
        char command = Serial.read();
        now = rtc.GetDateTime();
        switch(command){
            case 'w':
                Serial.print("Write to RAM: ");
                makeDateTimeString(now, datestring, sizeof(datestring));
                Serial.println(datestring);
                rtc.SetMemory((const uint8_t*)datestring, sizeof(datestring));
                break;
            case 'r':
                rtc.GetMemory((uint8_t*)datestring, sizeof(datestring));
                Serial.print("Read from RAM: ");
                Serial.println(datestring);
                break;
            default:
                Serial.println("No valid command");
        }
    }
}

void makeDateTimeString(const RtcDateTime& dt, char* charArray, uint8_t size){
    snprintf_P(charArray,
        size,
        PSTR("%02u/%02u/%04u %02u:%02u:%02u"),
        dt.Month(),
        dt.Day(),
        dt.Year(),
        dt.Hour(),
        dt.Minute(),
        dt.Second() );
}
And this is the output:

Explanations for ds1302_ram.ino
The function for writing something to RAM is:
SetMemory((const uint8_t*)data, sizeof(data));
That means you typically pass an array to the function. The start address is zero. The function returns the number of bytes written.
Alternatively, you can write single bytes to an address of your choice:
SetMemory(address, value);
The parameters address and value are of byte data type (uint8_t).
You read the content of the RAM with the function:
GetMemory((uint8_t*)data, sizeof(data));
Alternatively, you can read individual bytes:
GetMemory(address);
Here, address is of data type byte (uint8_t).
DS1307 – RAM usage example
The sketch for the DS1307 does the same as the previous sketch for the DS1302. The difference is that here you can also choose a starting address when passing arrays:
#include <Wire.h>
#include <RtcDS1307.h>

RtcDS1307<TwoWire> rtc(Wire);

#define countof(a) (sizeof(a) / sizeof(a[0]))
RtcDateTime now;

void setup () {
    Serial.begin(9600);
    rtc.Begin();
    char data[] = "No entry yet";
    uint8_t count = sizeof(data);
    uint8_t written = rtc.SetMemory(0,(const uint8_t*)data, count); // this includes a null terminator for the string
    if (written != count) {
        Serial.print("something didn't match, count = ");
        Serial.print(count, DEC);
        Serial.print(", written = ");
        Serial.print(written, DEC);
        Serial.println();
    }
    Serial.println("Enter \"w\" to write current time to the RAM");
    Serial.println("Enter \"r\" to read stored time from the RAM");
}

void loop () {
    char datestring[20];
    if((millis()%5000) == 0){
        now = rtc.GetDateTime();
        makeDateTimeString(now, datestring, sizeof(datestring));
        Serial.println(datestring);
    }
    if(Serial.available()){
        char command = Serial.read();
        now = rtc.GetDateTime();
        switch(command){
            case 'w':
                Serial.print("Write to RAM: ");
                makeDateTimeString(now, datestring, sizeof(datestring));
                Serial.println(datestring);
                rtc.SetMemory(0,(const uint8_t*)datestring, sizeof(datestring));
                break;
            case 'r':
                rtc.GetMemory(0,(uint8_t*)datestring, sizeof(datestring));
                Serial.print("Read from RAM: ");
                Serial.println(datestring);
                break;
            default:
                Serial.println("No valid command");
        }
    }
}

void makeDateTimeString(const RtcDateTime& dt, char* charArray, uint8_t size){
    snprintf_P(charArray,
        size,
        PSTR("%02u/%02u/%04u %02u:%02u:%02u"),
        dt.Month(),
        dt.Day(),
        dt.Year(),
        dt.Hour(),
        dt.Minute(),
        dt.Second() );
}
Explanations for ds1307_ram.ino
The function for writing something to RAM is:
SetMemory(address, (const uint8_t*)data, sizeof(data));
Here, address is of data type byte (uint8_t). The function returns the number of bytes written.
Alternatively you can write single bytes to a specific address:
SetMemory(address, value);
The parameters address and value are of data type byte (uint8_t).
You read data from the RAM with:
GetMemory(address, (uint8_t*)data, sizeof(data));
Alternatively, you can read individual bytes:
GetMemory(address);
Here, address is of data type byte (uint8_t).
The DS1302 as Trickle Charger
The DS1302 can be used as a trickle charger, i.e. it ensures that a battery or capacitor maintains its full state of charge. The trickle charger function is not suitable as a battery charger, i.e. to charge discharged batteries, since the currents applied are far too low.
You can set two parameters for the charging circuit:
- The number of diodes (one or two).
- The charge voltage is reduced by approx. 0.7 volts per diode.
- The resistor (2, 4 or 8 kΩ).
The voltage supply is via VCC2, the output for the charging current is VCC1. Schematically, it looks like this:

A circuit (here with capacitor to be trickle charged) could look like this:
The maximum current (in the uncharged state) is:
![\[ I_{max}\;\text{[A]}=\frac{V_{CC2}-0.7\cdot{number\_diodes}}{R_{set}}\;\;\;\;\; \text{with:}\;{R_{set}}=2, 4, 8\; \text{k}\Omega \]](https://wolles-elektronikkiste.de/wp-content/ql-cache/quicklatex.com-a815b6fd33028e41bb45e22c1cece920_l3.png "Rendered by QuickLaTeX.com")
So, for example, if you choose a supply voltage of 5 volts, choose a diode and the smallest resistor, then the maximum current is:
![\[ I_{max}=\frac{5-0.7}{2000} = 0.00215 \;\text{[A]} = 2.15 \;\text{[mA]} \]](https://wolles-elektronikkiste.de/wp-content/ql-cache/quicklatex.com-77fe08b99d826a6131e1530ea80ce04f_l3.png "Rendered by QuickLaTeX.com")
As the state of charge increases, VCC1 increases and the charge current decreases accordingly. Before you use the trickle charger with batteries, inform yourself whether your battery is suitable for it! In general, it is strongly advised not to use trickle chargers for lithium batteries!
Programming the trickle charge function is simple. The sketch is self-explanatory:
#include <ThreeWire.h>
#include <RtcDS1302.h>

ThreeWire myWire(6,5,4); // DAT (I/O), CLK (SCLK), RST (CE)
RtcDS1302<ThreeWire> rtc(myWire);

void setup () {
    rtc.Begin();
    /* DS1302TcrResistor:
    DS1302TcrResistor_2KOhm
    DS1302TcrResistor_4KOhm
    DS1302TcrResistor_8KOhm

    DS1302TcrDiodes:
    DS1302TcrDiodes_One
    DS1302TcrDiodes_Two

    DS1302TcrStatus:
    DS1302TcrStatus_Enabled
    DS1302TcrStatus_Disabled

    Usage:
    SetTrickleChargeSettings(DS1302TcrResistor | DS1302TcrDiodes | DS1302TcrStatus)
    */

    rtc.SetTrickleChargeSettings(DS1302TcrResistor_2KOhm | DS1302TcrDiodes_One |  DS1302TcrStatus_Enabled);
}

void loop () {
Acknowledgement
I have to thank Peggy and Marco Lachmann-Anke on Pixabay for the post image (Big Ben).
Ifound the solution, I had to change
uint32_t timeToNewYear = newYear – now
to uint32_t timeToNewYear = newYear.TotalSeconds() – now.TotalSeconds();
This is regarding to the calculations example, which threw an error for me. The previous message I posted didn’t come through for some reason.
Hi, thank you. You are right and I changed it. All sketches I publish are tested – don’t know how this slipped through. Maybe I uploaded a wrong version of the sketch.