
About this post
Having already presented a number of my libraries on this blog (see also on GitHub), I have been asked several times how to actually create them. It’s a bit like being asked how to write an Arduino sketch – there are many answers to that in any length. At least, I will not manage to cover the topic in all its facets, although I spend two posts on it.
But I hope this crash course will help you get started. And even if you don’t want to create your own libraries, some knowledge is still very useful. Being able to “read” libraries will help you to use them better or to understand error messages if necessary.
In this first part, I explain the basics. The grammar, so to speak. I have deliberately chosen an example that has nothing to do with microcontrollers. In the second part, I will show you how to develop a library for a sensor and what typical issues arise.
Libraries – basic terms
I don’t want to get too deep into general theory, but make sure “we’re speaking the same language”. I will keep this part about the basic concepts short because I want to focus on the practical application. If you think it’s too short, do a little googling. There is already so much on the net about this that I can’t offer any added value.
Libraries vs. classes
A library is actually just a collection of program parts that is not executable on its own. The library can contain classes, but it does not have to. For the class, the library is a kind of container in which it is kept – alongside other components, if necessary.
The Arduino libraries that are not part of the “basic equipment” are located in the folder “Arduino/libraries” as subfolders. The subfolders have the name of the library.
Objects and object-oriented programming
In object-oriented programming (OOP), we think of the world as a collection of objects that are related to each other. Classes are the blueprints for objects, just as circuit diagrams are for circuits, for example. Just as you can create virtually an infinite number of circuits from a circuit diagram, you can create an unlimited number of objects from a class. At least as many as the memory allows you.
The objects or the classes are designed in such a way that they reveal only what is necessary to the outside world (principle of encapsulation). Basically, the object properties should only be able to be changed via defined methods. This initially means increased effort, but it pays off later. Who does not know this: You extend a program, which then no longer works because the program parts affect each other unintentionally. Using OOP, these problems can be minimized.
In addition to encapsulation, there are other fundamental principles of OOP. Above all, these are inheritance, polymorphism and abstraction. However, I will not go into it any further. Interested parties can look here, for example.
Attributes and methods
Objects have certain attributes (properties) and methods (functions). An example that is often used to illustrate this is a car:
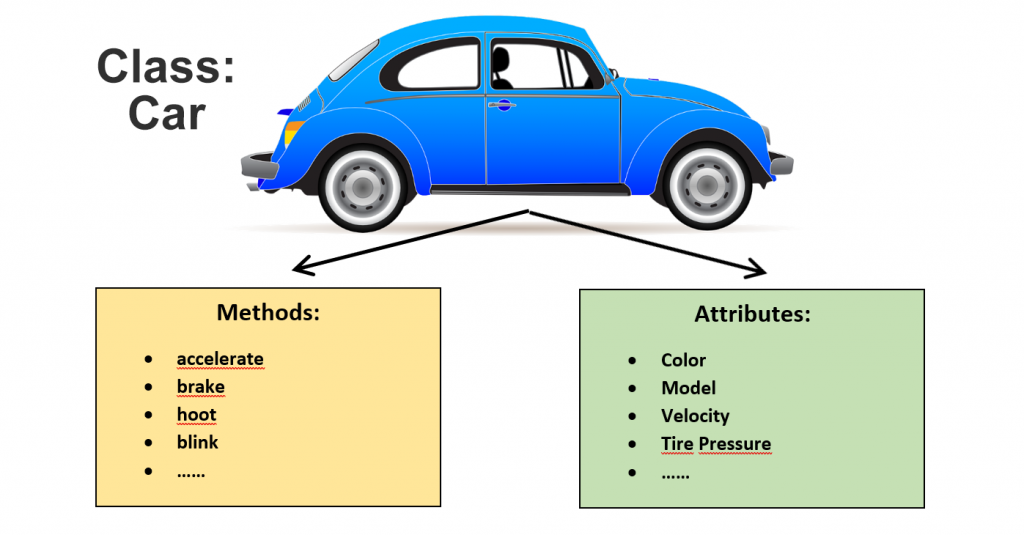
Some properties are invariant, such as the model or the color. Other properties, such as speed, are variable and are changed via methods. Methods, on the other hand, do not necessarily have to control a property, such as the “hoot” method here.
Header and source files
The library folders contain the corresponding header (extension “.h”) and source files (extension “.cpp”). Among other things, the header files contain the class declarations. If necessary, further elements are placed there, such as #define and #include statements or enum definitions. The source files mainly contain the functions.
For simple libraries that contain only a single class, the library, the class, and the header and source files often have the same name.
If you are designing a library yourself, make sure that you use individual names. Header files or classes whose names appear twice in the library directory can cause problems. That’s why (almost) all my libraries and classes that I publish on GitHub have my initials “WE” in their names, so you can see that this doesn’t (only 🙂 ) serve my ego.
Preparations
You can download the CoolCarLib exercise library used in this post from GitHub. Follow this link, then click on the “Code” button and select “Download ZIP”. Save the ZIP file in your “Arduino/libraries” folder and unzip it there. You should then find a folder called “CoolCarLib-main”. You don’t need the ZIP file anymore and can delete it. The easiest way to get to the library example sketches is via File → Examples → CoolCarLib-main in the Arduino IDE.
For the creation and editing of libraries, the Arduino IDE is not particularly well suited as an editor. I recommend the free Notepad++. For smaller projects, the program is absolutely sufficient and requires hardly any introduction.
A minimal class – CoolCarBasic
The first class we are looking at describes a car and is named CoolCarBasic. The car is very minimalistic, having only the following attributes and methods:
- Attributes:
- Maximum number of passengers (maxPassengers)
- Speed (speed)
- Methods
- Return the maximum number of passengers (getMaxPassengers):
- Set the speed (setSpeed)
- Return the current speed (getSpeed)
- Hoot! /li>
CoolCarBasic – header file
CoolCarLib contains the two classes CoolCarBasic and CoolCar. The following excerpt of the header file CoolCarLib.h contains a general part and the code of the CoolCarBasic class declaration:
#ifndef COOL_CAR_LIB_H_
#define COOL_CAR_LIB_H_

#include <Arduino.h>

/* ###############  CoolCarBasic ############### */

class CoolCarBasic  // Class Declaration
{
    public:
        CoolCarBasic(uint8_t mP);  // Constructor

        uint8_t getMaxPassengers();
        uint16_t getSpeed();
        void setSpeed(uint16_t speed);
        void hoot();

    protected:
        uint8_t maxPassengers;
        uint16_t speed;
};

/* #################  CoolCar ################
....
....
....
*/

#endif
Explanation of the header file
The content of the header file is framed by:
#ifndef COOL_CAR_LIB_H_
#define COOL_CAR_LIB_H_
.......

#endif
The statements beginning with the hash # are preprocessor directives. That is, they are not part of the actual code, but determine what is read as code. Only if COOL_CAR_LIB_H_ has not been defined yet, the code between #ifndef (= if not defined) and #endif is included. COOL_CAR_LIB_H_ would be defined then. This prevents the code from being read in twice.
#include <Arduino.h> embeds – not surprisingly – the Arduino library. What is surprising, however, is that you have to include Arduino.h at all. If you write a simple sketch, Arduino.h will be included automatically even without this directive. This necessity results from the order in which the program parts are read. If your library is read before the Arduino library, the compiler will stop with an error message when it encounters an Arduino-specific function such as digitalWrite() or Serial.print().
Then follows the class declaration, started with the keyword class. The content of the class declaration is enclosed in curly brackets. It ends with a semicolon. If the semicolon is missing, there are error messages, which unfortunately do not point directly to the cause.
All functions (methods) and variables (attributes) after public: are publicly accessible. You access them via the object name and the point operator. Everything after protected: is available only to the class itself. That means, if you create a CoolCarBasic object with the name myCar, then the statement myCar.setSpeed(50) is allowed. myCar.speed = 50, on the other hand, would not be allowed. An alternative to protected is private. The difference is that private functions and variables cannot be accessed in inherited classes.
The first function of the class is CoolCarBasic(uint8_t);. This is the constructor, which we will discuss below.
For variable definitions of integers, you should specify the variable type in the notation (u)intx_t . “int” stands for integer, “u” for unsigned and “x” for the size in bits. For example, on an Arduino, a uint16_t corresponds to unsigned int. However, there are MCUs, such as the ESP32, on which an integer is larger than 16 bits. Therefore, uint16_t is a clearer definition.
CoolCarBasic – source file
Now we come to the source file CoolCarLib.cpp. First, here is the code relevant for CoolCarBasic:
#include <CoolCarLib.h>

/* ###############  CoolCarBasic ############### */

/************  Constructor ************/

CoolCarBasic::CoolCarBasic(uint8_t mP){
  maxPassengers = mP;
  speed = 0;
}

/**********  Public Functions **********/

uint8_t CoolCarBasic::getMaxPassengers(){
    return maxPassengers;
}

uint16_t CoolCarBasic::getSpeed(){
    return speed;
}

void CoolCarBasic::setSpeed(uint16_t sp){
    speed = sp;
}

void CoolCarBasic::hoot(){
  Serial.println("beep! beep! beep!");
}

/* #################  CoolCar ################
............
*/
Explanation of the source file
In the first line CoolCarBasic.h is included. The statement seems superfluous because we include the file in the sketches right away. But you can’t do without it – these are the peculiarities of the preprocessor.
This is followed by the definitions of the functions previously declared in the header file. What stands out is that all function names are preceded by the class name, separated by the double colon ::. This character has the bulky name “scope resolution operator”. CoolCarBasic::xxx() means that the function xxx() belongs to the CoolCarBasic class. How else should the compiler know which class to assign the function to!
Now we come to the constructor CoolCarBasic::CoolCarBasic(uint8_t){...}. The constructor is the function you use to create your objects. As a function, the constructor is special in that it has no return value. However, it is allowed to pass parameters to the constructor. In our example, the constructor gets the maximum number of passengers and assigns it to the maxPassengers private variable. In addition, speed is set to the initial value 0. Typically, however, this is something you don’t put in the constructor, but in a init() or begin() function.
You query the maximum number of passengers with getMaxPassengers(). Since maxPassengers is a constant value, there is no setMaxPassengers() function. This is different for speed. Here we define a get and a set function.
The function hoot() is a method that does not change any variable. When it is called, it will trigger a Serial.println() instruction. Normally, I would not define the output medium in a class, but only return values – how they are output is decided by the user.
CoolCarBasic – Usage
cool_car_basic_test.ino – test sketch
And this is what a sketch using CoolCarBasic might look like:
#include <CoolCarBasic.h>

CoolCarBasic myCar = CoolCarBasic(7); // 7 passengers is maximum

void setup() {
  Serial.begin(9600);
  //delay(200); // uncomment for ESP32 / ESP8266 Boards

  byte passengerLimit = myCar.getMaxPassengers();
  unsigned int currentSpeed = myCar.getSpeed();

  Serial.print("Max. number of passengers: ");
  Serial.println(passengerLimit);

  Serial.print("CurrentSpeed [km/h]: ");
  Serial.println(currentSpeed);

  myCar.setSpeed(50);
  currentSpeed = myCar.getSpeed();
  Serial.print("CurrentSpeed [km/h]: ");
  Serial.println(currentSpeed);

  myCar.hoot();
}

void loop() {}
Line 3 calls the constructor and creates the object myCar. You can also say: An instance of the CoolCarBasic class is created. In doing so, you pass the value for maxPassengers to the object.
If you use an ESP32 or ESP8266 based board, you should uncommentdelay(200); in line 7. Otherwise, you might see an empty serial monitor after uploading the sketch.
The rest of the sketch should be self-explanatory.
Output of cool_car_basic_test.ino
The output is not particularly surprising:

One more thing you could try: Turn the variable speed into a public variable by moving its declaration to the “public” area. You will see that you can then make an assignment such as myCar.speed = 150. Or you can display the value using Serial.print(myCar.speed). And why don’t you do that, but go to the trouble of writing set and get functions? The answer is: Because of the principle of encapsulation. And why is encapsulation important? You have control! For example, checks can be built into the set function to prevent the entry of invalid values.
An advanced class – CoolCar
With CoolCarBasic, you got to know the basic framework for a class. However, a few important things that you typically need are still missing. I would like to explain this using the second class of CoolCarLib, namely CoolCar. Actually, this would also be a good opportunity to deal with the topic of inheritance, but I don’t want this post to become too long.
CoolCar has the following attributes and methods:
- Attributes:
- Maximum number of passengers
- Maximum speed
- Current speed
- Length
- Air conditioner level
- Methods:
- Initialization
- Get the maximum number of passengers / maximum speed / length / current speed
- Accelerate / brake by the value x
- Hoot!
- Get / set the level of air conditioning
CoolCar – header file
Here is the relevant part of the header file:
/* #################  CoolCar ################ */

enum cc_ac_level{
    CC_AC_OFF, CC_AC_LOW, CC_AC_MEDIUM, CC_AC_HIGH, CC_AC_MAX
};

class CoolCar
{
    public:
        CoolCar(const uint8_t mP, const uint16_t mSp, const float len = 4.2)
        : maxPassengers{mP}, maxSpeed{mSp}, length{len} { /*empty */ }

        void init();
        uint8_t getMaxPassengers();
        uint16_t getMaxSpeed();
        float getLengthInMeters();
        void hoot();
        bool accelerate(uint16_t accVal);
        void brake(uint16_t brakeVal);
        uint16_t getCurrentSpeed();
        void setAirConLevel(cc_ac_level acLevel);
        cc_ac_level getAirConLevel();

    protected:
        uint8_t maxPassengers;
        uint16_t maxSpeed;
        float length;
        int16_t currentSpeed;
        cc_ac_level airConLevel;

        int16_t calculateNewSpeed(int16_t value);
};
Explanations to the header file
Use of Enum Definitions
Our CoolCar car now has an air conditioning system that is supposed to be adjustable in five levels, from “Off” (CC_AC_OFF) to “Maximum” (CC_AC MAX). To define the levels, we use the private variable airConLevel, which is an enumeration. The setting is made via setAirConLevel(). Of course, you could simply use integer values from 0 to 4 for the levels. But “MEDIUM”, for example, is more understandable than “Level 2”.
The names of the enumeration elements should be individual. That’s why I prefixed them with “CC_AC_” (Cool Car Air Condition). If you do not follow this rule and the identifier has already been used elsewhere for a global definition, you will get an error message. You can provoke this issue by trying to rename CC_AC_HIGH to a simple HIGH, which as you know is already assigned for the logic level.
Recommended: Enum classes
Actually, it is recommended to use enum class instead of the simple enumerations:
enum class cc_ac_level : uint8_t {
    CC_AC_OFF, CC_AC_LOW, CC_AC_MEDIUM, CC_AC_HIGH, CC_AC_MAX
};
If you want to access the elements, you must prefix them with the name of the enum class separated by the scope resolution operator ::, for example like this: cc_ac_level::CC_AC_MEDIUM. The advantage is on the one hand less risk of name collisions, on the other hand implicit type conversions, which could lead to unhappy surprises, are avoided. For more details, look e.g. here.
In most Arduino libraries you can find the simple enumerations, so also in mine, I have to confess.
Passing multiple parameters to the constructor
The constructor of the CoolCar class is passed the following parameters:
- Maximum number of passengers
- Maximum speed
- Car length
Since these properties do not change, it is best to pass them as constants.
The larger the number of parameters, the higher the probability that the user will make a mistake in sequence. Therefore, you should not overdo it.
As with ordinary functions, parameters for the constructor can also be set up as optional by predefining them. In this example, we do that for the length len. If the length is not passed, the default setting “4.2” is used.
By the notation I use here, the object properties here are already assigned the passed parameters in the header file.
It is also possible to overload the constructor, i.e. to declare it multiple times with different parameters.
CoolCar – source file
Here is the relevant part of the source file:
/**********  Public Functions **********/

void CoolCar::init(){
    currentSpeed = 0;
    airConLevel = CC_AC_OFF;
}

uint8_t CoolCar::getMaxPassengers(){
    return maxPassengers;
}

uint16_t CoolCar::getMaxSpeed(){
    return maxSpeed;
}

float CoolCar::getLengthInMeters(){
    return length;
}

uint16_t CoolCar::getCurrentSpeed(){
    return currentSpeed;
}

void CoolCar::hoot(){
    Serial.println("beep! beep! beep!");
}

bool CoolCar::accelerate(uint16_t accVal){
    bool noLimitViolation = true;
    uint16_t newSpeed = static_cast<uint16_t>(calculateNewSpeed(accVal));
    if(newSpeed > maxSpeed){
        currentSpeed = maxSpeed;
        noLimitViolation = false;
    }
    else{
        currentSpeed = newSpeed;
    }
    return noLimitViolation;
}

void CoolCar::brake(uint16_t brakeVal){
    int16_t newSpeed = calculateNewSpeed(brakeVal * (-1));
    if(newSpeed <= 0){
        currentSpeed = 0;
    }
    else{
        currentSpeed = (uint16_t)newSpeed;
    }
}

void CoolCar::setAirConLevel(cc_ac_level level){
    airConLevel = level;
}

cc_ac_level CoolCar::getAirConLevel(){
    return airConLevel;
}

/*********  Private Functions *********/

int16_t CoolCar::calculateNewSpeed(int16_t value){
    int16_t speed = currentSpeed + value;
    return speed;
}
Explanations to the source file
Constructor
The constructor does not need to be listed again in the source file this time. The parameters have already been passed.
Init() function
Many Arduino classes have a init() or begin() function in which object properties are assigned a certain default value. In our case, this concerns the air conditioner level and the current speed.
If the classes represent components such as sensors or controllers, init() also typically checks whether the components have been connected correctly.
Speed control
In contrast to the last example, we control the speed via acceleration accelerate() and via braking brake(). If you try to exceed the maximum speed, then the speed will be limited to the maximum speed. Moreover, the function accelerate() has a return value (noLimitViolation). If it is true, then everything is fine. If, on the other hand, it is false, you have tried to accelerate beyond the maximum speed.
The rule for braking is that it must not lead to negative speeds. brake() contains a corresponding control function. However, I have dispensed with a return value.
Be careful with the signs
Our car can only drive forward. So, the speed should always be positive. Still, calculateNewSpeed() returns a int16_t. The reason is easy to see: The check for negative values only takes place after the return to brake(). The return value must be explicitly converted to a uint16_t. Especially when working with registers (see part 2 of the article), it is easy to forget that they may also contain negative values.
Many authors use the so-called C-type cast for type conversion, for example (uint16_t)value. You should use static_cast<uint16_t>(value) instead – but I often don’t stick to that either.
CoolCar – Usage
cool_car_test.ino – Test Sketch
Here’s a little example sketch:
#include <CoolCarLib.h>

CoolCar myCar = CoolCar(5, 180, 3.5);
// Alternative: CoolCar myCar(5, 180);

void setup() {
  Serial.begin(9600);
  //delay(200); // uncomment for ESP32 / ESP8266
  myCar.init();
  Serial.print("Max. number of passengers: ");
  Serial.println(myCar.getMaxPassengers());
  Serial.print("Max. Speed [km/h]: ");
  Serial.println(myCar.getMaxSpeed());
  Serial.print("Length [meters]: ");
  Serial.println(myCar.getLengthInMeters());
  myCar.hoot();
  Serial.print("Speed: ");
  Serial.println(myCar.getCurrentSpeed());

  if(!myCar.accelerate(50)){
    Serial.println("Speed Limit Warning!");
  }
  Serial.print("New Speed [km/h]: ");
  Serial.println(myCar.getCurrentSpeed());

  if(!myCar.accelerate(150)){
    Serial.println("Acceleration warning!!");
  }
  Serial.print("New Speed [km/h]: ");
  Serial.println(myCar.getCurrentSpeed());

  Serial.print("Air Conditioning Level: ");
  Serial.println(myCar.getAirConLevel());

  myCar.brake(60);
  Serial.print("New Speed [km/h]: ");
  Serial.println(myCar.getCurrentSpeed());

  myCar.setAirConLevel(CC_AC_MEDIUM);
  Serial.print("Air Con Level [num]: ");
  Serial.println(myCar.getAirConLevel());
  printAirConLevel();
}

void loop() {}

void printAirConLevel(){
  cc_ac_level acLevel = myCar.getAirConLevel();
  Serial.print("Air Con Level [level]: ");
  switch(acLevel){
    case CC_AC_OFF:
      Serial.println("off");
      break;
    case CC_AC_LOW:
      Serial.println("low");
      break;
    case CC_AC_MEDIUM:
      Serial.println("medium");
      break;
    case CC_AC_HIGH:
      Serial.println("high");
      break;
    case CC_AC_MAX:
      Serial.println("maximum");
      break;
    default:
      Serial.print("couldn't detect");
  }
}
Output of cool_car_test.ino
This output should not be unexpected either:
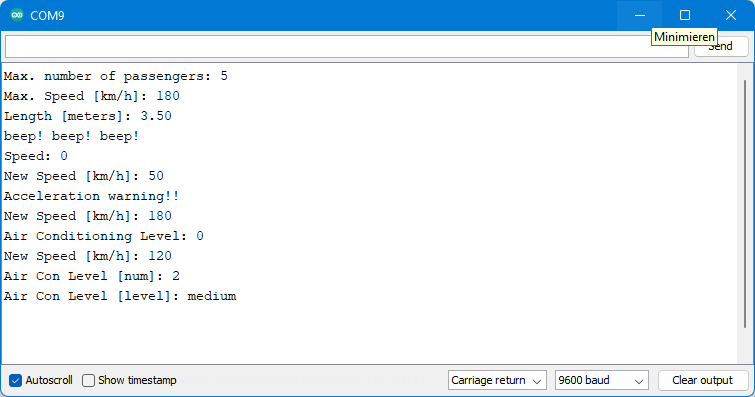
The example shows a disadvantage of the simple enumerations and enum classes. If you query airConLevel with getAirConLevel(), you will only get the bare number, but not the name of the enumeration element. Only a function like printAirConLevel() translates the return value into something understandable.
Keyword Highlighting with keywords.txt
To avoid typos or to recognize them more easily, it is helpful if the keywords, i.e. functions, variables, enumeration elements, etc. are highlighted in color by the Arduino IDE. To do this, create a file called keywords.txt and copy it to the library directory. You list the names to be highlighted in the file. Behind the names you put, separated by a tab(!), KEYWORD1, KEYWORD2 or LITERAL. The # sign indicates comments. Other IDEs have smarter solutions!
#######################################
# Syntax Coloring Map For CoolCarLib
#######################################

#######################################
# Datatypes (KEYWORD1)
#######################################

CoolCar	KEYWORD1
CoolCarBasic	KEYWORD1

# ENUM TYPES
cc_ac_level	KEYWORD1

#######################################
# Methods and Functions (KEYWORD2)
#######################################

getMaxPassengers	KEYWORD2
getSpeed	KEYWORD2
setSpeed	KEYWORD2
hoot	KEYWORD2
maxPassengers	KEYWORD2
speed	KEYWORD2
init	KEYWORD2
getMaxSpeed	KEYWORD2
getLengthInMeters	KEYWORD2
accelerate	KEYWORD2
brake	KEYWORD2
getCurrentSpeed	KEYWORD2
setAirConLevel	KEYWORD2
getAirConLevel	KEYWORD2
maxSpeed	KEYWORD2
length	KEYWORD2
currentSpeed	KEYWORD2
calculateNewSpeed	KEYWORD2

#######################################
# Constants (LITERAL1)
#######################################

# ENUM VALUES
CC_AC_OFF	LITERAL1
CC_AC_LOW	LITERAL1
CC_AC_MEDIUM	LITERAL1
CC_AC_HIGH	LITERAL1
CC_AC_MAX	LITERAL1
Conclusion and outlook
With this post, you have learned basics of creating libraries. However, this example had no real relation to microcontrollers yet. If you want to create a library for typical Arduino components, further questions arise. For example: How do I selectively change certain bits in a register? Or: How do I read values that span multiple registers? Or: how do I pass an SPI or Wire object? These and other questions will be answered in the second part of this article using a practical example.
very fruitful lessons. I enjoyed.
I am very excited to see the part 2 how to create a library for sensor.
my hope is to create a library for photo detector or temperature sensor using ATtiny85 as slave with I2C communication sending data to an other ATtiny85 as master
very useful
Thx
Thank you for taking the time to study this arcane, but very important topic, and to pass on your hard won knowledge in an way that’s both easy to understand and useful, a rare combination.
Thank you for your kind feedback!