About this post
There are two predominant technologies in CO2 sensors for monitoring indoor air quality. In my last post I had reported about the relatively expensive, but in my experience also reliable NDIR CO2 sensors. Here I would like to cover the less expensive, metal oxide-based TVOC and eCO2 sensors.
The TVOC and eCO2 sensors react to the presence of certain organic substances in the air (VOCs) and calculate the total concentration of volatile organic compounds (TVOC). From the TVOC and, if necessary, other measured values, the sensors estimate an equivalent concentration of CO2 (eCO2) via proprietary algorithms.
I won’t hide the fact that my enthusiasm for this type of sensor is limited. But since I have now invested some time and one or the other may wonder what these parts are capable of (or not!), I would like to share my experience.
In this article, I look at two representatives of this sensor class, namely the CCS811 and the SGP30. I focus on the following topics:
- Measuring principle of the MOX TVOC and eCO2 sensors
- Technical characteristics of the CCS811 and SGP30 modules
- Baselines
- Control of the modules using libraries
- Reliability (compared to NDIR)

Measuring principle of the TVOC and eCO2 sensors
What are VOCs?
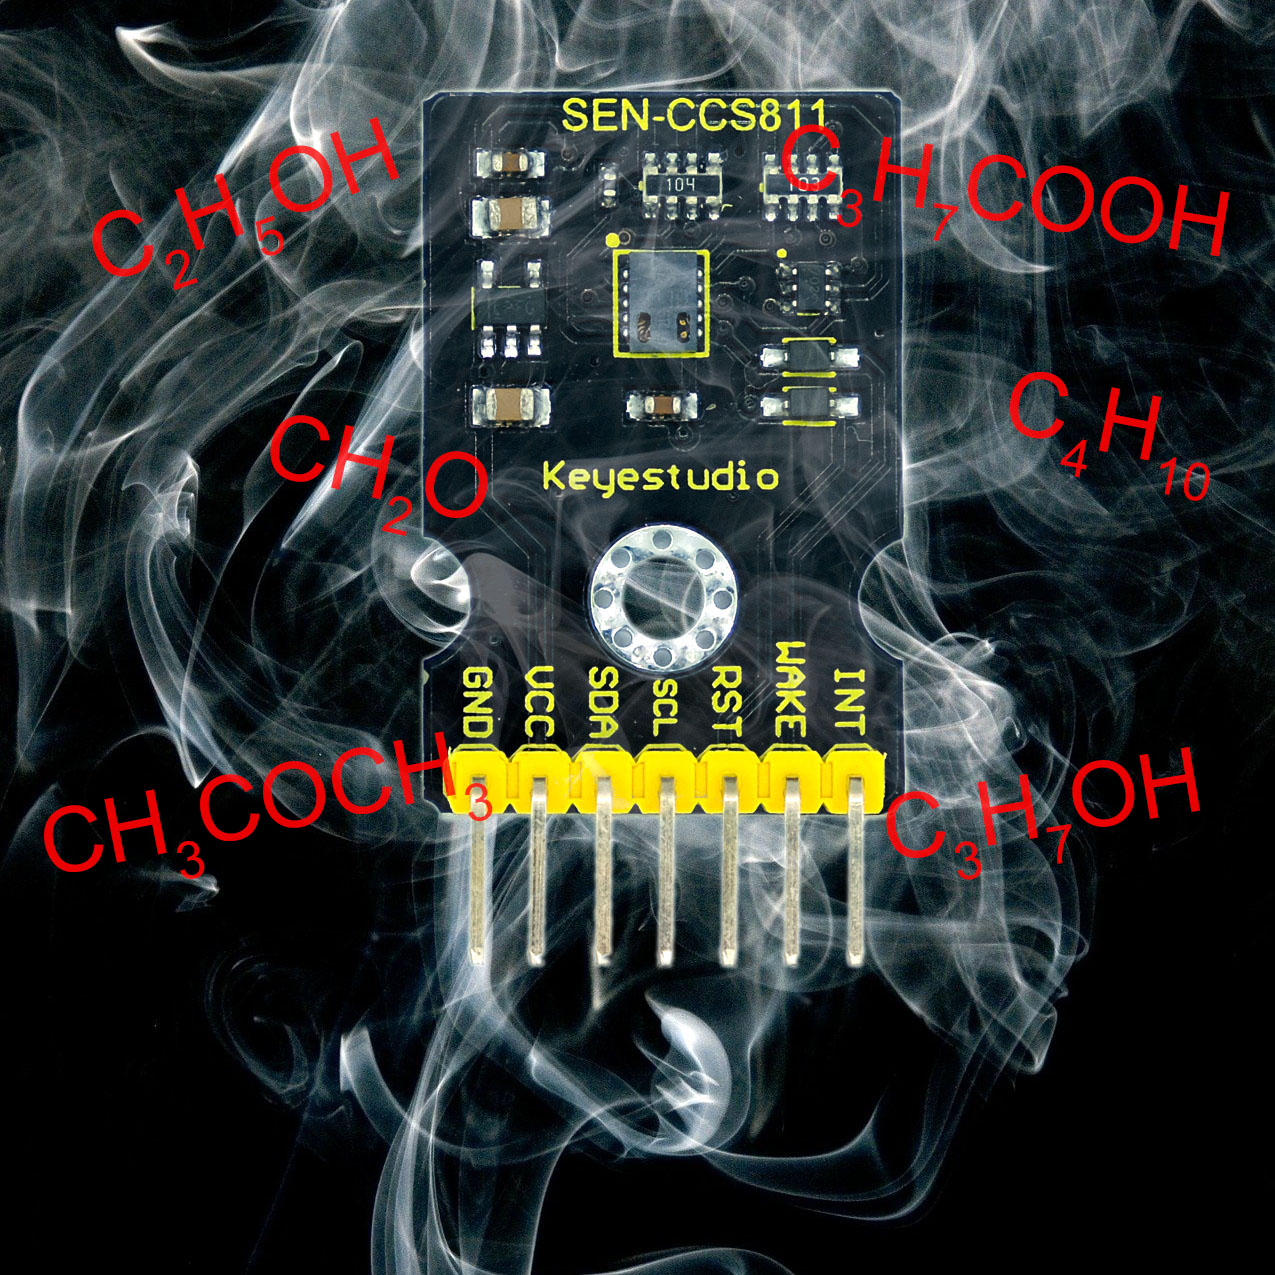
VOCs can be various chemical substances. These include alcohols, aldehydes, ketones and hydrocarbons. This sounds very chemical and artificial, but these substances are also natural metabolic products that we exhale or release through the skin.
The “T” in TVOC merely states that the sensors determine the total concentration of VOCs without further breaking them down by substance classes.
How does the actual sensor work?
The heart of the TVOC and eCO2 sensors is a thin layer of metal oxide. Therefore, the sensors are also called MOX sensors or MOS for short. The metal oxide is mostly tin dioxide.
The metal oxide layer does not have an ideal crystal structure. Some oxygen atoms are missing and this causes a certain conductivity. In clean ambient air, the metal oxide layer absorbs oxygen, which eagerly attracts electrons. This reduces the concentration of free charge carriers and thus also the conductivity. In polluted air, the metal oxide also absorbs VOCs. The VOCs, in turn, react with the oxygen present on the metal oxide. The reaction products leave the metal oxide layer. As a result, conductivity increases again. For the whole thing to work, the metal oxide layer must be heated. The metal oxide acts not only as a sensor, but also as a catalyst.
The reciprocal of the conductivity is the resistance, and this can be measured well. The dirtier the air, the lower the resistance. I found a nice animation here.
But how do the sensors determine the CO2 content?
Assuming that each person emits a certain amount of VOCs over time, a CO2 concentration can be estimated. Since this is a calculated CO2 value, this is called an equivalent concentration (eCO2). The sensors do not react to CO2 itself!
How reliable are the sensors?
I’ll preface my conclusion by saying that the TVOC and eCO2 sensors do not provide quantitatively reliable results. This applies in particular to the eCO2 values. In their dimension, however, the values show a certain reproducibility under comparable conditions. At least that’s true if you follow the recommended procedures. I positively rate the high sensitivity of the sensors and their and the fast response.
The CCS811
Technical characteristics
Here are the most important technical data:
- eCO2 Range: 400 – 32768 ppm
- TVOC Range: 0 – 29206 ppb
- Supply voltage:
- For the bare sensor: 1.8 – 3.3 volts
- For the module: it depends on your module, some modules have voltage regulators, others do not!
- Power consumption: in continuous operation at 5 volts, I measured 18 mA
- Pulse and sleep modes can reduce consumption to a minimum
- Communication: I2C (100 kHz / 400 kHz)
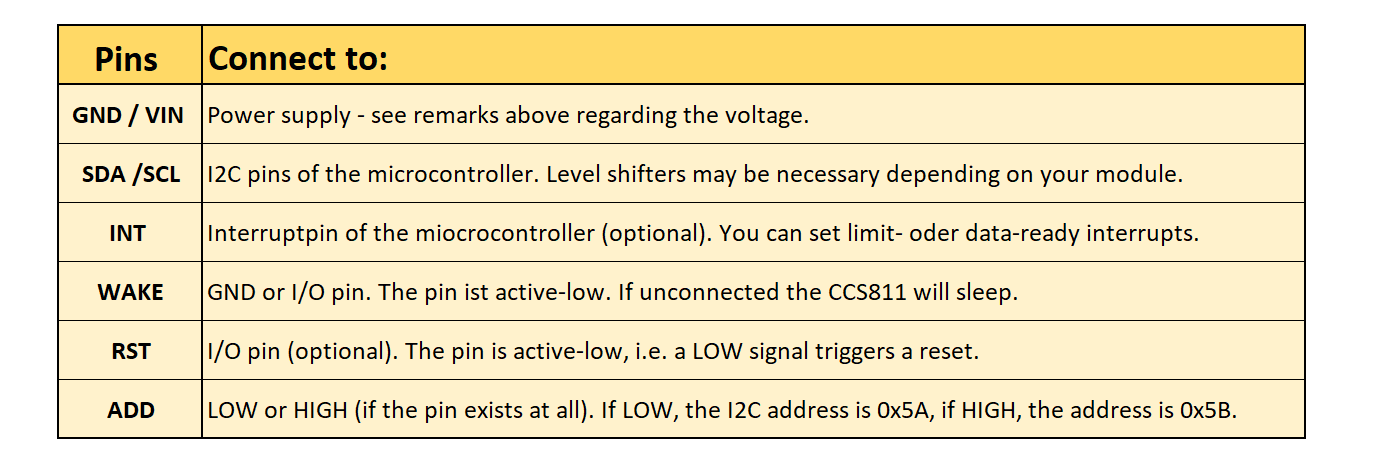
- Address 0x5A / 0x5B (adjustable if the module has an address pin)
- Whether pull-ups are necessary depends on the module
Further information can be found in the data sheet. In addition, there are half a dozen application notes, which you can find here on the pages of the manufacturer (Sciosense).
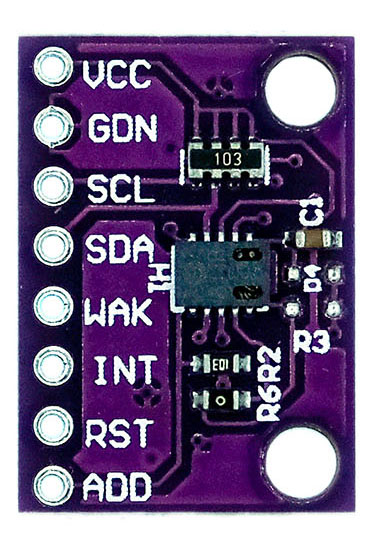
Pinout
Not every module has implemented all the connectors of the CCS811 as a pin.
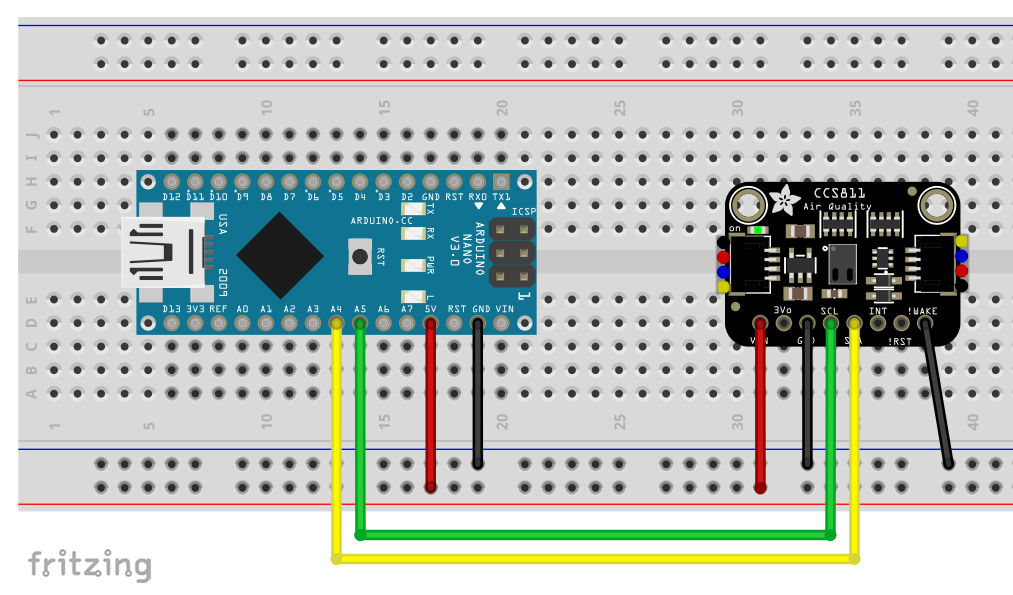
Connection to the microcontroller
Operation – the Baseline concept
The CCS811 TVOC and eCO2 sensor calculates the output values via the resistance of a metal oxide layer, as already described. The exact correlation varies from sensor to sensor and changes over operating time. In particular, this applies to the first few days.
For the calculation of the TVOC and eCO2 values, the CCS811 compares the current measured values with the so-called baseline. The baseline represents the measured values for clean air, i.e. a CO2 concentration of 400 ppm and a TVOC concentration of 0 ppb. The baseline is continuously updated in the background. By default, the highest resistance over a 24-hour window is taken as the baseline. It follows that the sensor must be located in a room that is ventilated daily. If not, the baseline shifts.
If you disconnect the CCS811 from the current, it forgets its baseline. The good news is that you can read the baseline. If you save it regularly in the EEPROM, for example, you can read it from there at the next power-on. This gives you meaningful readings without having to wait and ventilate until a reliable baseline is set.
According to the manufacturer, the baseline should be stored daily in the first week, later every 1 – 28 days. If unplanned power interruptions can occur, you should save it more often for safety’s sake.
Do not try to interpret the baseline value. It is more than a simple resistance value and also contains information about the humidity and temperature, as these also influence the measured values.
Control of the CCS811 with the Adafruit library
I had first tried the library of Keyestudio, the manufacturer of one of my modules. The documentation can be found here. But I was not particularly fond of it. Little is explained, and the example sketch is a bit odd because a constant baseline is written to the CCS811 every second. To me, this makes no sense.
I liked the library of Adafruit much better. You can find it here on GitHub or install it directly via the Arduino IDE. Search for “CCS811”. There is also a tutorial on Adafruit’s web pages.
The start
The best way to start is to upload the following sketch. This is a sample library sketch that I have expanded to include the regular baseline output. I recommend starting in a well-ventilated environment so that the measured values make more sense from the beginning.
/***************************************************************************
  Example sketch modified by Wolfgang Ewald. Original comments:

  This is a library for the CCS811 air

  This sketch reads the sensor

  Designed specifically to work with the Adafruit CCS811 breakout
  ----> http://www.adafruit.com/products/3566

  These sensors use I2C to communicate. The device's I2C address is 0x5A

  Adafruit invests time and resources providing this open source code,
  please support Adafruit andopen-source hardware by purchasing products
  from Adafruit!

  Written by Dean Miller for Adafruit Industries.
  BSD license, all text above must be included in any redistribution
 ***************************************************************************/

#include "Adafruit_CCS811.h"

Adafruit_CCS811 ccs;

void setup() {
  Serial.begin(9600);

  Serial.println("CCS811 test");

  if(!ccs.begin()){
    Serial.println("Failed to start sensor! Please check your wiring.");
    while(1);
  }

  // Wait for the sensor to be ready
  while(!ccs.available());
}

void loop() {
  static int counter = 0;
  static unsigned int baseline = ccs.getBaseline();
  if(ccs.available()){
    if(!ccs.readData()){
      Serial.print("CO2: ");
      Serial.print(ccs.geteCO2());
      Serial.print("ppm, TVOC: ");
      Serial.println(ccs.getTVOC());
    }
    else{
      Serial.println("ERROR!");
      while(1);
    }
  }
  counter++;
  if(counter==30){
    baseline = ccs.getBaseline();
    Serial.print("Baseline: ");
    Serial.println(baseline, HEX);
    counter=0;
  }
  delay(500);
}
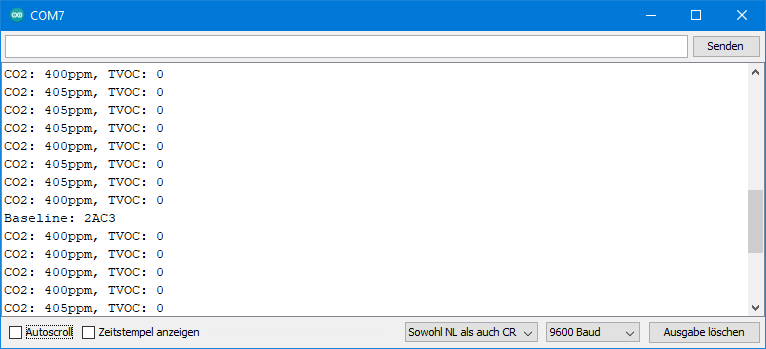
And this or similar is what the output looks like:
Continuous operation
In continuous operation, you probably want to save the baseline periodically and write it back to the CCS811 if you need to restart. For this, you can use the EEPROM memory of your Arduino. The following sketch writes a first baseline into the EEPROM. Take the baseline that you have determined before and change the sketch accordingly.
#include <EEPROM.h>

void setup(){
  unsigned int baseline = 0x847B;
  int address = 0;
  Serial.begin(9600);

  EEPROM.put(address, baseline);
  baseline = 0;
  Serial.println(baseline);
  EEPROM.get(address, baseline);
  Serial.println(baseline,HEX);
}

void loop()
{
}
For continuous operation, I have extended the test sketch. At the beginning, the baseline stored in the EEPROM is read and written to the CCS811. With the function setDriveMode() you can change the measurement mode. In the main loop, the baseline is read every three hours and saved to the EEPROM.
/***************************************************************************
  Example sketch, modified by Wolfgang Ewald. Original comments:

  This is a library for the CCS811 air

  This sketch reads the sensor

  Designed specifically to work with the Adafruit CCS811 breakout
  ----> http://www.adafruit.com/products/3566

  These sensors use I2C to communicate. The device's I2C address is 0x5A

  Adafruit invests time and resources providing this open source code,
  please support Adafruit andopen-source hardware by purchasing products
  from Adafruit!

  Written by Dean Miller for Adafruit Industries.
  BSD license, all text above must be included in any redistribution
 ***************************************************************************/

#include <EEPROM.h>
#include "Adafruit_CCS811.h"

Adafruit_CCS811 ccs;

void setup() {
  Serial.begin(9600);

  Serial.println("CCS811 test");

  if(!ccs.begin()){
    Serial.println("Failed to start sensor! Please check your wiring.");
    while(1);
  }

  // Wait for the sensor to be ready
  while(!ccs.available());
  unsigned int restoredBaseline = 0;
  EEPROM.get(0, restoredBaseline);
  ccs.setBaseline(restoredBaseline);
  Serial.print("Restored baseline: ");
  Serial.println(restoredBaseline, HEX);
  /*You can set the following modes to set the measurement frequency:
   * CCS811_DRIVE_MODE_IDLE
   * CCS811_DRIVE_MODE_1SEC
   * CCS811_DRIVE_MODE_10SEC
   * CCS811_DRIVE_MODE_60SEC
   * CCS811_DRIVE_MODE_250MS
   * Mode 1 is default. Low frequncy saves power.
   */
   // ccs.setDriveMode(CCS811_DRIVE_MODE_1SEC);
}

void loop() {
  static int counter = 0;
  static unsigned int baseline = ccs.getBaseline();
  static unsigned long lastBaselineSaving = millis();
  const unsigned long baselineSavePeriod = 10800000; // 3h - modify according to your needs
  if(ccs.available()){
    if(!ccs.readData()){
      Serial.print("CO2: ");
      Serial.print(ccs.geteCO2());
      Serial.print("ppm, TVOC: ");
      Serial.println(ccs.getTVOC());
    }
    else{
      Serial.println("ERROR!");
      while(1);
    }
  }
  counter++;
  if(counter==30){
    baseline = ccs.getBaseline();
    Serial.print("Baseline: ");
    Serial.println(baseline, HEX);
    counter=0;
  }
  if((millis()-lastBaselineSaving)>baselineSavePeriod){
    baseline = ccs.getBaseline();
    EEPROM.put(0, baseline);
    lastBaselineSaving = millis();
  }
  delay(500);
}
The SGP30
The SGP30 is similar in principle to the CCS811, but differs significantly in detail. The sensor has a special sensitivity to hydrogen and ethanol. From this, it calculates equivalent concentrations for TVOC and CO2 using two baselines.
Technical characteristics

Here are the most important technical features:
- eCO2 Range: 400 – 60000 ppm.
- TVOC Range: 0 – 60000 ppb.
- Measuring frequency: 1 Hz (not adjustable).
- Supply voltage:
- Sensor: 1.62 – 1.98 volts.
- For the module: it depends on whether and which voltage regulator your module has. My CJMCU-30 module (right) can be operated with 3 – 5 volts.
- Power consumption: In continuous operation at 5 volts I measured 47 mA.
- Communication: I2C (100 kHz / 400 kHz).
- Address: 0x58, fixed.
- Whether pull-ups and / or level shifters are necessary depends on the module.
Further information can be found in the data sheet.
The wiring to the microcontroller is probably self-explanatory given the small number of pins.
Operation – Baselines
The SGP30 also performs dynamic baseline adjustments. This means that, just like the CCS811, it should be placed in an environment that is regularly ventilated. Likewise, the SGP30 has no internal permanent memory, so baselines must be stored externally.
If you have not yet established baselines, the sensor should have been in operation for 12 hours before you save the baselines and write them back on future power-ups. If you do not write back the baselines, the SGP30 will determine new ones. If the sensor is in a room with polluted air, the baselines will be correspondingly incorrect.
Control of the SGP30 with the Adafruit library
Start
You can find the Adafruit SGP-30 library here on GitHub or install it via the library manager of the Arduino IDE.
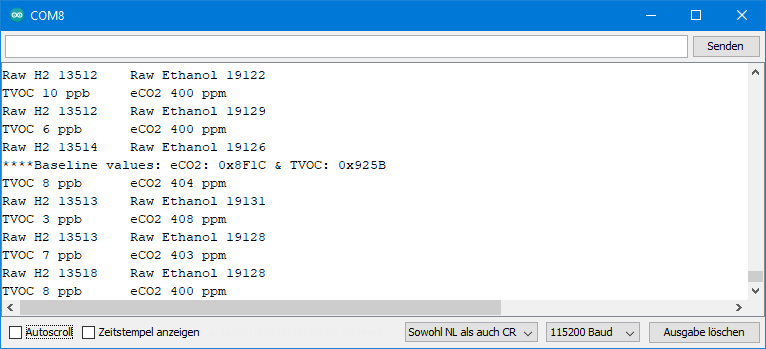
It is best to start with the unmodified example sketch SGP30test.ino. It provides the raw data for hydrogen and ethanol and the eCO2 and TVOC values calculated from them. After every thirty measurements, it reads and outputs the baselines. It is best to let the SGP30 run for twelve hours and then write down the baseline values.
Continuous operation
If you want to avoid waiting twelve hours for valid baselines every time after a restart, then you have to save the baselines and write them back. With the following sketch, you can save a starting value in the EEPROM.
#include <EEPROM.h>

void setup(){
  unsigned int eCO2Baseline = 0x9233;
  unsigned int TVOCBaseline = 0x93AA;
  int address = 0;
  Serial.begin(9600);

  EEPROM.put(address, eCO2Baseline);
  address += sizeof(unsigned int);
  EEPROM.put(address, TVOCBaseline);

  address = 0;
  EEPROM.get(address, eCO2Baseline);
  address += sizeof(unsigned int);
  EEPROM.get(address, TVOCBaseline);
  Serial.println(eCO2Baseline,HEX);
  Serial.println(TVOCBaseline, HEX);
}

void loop()
{
}
For continuous operation, I modified SGP30test.ino. At the beginning, the sketch reads the baselines from the EEPROM and writes them to the SGP30. Every three hours, the current baseline is read and stored in the EEPROM.
#include <Wire.h>
#include "Adafruit_SGP30.h"
#include <EEPROM.h>

Adafruit_SGP30 sgp;

/* return absolute humidity [mg/m^3] with approximation formula
* @param temperature [°C]
* @param humidity [%RH]
*/
uint32_t getAbsoluteHumidity(float temperature, float humidity) {
    // approximation formula from Sensirion SGP30 Driver Integration chapter 3.15
    const float absoluteHumidity = 216.7f * ((humidity / 100.0f) * 6.112f * exp((17.62f * temperature) / (243.12f + temperature)) / (273.15f + temperature)); // [g/m^3]
    const uint32_t absoluteHumidityScaled = static_cast<uint32_t>(1000.0f * absoluteHumidity); // [mg/m^3]
    return absoluteHumidityScaled;
}

void setup() {
  unsigned int restoredECO2Baseline = 0;
  unsigned int restoredTVOCBaseline = 0;
  int address = 0;
  Serial.begin(9600);
  while (!Serial) { delay(10); } // Wait for serial console to open!

  EEPROM.get(address, restoredECO2Baseline);
  address += sizeof(unsigned int);
  EEPROM.get(address, restoredTVOCBaseline);
  Serial.print("Restored eCO2 baseline: ");
  Serial.println(restoredECO2Baseline,HEX);
  Serial.print("Restored TVOC baseline: ");
  Serial.println(restoredTVOCBaseline, HEX);

  Serial.println("SGP30 test");

  if (! sgp.begin()){
    Serial.println("Sensor not found :(");
    while (1);
  }
  Serial.print("Found SGP30 serial #");
  Serial.print(sgp.serialnumber[0], HEX);
  Serial.print(sgp.serialnumber[1], HEX);
  Serial.println(sgp.serialnumber[2], HEX);

  sgp.setIAQBaseline(restoredECO2Baseline, restoredTVOCBaseline);
}

int counter = 0;
void loop() {
  static unsigned int eCO2Baseline;
  static unsigned int TVOCBaseline;
  static unsigned long lastBaselineSaving = millis();
  unsigned long baselineSavePeriod = 10800000; // 3h
  // If you have a temperature / humidity sensor, you can set the absolute humidity to enable the humditiy compensation for the air quality signals
  //float temperature = 22.1; // [°C]
  //float humidity = 45.2; // [%RH]
  //sgp.setHumidity(getAbsoluteHumidity(temperature, humidity));

  if (! sgp.IAQmeasure()) {
    Serial.println("Measurement failed");
    return;
  }
  Serial.print("TVOC "); Serial.print(sgp.TVOC); Serial.print(" ppb\t");
  Serial.print("eCO2 "); Serial.print(sgp.eCO2); Serial.println(" ppm");

  if (! sgp.IAQmeasureRaw()) {
    Serial.println("Raw Measurement failed");
    return;
  }
  Serial.print("Raw H2 "); Serial.print(sgp.rawH2); Serial.print(" \t");
  Serial.print("Raw Ethanol "); Serial.print(sgp.rawEthanol); Serial.println("");

  delay(1000);

  counter++;
  if (counter == 30) {
    counter = 0;

    if (! sgp.getIAQBaseline(&eCO2Baseline, &TVOCBaseline)) {
      Serial.println("Failed to get baseline readings");
      return;
    }
    Serial.print("****Baseline values: eCO2: 0x"); Serial.print(eCO2Baseline, HEX);
    Serial.print(" & TVOC: 0x"); Serial.println(TVOCBaseline, HEX);
  }
  if((millis()-lastBaselineSaving)>baselineSavePeriod){
    int address = 0;
    sgp.getIAQBaseline(&eCO2Baseline, &TVOCBaseline);
    EEPROM.put(address, eCO2Baseline);
    address += sizeof(unsigned int);
    EEPROM.put(address, TVOCBaseline);
    lastBaselineSaving = millis();
  }
}
SGP30 and CCS811 vs. NDIR Sensor
I had the two TVOC and eCO2 sensors SGP30 and CCS811 in testing for two weeks and compared the eCO2 values with the readings from my Technoline WL 1030. In my last post, I had shown that the measured values of the Technoline device are reliable.
After full ventilation, all sensors have displayed values close to 400 ppm. With increasing pollution, however, the eCO2 results for the CCS811 and the SGP30 were increased very fast. Compared to the Technoline, the CCS811 delivered up to four times higher readings. With the SGP30, the values were “only” up to two times higher.
So forget the absolute values! The TVOC and eCO2 sensors give trends, nothing more. If you really want to monitor the CO2 content of the room air, you’d better use the slightly more expensive NDIR CO2 sensors.
SGP40
Meanwhile, there is a successor model of the SGP30, namely the SGP40. Instead of TVOC and eCO2 values, this device provides a dimensionless index between 0 and 500. For me, this seems like a good approach, since an eCO2 value suggests that CO2 concentrations can be estimated at least halfway reliably. I have ordered it, but not yet tried. Maybe I’ll report on it in a later post.
Acknowledgement
The smoke on the post image where I pixelated the CCS811 module is from goranmx at Pixabay.
I would like to thank Adafruit for their libraries and the Fritzing components.