About this post
In my last post, I showed how to build a wireless 433 MHz BBQ thermometer with graphical display of the temperature curve. The effort for this project was considerable, which might discourage some from replicating it. Therefore, I would like to present in this article a much simpler variant based on WiFi. You only have to build a transmitter unit because the receiver is the browser of your smartphone, tablet, PC or laptop. The transmitter unit itself is also kept simpler by dispensing with a display and the external A/D converter. And since I use an ESP32 as a microcontroller, no radio module is needed.
The disadvantage is that the display of the temperature curve is missing. On the other hand, you do not have to do without a warning when the target temperature is reached. I realise this via the IFTTT service (if-this-then-that), as a direct acoustic warning via the browser would only be possible via some detours.
The concept
Here is the circuit:
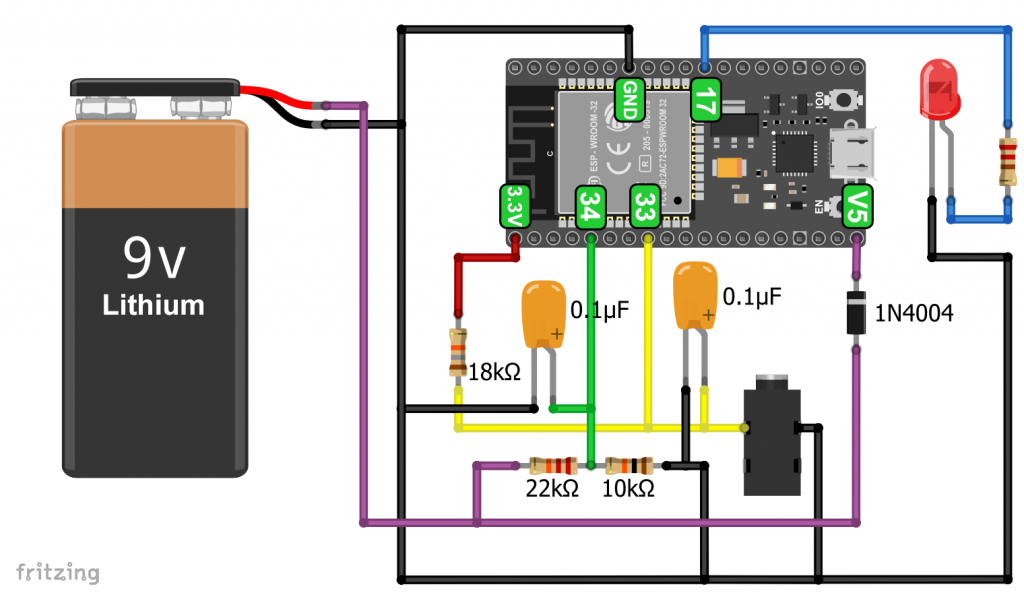
The temperature sensor is represented by its connection socket.
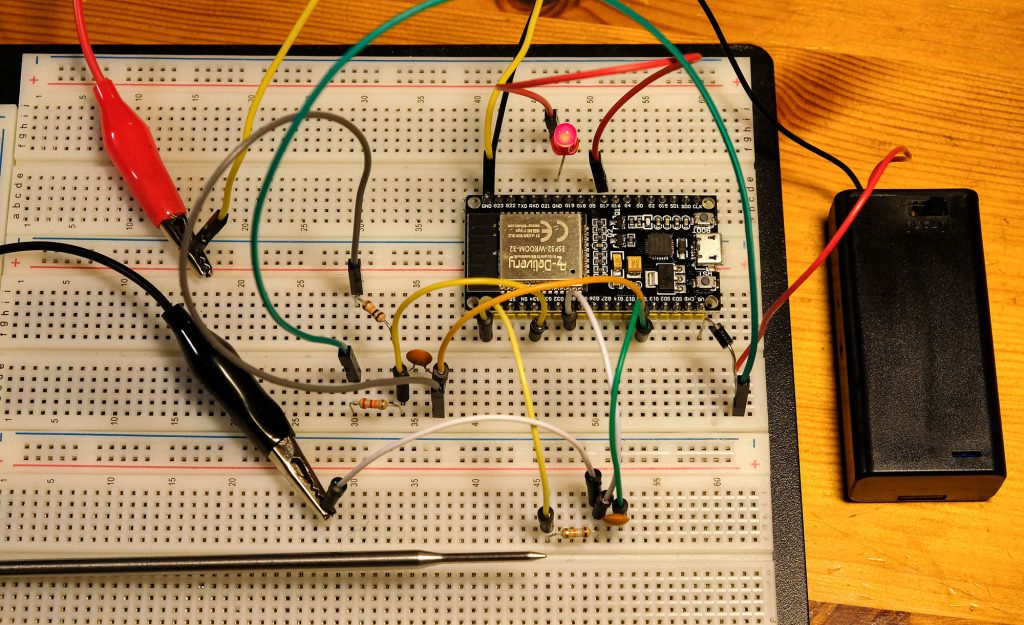
And this is what it looked like on the breadboard:
By the way, I use an LED with integrated resistor – before anyone asks why a resistor is missing here.
Temperature measurement
As in the last post, I use a replacement barbecue thermometer sensor that is available from Amazon and other online shops for a few euros. The temperature sensor changes its resistance with temperature. Accordingly, the voltage dropping across it changes when you use it in a voltage divider. Compared to the last BBQ thermometer presented, this part of the circuit is simplified by the fact that I only measure the thermometer voltage and not the entire 3.3 volts. This requires a very stable overall voltage supply.
The ADC of the ESP32 does not work linearly (details here) and delivers quite a lot of noise. The latter can be reduced somewhat by capacitors, as recommended by the manufacturer Espressif (see here). The non-linearity is simply “calibrated away”.
Power supply for the WiFi BBQ thermometer
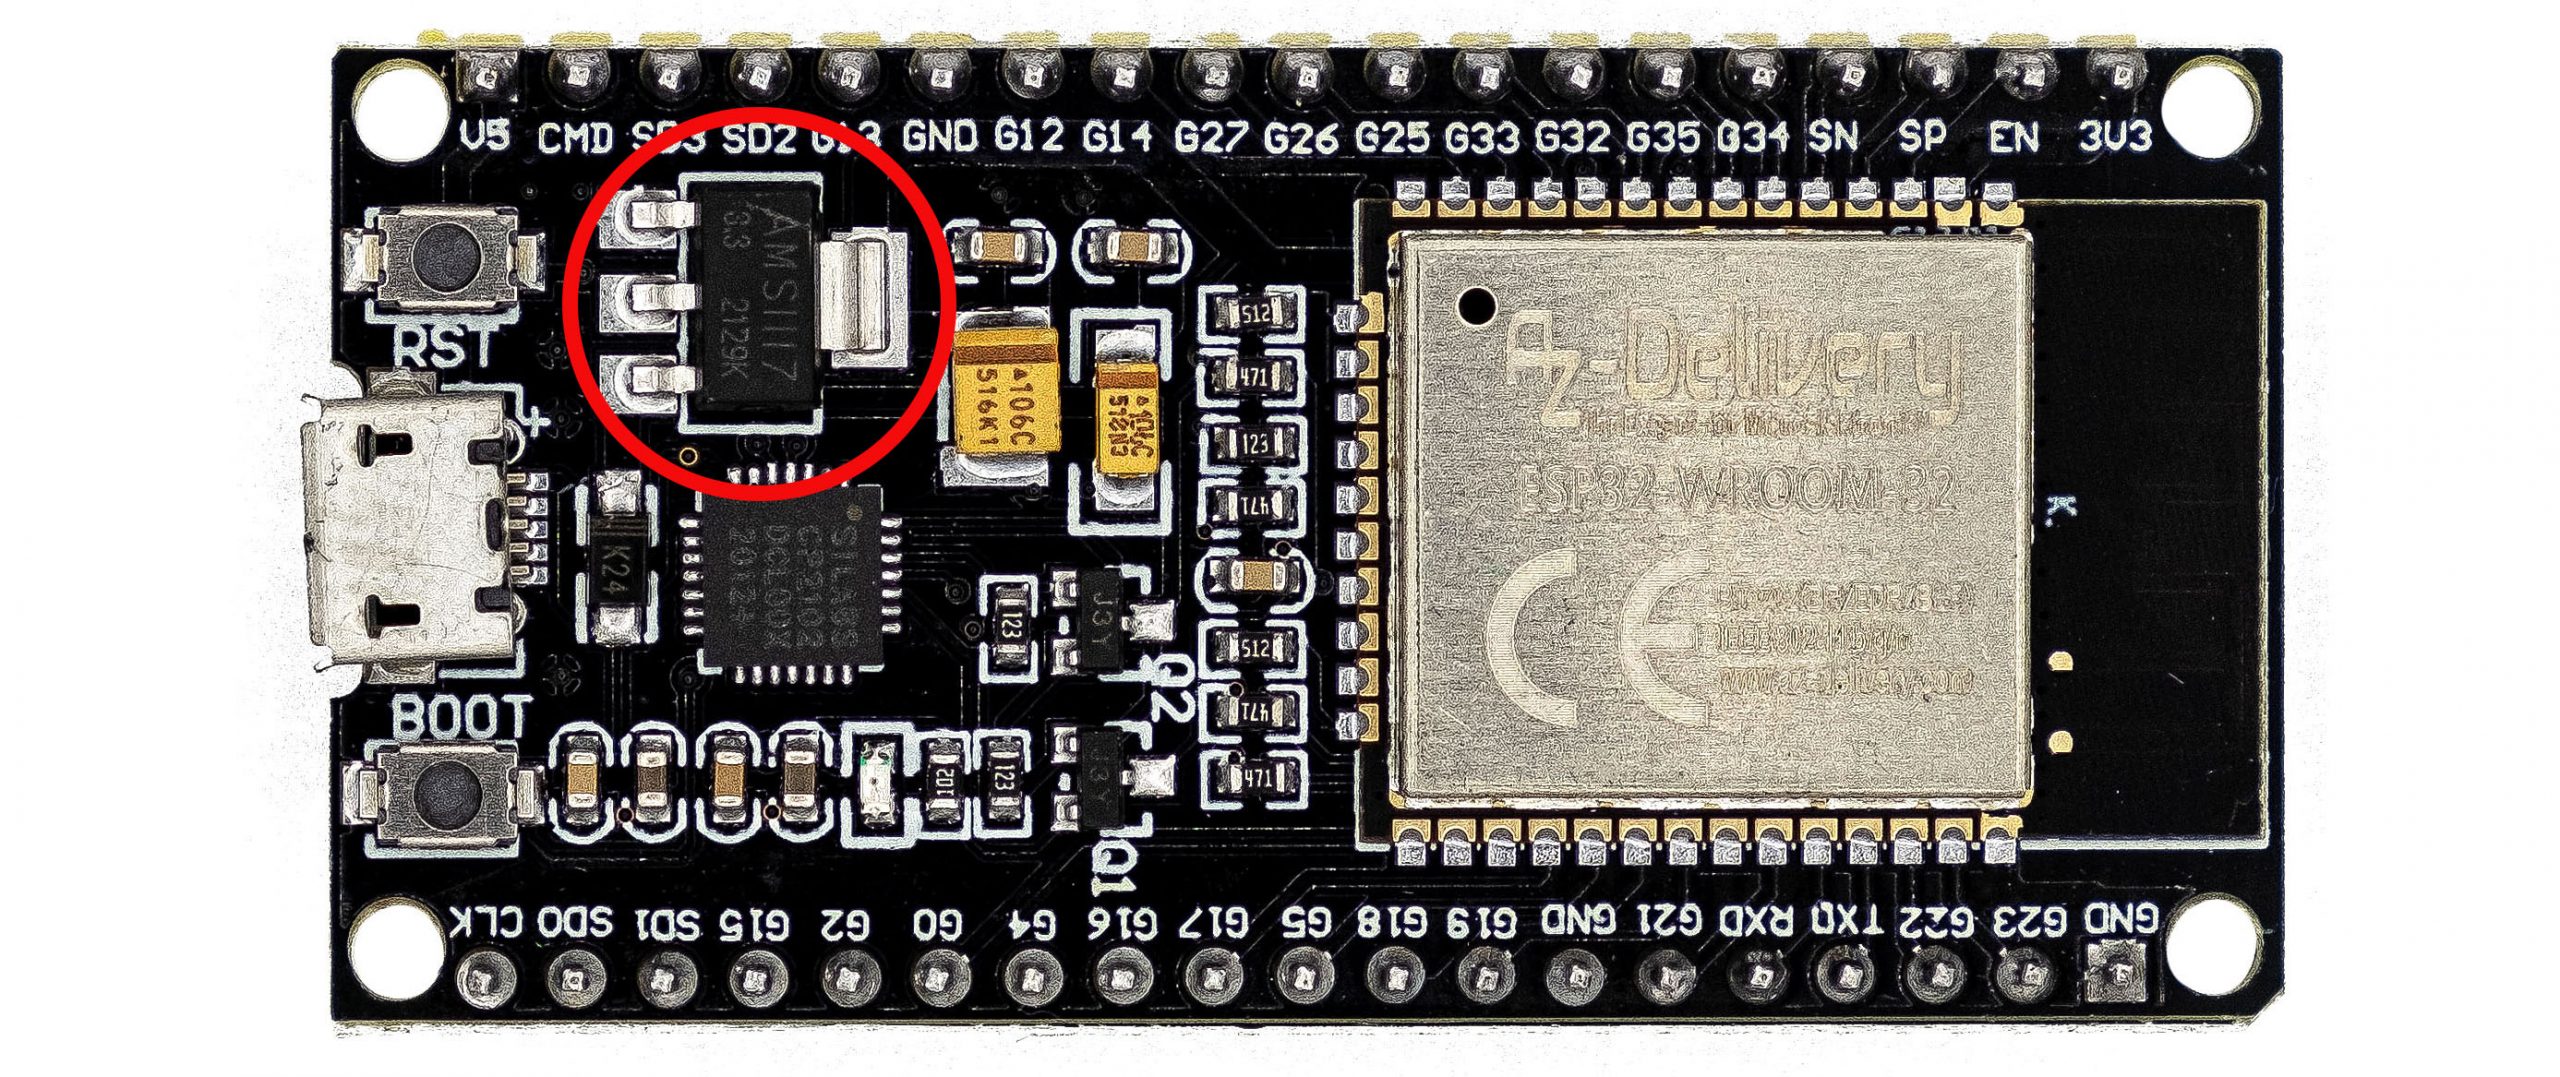
Opinions differ on the best way to operate an ESP32 board with (rechargeable) batteries. When you programme your board on the PC, it receives its supply voltage via the USB socket, i.e. 5 volts. Normally, there is an AMS1117-3.3 voltage regulator on the board that reduces the supply voltage to the 3.3 volts required for the ESP32. According to the data sheet, the AMS1117-3.3 can handle voltages up to 12 volts higher than the output voltage.
Pin “V5” (it may be called something else on your board) is connected directly to the power connector of the USB socket and is normally used to supply 5 volts to other components. In my opinion, there is nothing wrong with using it as an input for the power supply and going beyond 5 volts. Since in a voltage regulator (see also here) the input and output currents are the same and the voltage changes, a power of P=ΔU⋅I is lost as heat. But even after a longer period of operation, the AMS1117 did not get particularly hot in my project.
Selecting the battery type
I use a lithium-ion battery as the power supply. Strictly speaking, I use two 3.7 V rechargeable batteries which are connected in series. You can use a 9V lithium battery as well. A rechargeable 9 V block battery consists internally of two lithium-ion batteries and therefore does not supply 9 volts, even if the name suggests this. Freshly charged, they deliver approx. 8.4 volts.
With this power supply, I got a very stable voltage on the 3.3 volt pin. The voltage drop over time was well below one hundredth of a volt, even when the battery charge dropped below 7 volts. Below 7 volts, the discharge progresses quickly and the battery should be replaced.
You should not connect any other loads to the 3.3 volt output – or you may prefer to use the measuring method from the last post where I measured the total voltage.
The diode on the 5 V pin serves to protect against reverse polarity. This is of course optional.
Important information about battery operation – please read!
Since Pin V5 is connected directly to the USB socket, you must not use a battery under any circumstances while the board is connected to the computer!
Measurement of battery voltage

It is useful to monitor the battery voltage so that the thermometer does not fail at the wrong moment. Since the battery voltage exceeds the limit of the ESP32’s ADC, I measure it indirectly via a voltage divider. Here, however, the deviation of the ESP32’s ADC must be considered. If you dimension the voltage divider cleverly, you are in a range in which the ADC operates linearly and, in a first approximation, is only shifted by a fixed offset (see right). You can then correct the values easily. I simply applied various known voltages between 6.5 and 8.5 volts to the voltage divider and measured the voltage with the ADC.
![\[ U_{\text{divided, ideal}}\;[\text{V}]=\frac{\text{analogRead}(34)}{4095}\cdot 3.3 \]](https://wolles-elektronikkiste.de/wp-content/ql-cache/quicklatex.com-40e2a46997dc3f77b90de6e30f884b22_l3.png "Rendered by QuickLaTeX.com")
The offset was about 0.14 volts. I measured this with a reliable multimeter. The conversion to the supply voltage is then done via a fixed factor determined by the ratio of the resistors:
![\[ U_{\text{supply}}\;[\text{V}]=\left(U_{\text{divided, ideal}}+0.14\right)\cdot3.237 \]](https://wolles-elektronikkiste.de/wp-content/ql-cache/quicklatex.com-c2cbe95d848ad79bc91c30b0d82084ea_l3.png "Rendered by QuickLaTeX.com")
Power-On LED
The LED on GPIO17 is only used to indicate that the thermometer is switched on. Otherwise, you could easily forget to turn it off after use. Of course, this is also optional.
Calibration
To record the calibration curve, I heated a pot of water, as I did with the last thermometer, and recorded temperature/voltage readings with a trusted reference thermometer as it cooled. For the voltage values, I averaged 50 individual values.
void setup(){
  Serial.begin(115200);
}

void loop(){
  unsigned long sum = 0;
  unsigned int numberOfSamples = 50;

  for(int i=0; i<numberOfSamples; i++){
    sum += analogRead(33);
  }

  float milliVolts = (sum /(numberOfSamples*1.0))/4.095 * 3.3;
  Serial.println(milliVolts);
  delay(500);
}
In entered the measured values in Excel and applied the “trend line” function. Only a fourth-order polynomial fit.
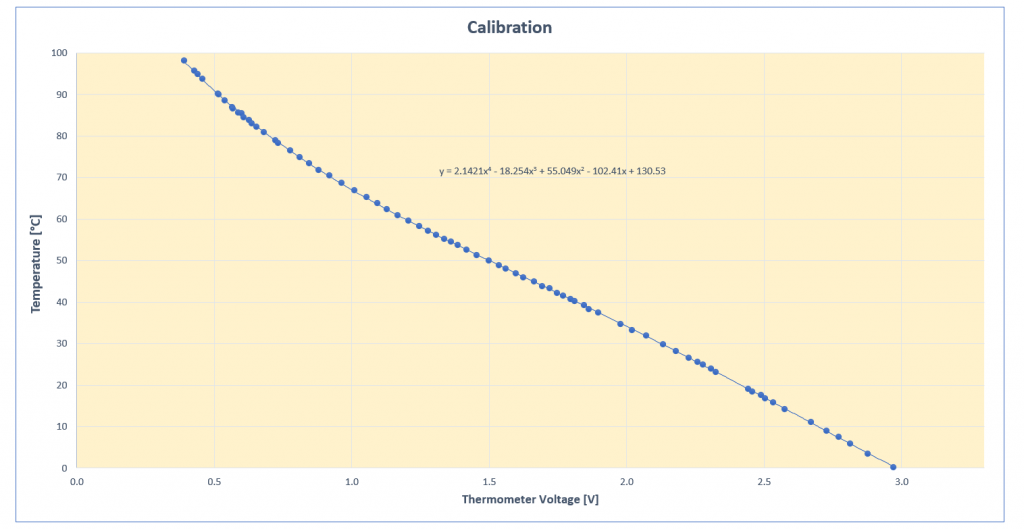
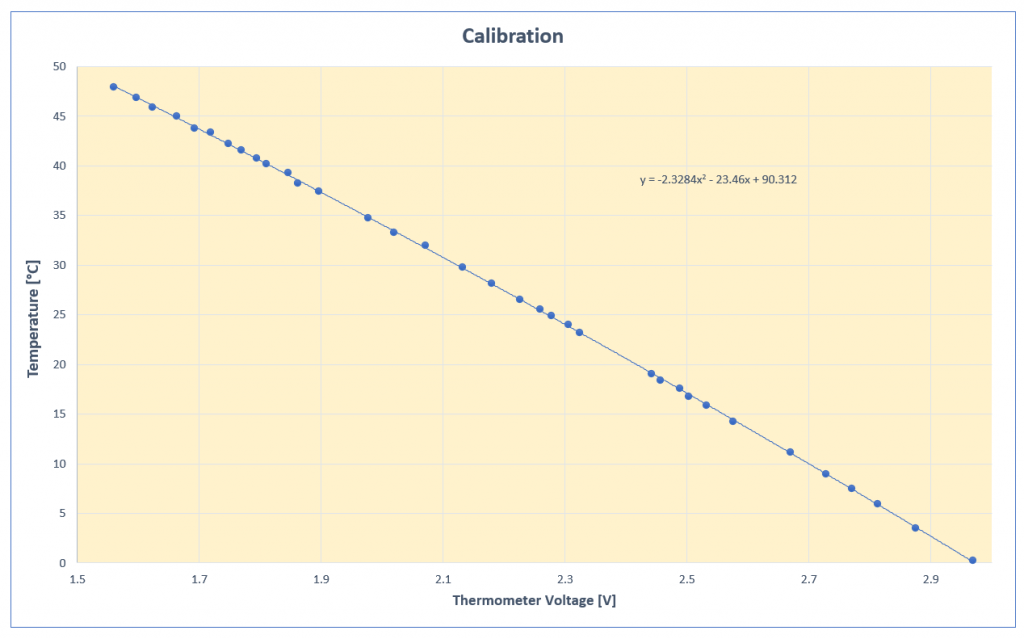
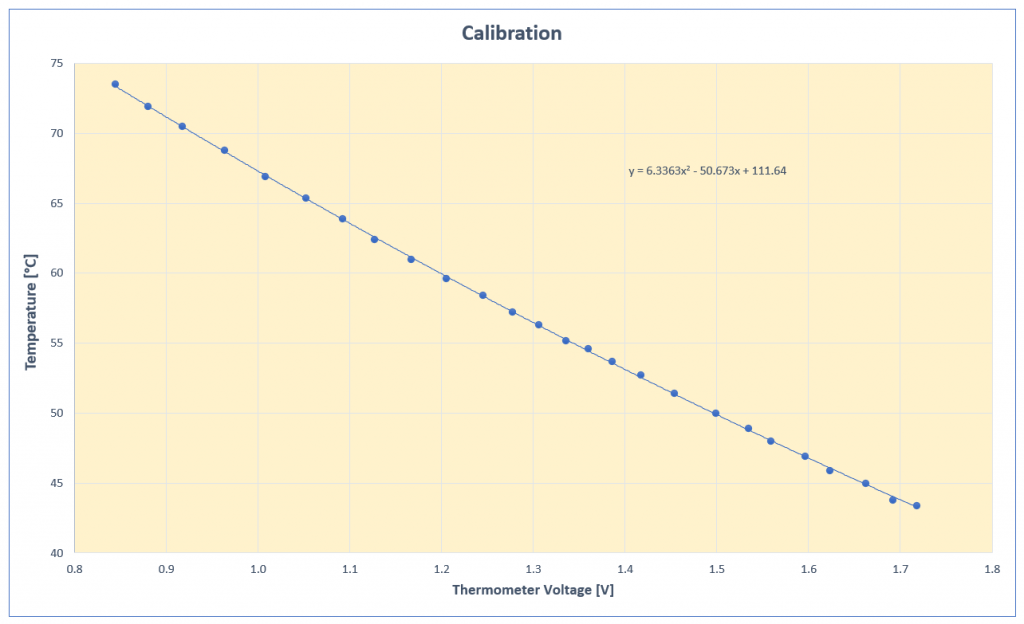
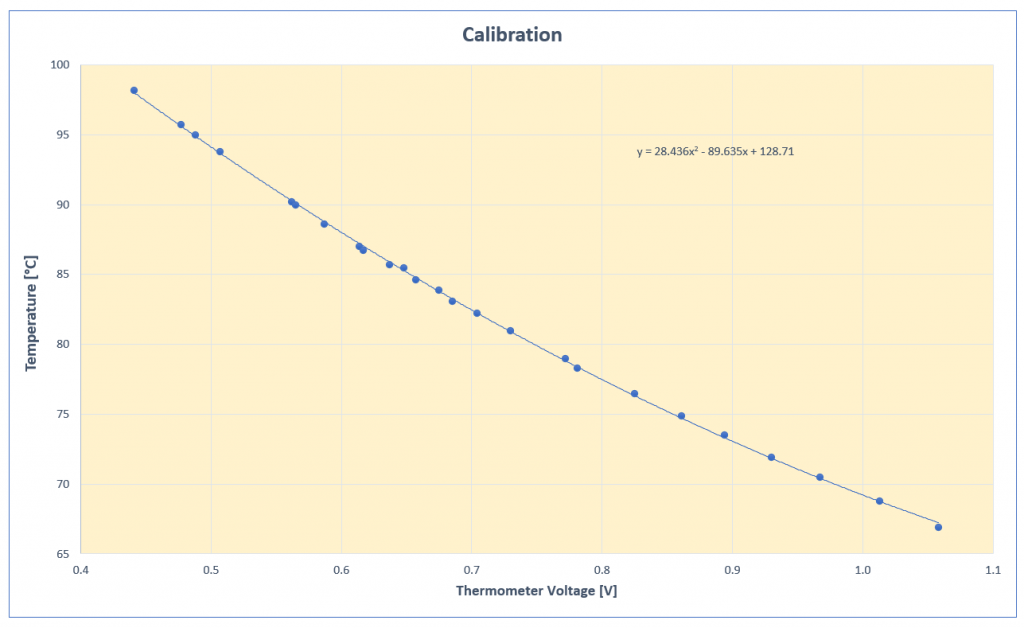
Even though it would have worked this way, in the end I decided to chunk the curve and use smaller polynomials:
I described how to ensure that the coefficients of your polynomial are output with enough decimal places in the last post.
The sketch for the WiFi BBQ thermometer
Option 1: The simple solution
The simple solution only displays the temperature and battery voltage in any browser, for example on your smartphone or tablet. I have covered the basics of using WiFi use in detail here. In this article, I will only discuss it superficially. Here is the sketch.
#include <WiFi.h>
#include <WebServer.h>
#define TEMPERATURE_PIN 33
#define SUPPLY_VOLTAGE_PIN 34
#define LED_PIN 17 // power-on LED
const char* ssid = "Your WiFi name";
const char* pass = "Your WiFi password";
WebServer server(80); // creating a webserver object
String headString = "<head><style>" // head and CSS style elements
".blueBox {"
"background-color: blue;"
"color: white;"
"width: 600px;"
"padding: 20px;"
"text-align: center;"
"font-size: 50px;"
"font-family: arial;"
"margin: 20px 35px;"
"}"
"</style>";
String refreshString = "<meta http-equiv=\"refresh\" content=\"10\"></head>";
String trackTempString = "</BR><h1 align=\"center\">BBQ - Current Temperature</h1></div>";
void setup(){
pinMode(LED_PIN, OUTPUT);
digitalWrite(LED_PIN, HIGH);
Serial.begin(115200);
Serial.println("Connecting to ");
Serial.println(ssid);
WiFi.begin(ssid, pass);
while (WiFi.status() != WL_CONNECTED) {
delay(1000);
Serial.print(".");
}
Serial.println("");
Serial.println("WiFi connected..!");
Serial.print("Got IP: "); Serial.println(WiFi.localIP());
server.on("/",trackTemperatureScreen);
server.begin();
}
void loop(){
server.handleClient();
}
void trackTemperatureScreen(){
String message = "";
float bbqTemp = getBbqTemperature();
float supplyVoltage = getSupplyVoltage();
message += headString;
message += refreshString;
message += trackTempString;
message += "<div align=\"center\";>";
message += "<div class=\"blueBox\">";
message += "Current Temperature [˚C]: </BR></BR><span style=\"font-size: 100px;\">";
message += String(bbqTemp, 1);
message += "</span>";
message += "</div>";
message += "</BR><h2>Supply Voltage [V]: ";
message += String(supplyVoltage,1);
message += "</h2></div>";
server.send(200, "text/html", message);
}
float getBbqTemperature(){
// replace by your calibration function(s)
// 70-100°C: y = 28.436x2 - 89.635x + 128.71
// 45-70°C: y = 6.3363x2 - 50.673x + 111.64
// 0-45°C: y = -2.3284x2 - 23.46x + 90.312
float tV = 0.0; // thermometer voltage
float tC = 0.0; // temperature Celsius
unsigned long tempSum = 0;
unsigned int numberOfSamples = 50;
for(int i=0; i<numberOfSamples; i++){
tempSum += analogRead(TEMPERATURE_PIN);
}
tV = (tempSum /(numberOfSamples*1.0))/4095.0 * 3.3;
if(tV < 1.0){
tC = 28.436*pow(tV,2) - 89.635*tV + 128.71;
}
else if(tV < 1.7){
tC = 6.3363*pow(tV,2) - 50.673*tV + 111.64;
}
else{
tC = -2.3284*pow(tV,2) - 23.46*tV + 90.312;
}
return tC;
}
float getSupplyVoltage(){
unsigned long sum = 0;
unsigned int numberOfSamples = 50;
for(int i=0; i<numberOfSamples; i++){
sum += analogRead(SUPPLY_VOLTAGE_PIN);
}
float volts = (sum /(numberOfSamples*1.0))/4095.0 * 3.3;
volts = (volts + 0.14) * 3.237;
return volts;
}
Explanations of the sketch
The ESP32 serves as a server that displays the temperature and battery voltage on a website. The content of the website is transmitted as a string (“message”) to the client, i.e. the browser. Embedding HTML code in Arduino code is not conducive to readability, but that’s in the nature of things. A few more explanations:
- “ssid” / “pass” are your WiFi credentials
- In “headString”, the blue box design element is defined as CSS code.
- The content of “refreshString” causes the website to refresh every 10 seconds.
- The serial monitor shows the IP that your router assigns to the ESP32. It is best to set your router so that the ESP32 always gets this IP.
server.on("/",trackTemperatureScreen);causes the functiontrackTemperatureScreen()to be called when the IP address is called (there is only the main path “/”).trackTemperatureScreen()initiates new measurements, compiles the content of the website and sends it to the server.
Output of Option 1
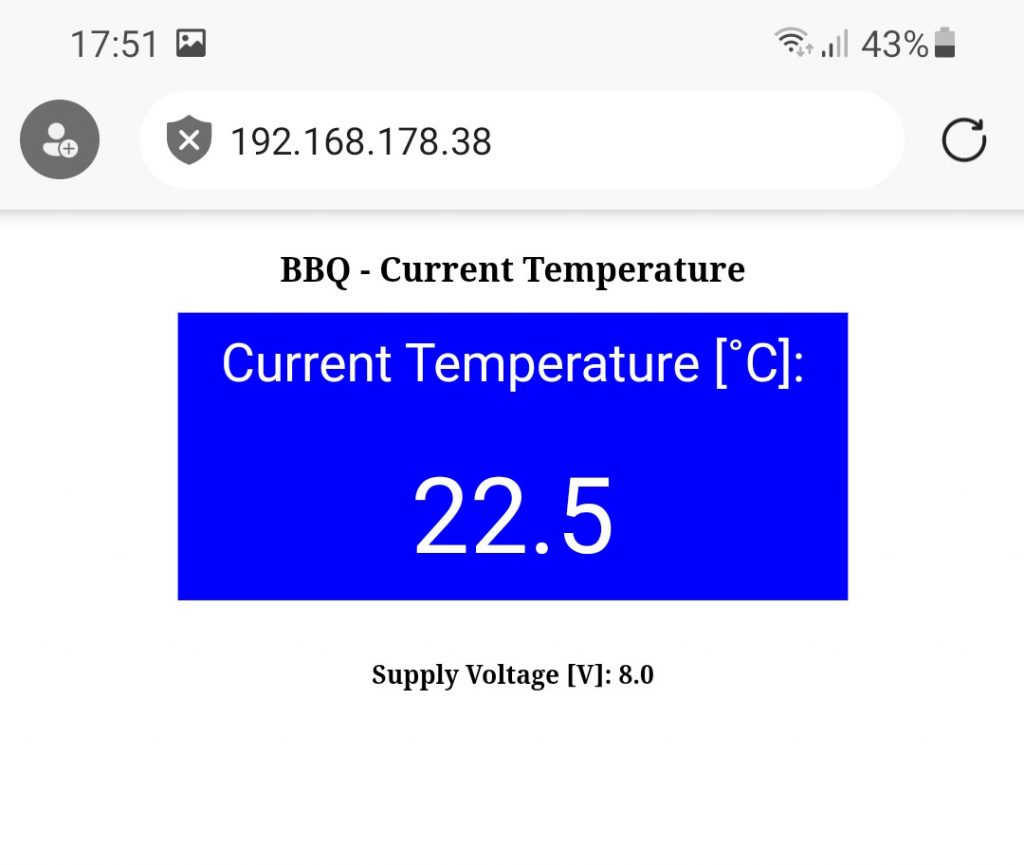
Go to the browser of the device of your choice and enter the IP of your ESP32. For me this is “192.168.178.38”. You may also have to append a slash, i.e. “192.168.178.38/”. An updated value should appear every 10 seconds.
If you have problems, connect the ESP32 directly to your computer and check that the ESP32 connects to the home network and that the IP address is correct.
Option 2: The “Comfort Solution”
The comfort solution for the WiFi BBQ thermometer includes the setting of a temperature limit and an alert when the limit has been reached. This actually sounds like a minor extension, but the resulting sketch ended up being two and a half times as long.
Setting the target temperature
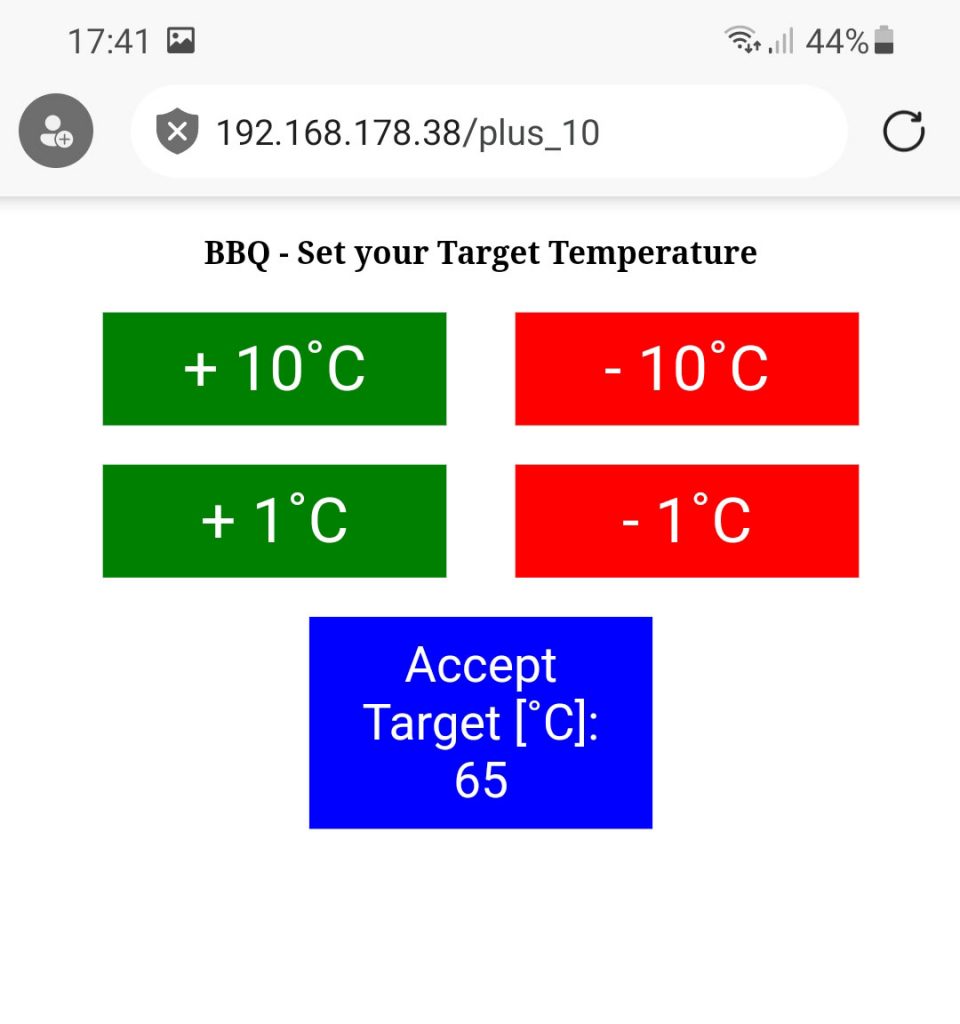
I have set up a separate screen for setting the target temperature (see right). It appears when the website is accessed. In the sketch, this is done by calling setTemperatureScreen(). The default temperature setting is 55 °C. You can change the target temperature by tapping the +/- 10 °C and +/- 1 °C touch keys. These touch keys are defined as HTML buttons and linked to corresponding paths of the website. To do this, I had to add a number of other server.on() functions to the sketch. The server.on() functions, in turn, call functions that change the target temperature as requested.
I have programmed the setting so that the target temperature can be selected between 40 and 99 °C. Of course, you can change that if it makes sense to you.
As soon as you have set the desired target temperature, tap on “Accept target”. The “trackTemperatureScreen” (see next picture) will be displayed.
Tracking the temperature
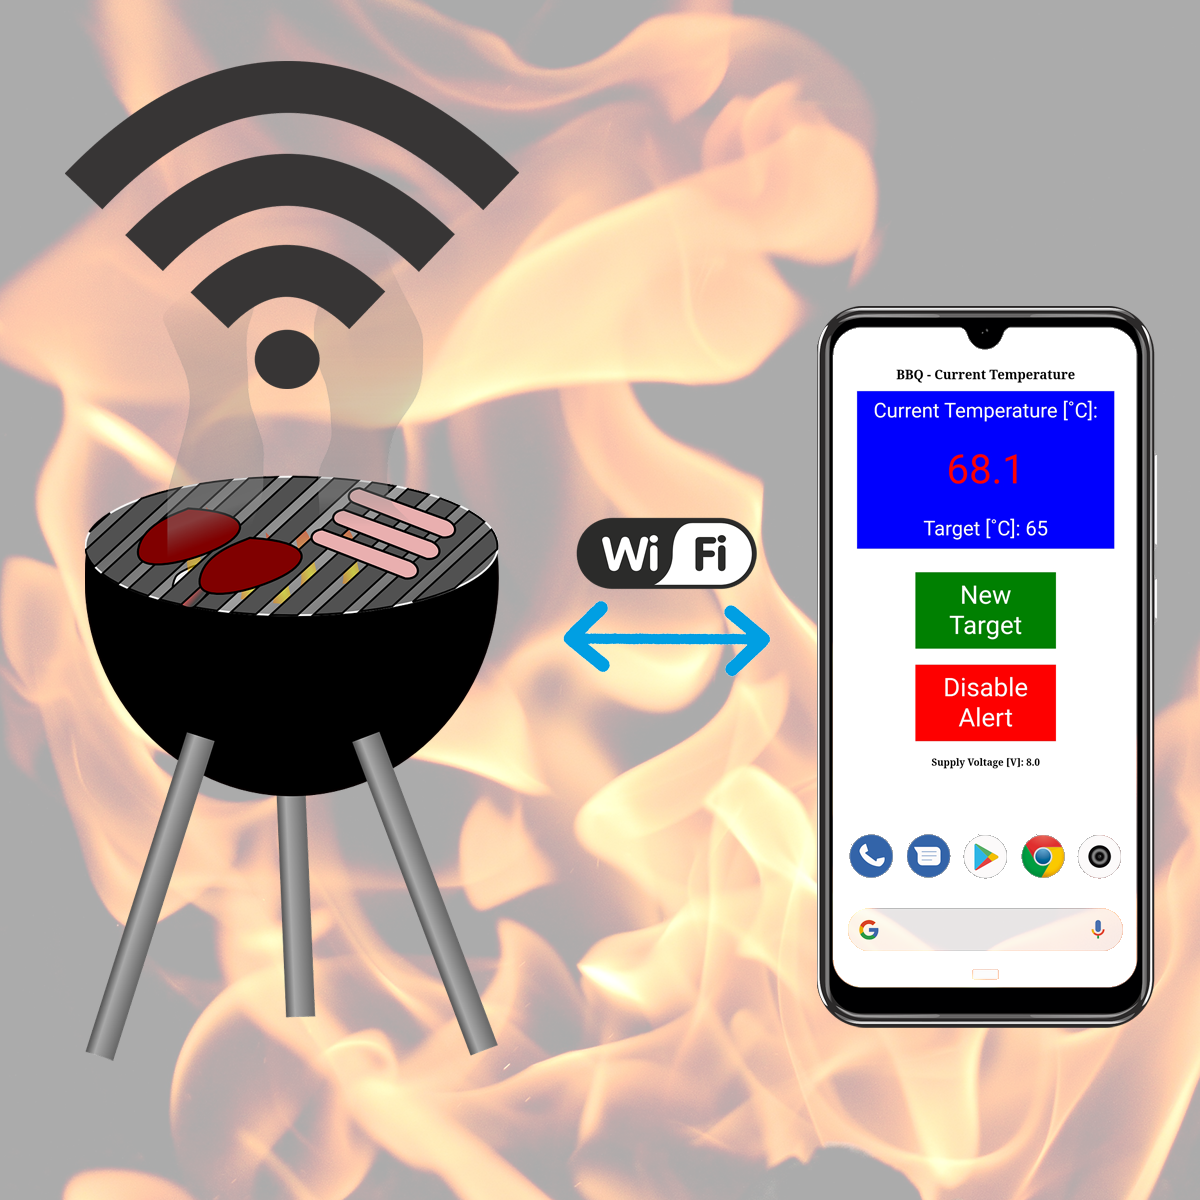
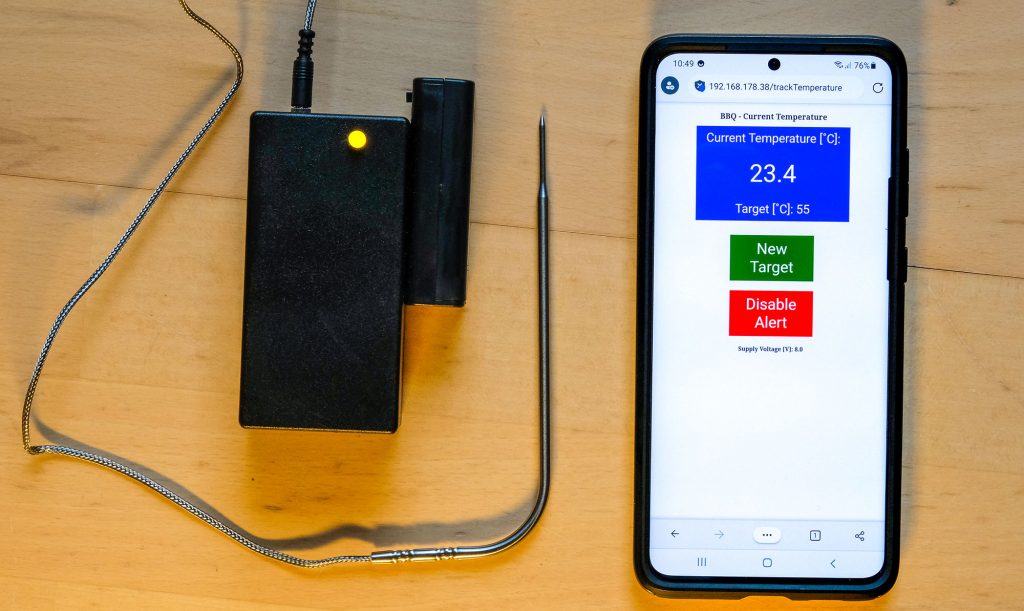
The “trackTemperatureScreen” for the WiFi BBQ thermometer shows the current temperature and the battery voltage. At the beginning, the temperature is displayed in white. At five degrees below target temperature, it turns orange. From one degree below target temperature, it turns red.
In addition, the screen has two touch keys. One is labeled “New Target” and leads back to the target temperature setting. With the second touch key, you can turn alert on or off. It then changes color and labeling accordingly. After the alert is triggered, it will be disabled.

Triggering an alert with IFTTT
For security reasons, websites cannot directly access programs on your device, make your smartphone ring, or initiate similar actions that you could use as an alert. Automatic playback of audio files is also only possible via detours and special settings.
To still trigger an alert, I use the free service IFTTT (if-this-then-that). What exactly this is, how you set up access and deal with the service, I have described here. I will therefore be brief in this article.
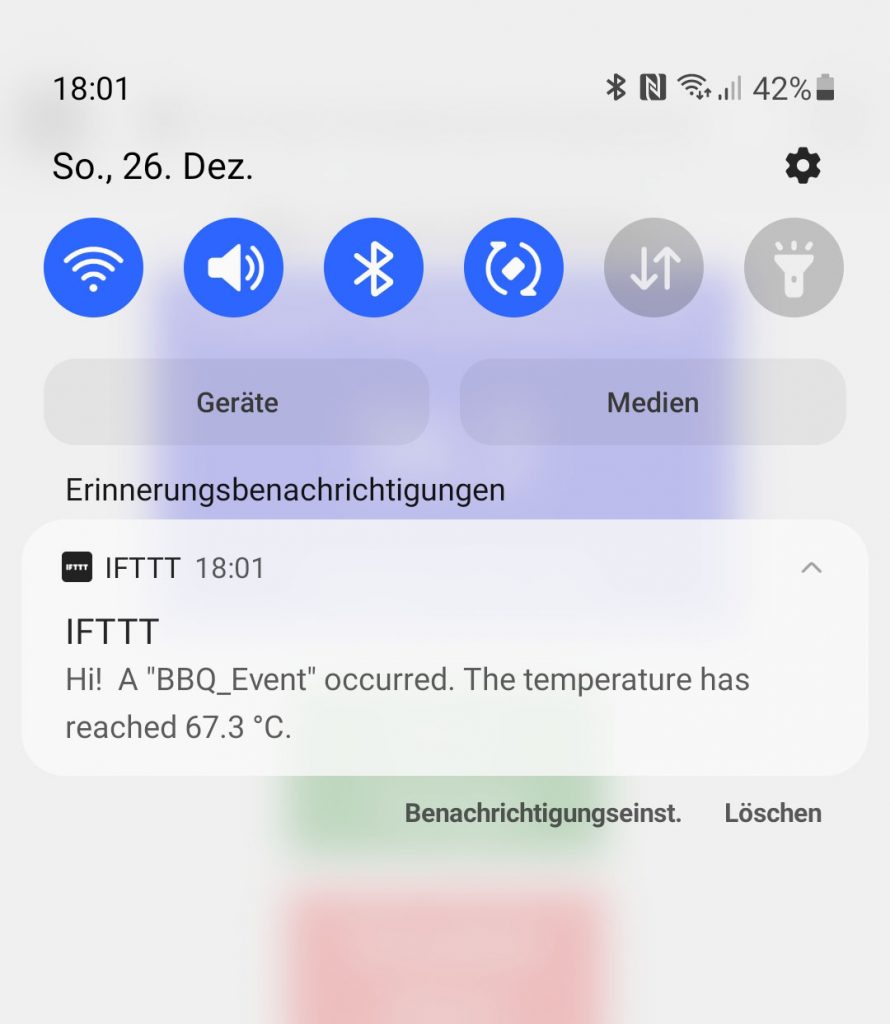
On IFTTT, you create so-called applets in a few minutes. These consist of a trigger (“if this”) and an action (“then that”). The trigger in this case is a so-called “webhook”. This is a small message in a specific format that is sent to IFTTT by websites via POST or GET request. In my sketch, this task is managed by the function send_webhook(). So, you don’t have to worry about the details. You can embed up to three variables in the webhook, in this case the temperature of your WiFi BBQ thermometer.
The action to be triggered by the webhook is a notification on your smartphone (see top right). You can vary the text freely. I have described how you do this in concrete terms in the article already mentioned here. It’s really simple.
Restrictions
There are still two small problems:
- If your phone “falls asleep” after a few minutes without use, notifications will be delayed.
- The update of the temperature and the check of the temperature limit are triggered by a request from the browser. If your smartphone is asleep, there is no update and therefore no alert.
To solve problem 1, I recommend extending the time for activating the screen lock. This could be changed in the settings, but would be annoying in the long run. This can be done even more conveniently with apps. Screen Alive, for example, works wonderfully for Android smartphones. This free and ad-free app offers a widget that allows you to activate the “Always On” mode with a single click. Alternatively, you do not use the notifications, but SMS as the “then that” part. The downside is that the service is limited to 10 SMS per month outside the US.
I solved the second problem by querying the temperature additionally in loop(). However, this only happens if at least 15 seconds have passed since the last temperature query.
The sketch for the comfort solution
Here is the complete sketch for the WiFi BBQ thermometer:
#include <WiFi.h>
#include <WebServer.h>
#define TEMPERATURE_PIN 33
#define SUPPLY_VOLTAGE_PIN 34
#define LED_PIN 17 // power-on LED
#define IFTTT_Key "Your IFTTT Key"
#define IFTTT_Event "BBQ_Event"
#define IFTTT_Value1 "Hi! "
#define IFTTT_Value3 "dummy";
const char* ssid = "Your WiFi SSID";
const char* pass = "Your WiFi Password";
unsigned int bbqTargetTemp = 55;
unsigned long lastTempMeasurement = 0;
volatile bool tempAlert = true;
WebServer server(80);
String headString = "<head><style>" // head and CSS style elements
".button {"
"border: none;"
"color: white;"
"width: 350px;"
"padding: 20px;"
"text-align: center;"
"margin: 20px 35px;"
"}"
".greenButton {background-color: green; font-size: 64px;}"
".greenButton:hover {background-color: darkgreen; font-size: 64px;}"
".redButton {background-color: red; font-size: 64px;}"
".redButton:hover {background-color: darkred; font-size: 64px;}"
".blueButton {background-color: blue; font-size: 50px;}"
".blueButton:hover {background-color: darkblue; font-size: 50px;}"
".blueBox {"
"background-color: blue;"
"color: white;"
"width: 600px;"
"padding: 20px;"
"text-align: center;"
"font-size: 50px;"
"font-family: arial;"
"margin: 20px 35px;"
"}"
"</style>";
String refreshString = "<meta http-equiv=\"refresh\" content=\"10\"></head>";
String setTargetString = "</BR><h1 align=\"center\">BBQ - Set your Target Temperature</h1></div>";
String trackTempString = "</BR><h1 align=\"center\">BBQ - Current Temperature</h1></div>";
String plus10String = "<a href=\"/plus_10\"><button class=\"button greenButton\">+ 10˚C</button></a>";
String minus10String = "<a href=\"/minus_10\"><button class=\"button redButton\">- 10˚C</button></a>";
String plus1String = "</BR><a href=\"/plus_1\"><button class=\"button greenButton\">+ 1˚C</button></a>";
String minus1String = "<a href=\"/minus_1\"><button class=\"button redButton\">- 1˚C</button></a>";
String setNewTargetString = "</BR><a href=\"/\"><button class=\"button greenButton\">New Target</button></a>";
String enableAlertString = "</BR><a href=\"/enableAlert\"><button class=\"button greenButton\">Enable Alert</button></a>";
String disableAlertString = "</BR><a href=\"/disableAlert\"><button class=\"button redButton\">Disable Alert</button></a>";
void setup(){
pinMode(LED_PIN, OUTPUT);
digitalWrite(LED_PIN, HIGH);
Serial.begin(115200);
Serial.println("Connecting to ");
Serial.println(ssid);
WiFi.begin(ssid, pass);
while (WiFi.status() != WL_CONNECTED) {
delay(1000);
Serial.print(".");
}
Serial.println("");
Serial.println("WiFi connected..!");
Serial.print("Got IP: "); Serial.println(WiFi.localIP());
server.on("/",handleRoot);
server.on("/plus_10", plus10);
server.on("/minus_10", minus10);
server.on("/plus_1", plus1);
server.on("/minus_1", minus1);
server.on("/enableAlert", enableAlert);
server.on("/acceptTemp", trackTemperatureScreen);
server.on("/disableAlert", disableAlert);
server.on("/trackTemperature", trackTemperatureScreen);
server.begin();
}
void loop(){
server.handleClient();
if(((lastTempMeasurement - millis()) > 15000) && tempAlert){
float bbqTemp = getBbqTemperature();
alertCheck(bbqTemp);
}
}
void handleRoot() {
setTemperatureScreen();
}
void plus10(){
bbqTargetTemp += 10;
setTemperatureScreen();
}
void minus10(){
bbqTargetTemp -= 10;
setTemperatureScreen();
}
void plus1(){
bbqTargetTemp++;
setTemperatureScreen();
}
void minus1(){
bbqTargetTemp--;
setTemperatureScreen();
}
void acceptTemp(){
enableAlert();
}
void enableAlert(){
tempAlert = true;
trackTemperatureScreen();
}
void disableAlert(){
tempAlert = false;
trackTemperatureScreen();
}
void trackTemperatureScreen(){
String message = "";
float bbqTemp = getBbqTemperature();
float supplyVoltage = getSupplyVoltage();
String colorString = "white";
if((bbqTargetTemp - bbqTemp) < 1.0){
colorString = "red";
}
else if((bbqTargetTemp - bbqTemp) < 5.0){
colorString = "orange";
}
message += headString;
message += refreshString;
message += trackTempString;
message += "<div align=\"center\";>";
message += "<div class=\"blueBox\">";
message += "Current Temperature [˚C]: </BR></BR><span style=\"font-size: 100px; color: ";
message += (colorString + "\">");
message += String(bbqTemp, 1);
message += "</span>";
message += "</BR></BR>Target [˚C]: ";
message += String(bbqTargetTemp);
message += "</div>";
message += setNewTargetString;
if(tempAlert){
message += disableAlertString;
}
else{
message += enableAlertString;
}
message += "</BR><h2>Supply Voltage [V]: ";
message += String(supplyVoltage,1);
message += "</h2></div>";
server.send(200, "text/html", message);
alertCheck(bbqTemp);
}
float getBbqTemperature(){
// replace by your calibration function(s)
// 70-100°C: y = 28.436x2 - 89.635x + 128.71
// 45-70°C: y = 6.3363x2 - 50.673x + 111.64
// 0-45°C: y = -2.3284x2 - 23.46x + 90.312
float tV = 0.0; // thermometer Voltage
float tC = 0.0; // temperature Celsius
unsigned long tempSum = 0;
unsigned int numberOfSamples = 50;
for(int i=0; i<numberOfSamples; i++){
tempSum += analogRead(TEMPERATURE_PIN);
}
tV = (tempSum /(numberOfSamples*1.0))/4095.0 * 3.3;
if(tV < 1.0){
tC = 28.436*pow(tV,2) - 89.635*tV + 128.71;
}
else if(tV < 1.7){
tC = 6.3363*pow(tV,2) - 50.673*tV + 111.64;
}
else{
tC = -2.3284*pow(tV,2) - 23.46*tV + 90.312;
}
lastTempMeasurement = millis();
return tC;
}
float getSupplyVoltage(){
unsigned long sum = 0;
unsigned int numberOfSamples = 50;
for(int i=0; i<numberOfSamples; i++){
sum += analogRead(SUPPLY_VOLTAGE_PIN);
}
float volts = (sum /(numberOfSamples*1.0))/4095.0 * 3.3;
volts = (volts + 0.14) * 3.237;
return volts;
}
void alertCheck(float currentTemp){
String tString = String(currentTemp, 1); // convert temperature as float into String
if((currentTemp > bbqTargetTemp) && tempAlert){
send_webhook(tString);
tempAlert = false;
}
}
void setTemperatureScreen(){
String message = "";
if(bbqTargetTemp >= 100){
bbqTargetTemp -= 60;
}
if(bbqTargetTemp < 40){
bbqTargetTemp += 60;
}
message += headString;
message += setTargetString;
message += "<div align=\"center\";>";
message = message + plus10String + minus10String + plus1String + minus1String;
message += "</BR><a href=\"/acceptTemp\"><button class=\"button blueButton\">";
message += "Accept</BR>Target [˚C]: </BR>";
message += String(bbqTargetTemp);
message += "</button></a>";
message += "</div>";
server.send(200, "text/html", message);
}
void send_webhook(String IFTTT_Value2){
WiFiClient client;
// construct the JSON payload
String jsonString = "";
jsonString += "{\"value1\":\"";
jsonString += IFTTT_Value1;
jsonString += "\",\"value2\":\"";
jsonString += IFTTT_Value2;
jsonString += "\",\"value3\":\"";
jsonString += IFTTT_Value3;
jsonString += "\"}";
int jsonLength = jsonString.length();
String lenString = String(jsonLength);
// connect to the Maker event server
client.connect("maker.ifttt.com", 80);
// construct the POST request
String postString = "";
postString += "POST /trigger/";
postString += IFTTT_Event;
postString += "/with/key/";
postString += IFTTT_Key;
postString += " HTTP/1.1\r\n";
postString += "Host: maker.ifttt.com\r\n";
postString += "Content-Type: application/json\r\n";
postString += "Content-Length: ";
postString += lenString + "\r\n";
postString += "\r\n";
postString += jsonString; // combine post request and JSON
client.print(postString);
delay(500);
client.stop();
}
The sketch is a bit hard to digest due to its length and the mix of HTML, CSS, and Arduino code. The HTML and CSS code is assembled piece by piece. All quotation marks that are not part of the Arduino code must be prefixed with a backslash, which does not exactly contribute to better readability. If you want to be creative with regard to the website itself, then I recommend doing this separately with a good editor like Notepad++. You use dummies for all variables. For example, this is what the pure HTML/CSS code for the “trackTemperatureScreen” looks like:
<head><style>.button {
border: none;
color: white;
width: 350px;
padding: 20px;
text-align: center;
margin: 20px 35px;
}
.greenButton {background-color: green; font-size: 64px;}
.greenButton:hover {background-color: darkgreen; font-size: 64px;}
.redButton {background-color: red; font-size: 64px;}
.redButton:hover {background-color: darkred; font-size: 64px;}
.blueButton {background-color: blue; font-size: 50px;}
.blueButton:hover {background-color: darkblue; font-size: 50px;}
.blueBox {
background-color: blue;
color: white;
width: 600px;
padding: 20px;
text-align: center;
font-size: 50px;
font-family: arial;
margin: 20px 35px;
}
</style><meta http-equiv="refresh" content="10"></head>
</BR><h1 align="center">BBQ - Current Temperature</h1><div align="center"><div class="blueBox">Current Temperature [˚C]: </BR></BR><span style="font-size: 100px; color: red">99.9
</span></BR></BR>Target [˚C]: 99.9
</div></BR><a href="/"><button class="button greenButton">New Target</button></a></BR><a href="/disableAlert"><button class="button redButton">Disable Alert</button></a></BR><h2>Supply Voltage [V]: 9.9</h2></div>
Assembly of the WiFi BBQ thermometer
I used a simple universal electronics housing that is not much bigger than the ESP32 board. I sawed out the board out of a prototype PCB. The board is attached to the baseplate with spacers. I attached the battery housing to the main housing with screws, routed the cables inside and led them through a hole into the main housing. I also had to drill two holes for the LED and the connection socket for the thermometer.
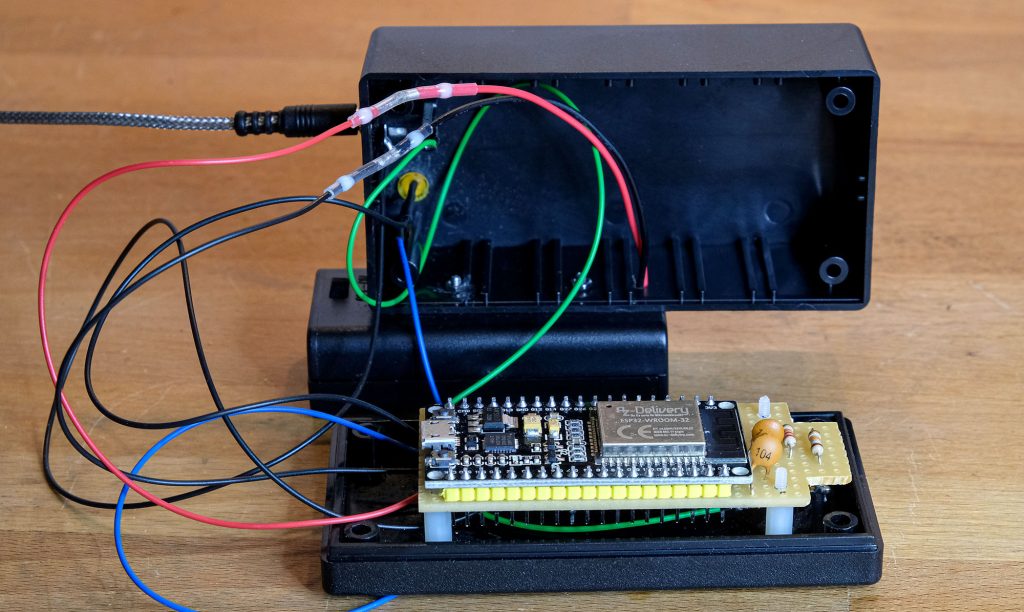
And here is the complete, assembled WiFi BBQ thermometer:
Acknowledgement
And once again, I would like to thank the hardworking artists who have made their images available on Pixabay. In my post image, I used the following in whole or in part:
- Grill: Clker-Free-Vector-Images
- Smartphone: Leo Romero
- WLAN icon: Ricardo_Duque
- WiFi icon: Pixaline
- Fire: Alexas_Fotos